Tag Archives: star

Three green foam tree ornaments.

Christmas Advent 2015 – Day 3 Foam Tree Ornament

I made it to day 3 of the Christmas countdown! This feels a bit monumental, as we have been absent from craft blogging for so long.

Today, I made little tree ornaments out of foam sheets (Foamies) in various shades of green.
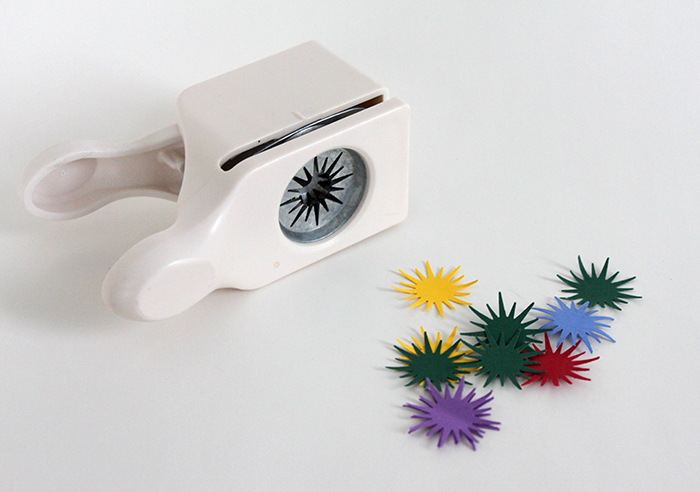
First my materials:

Photo of materials used.
The materials I used to make my foam tree ornament.
  • Small plastic snowflakes
  • Head pins with eyes
  • Jump rings
  • Tiny jingle bells
  • 4 sheets of green Foamie sheets
  • Wire cutters and pliers
  • Pointed yarn darning needle
  • Circle cutter (Thank you Martha Stewert)
  • Superglue (not pictured)

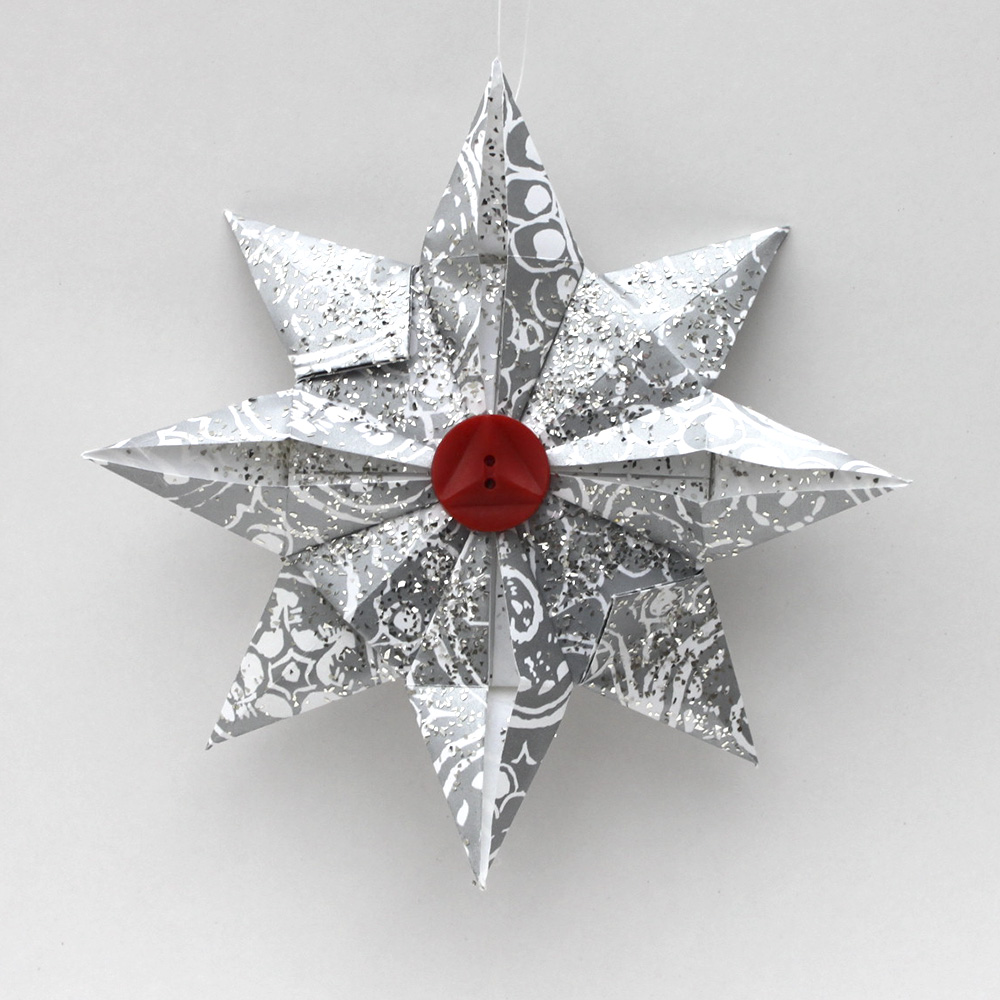
I used my circle cutter to cut out 24 circles of various sizes of green foam from 1″ to 2″ in diameter. I then poked a hole in the center of the plastic snowflakes and the green circles with the darning needle. Using the head pins, I slid on one snowflake, one circle, and another snowflake, twisted a loop and cut the wire. I ended up making 24 of these and then using the jump rings, I strung them together for a total of eight green circles on each ornament. I attached a single jingle bell to the last foam circle with a jump ring to add a little fun and noise.

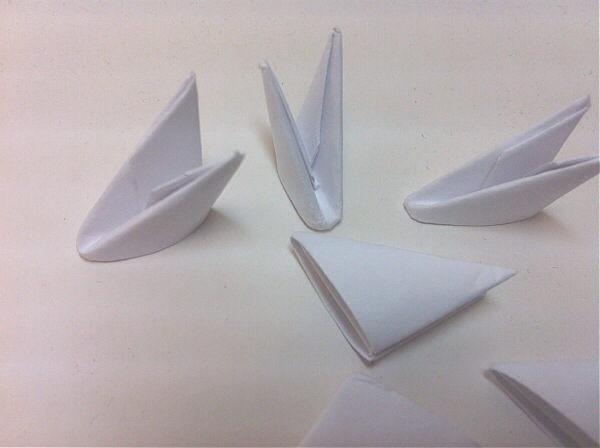
Lastly, I cut three more circles at 1 1/2″ diameter and cut them in half. I glued these into cones with superglue and then slid another snowflake on a headpin, then poked the headpin through the bottom of the cone, made a loop at the top of the cone and attached an ornament hook. I used another jump ring to attach the cone to the rest of the tree ornament and Voila! I was finished.

Green foam tree ornament.
Pretty green tree ornament.

I am very happy with how these turned out. My one recommendation is to use a circle cutter as cutting these out by hand makes them look very lopsided and wrong. The circle cutter makes them perfect and even.

Three green foam tree ornaments.
Just as easy to make three as it is to make one!

Happy Crafting,

Kristin

Easy Scrapbook Paper Star Garland

garland2

Loryn:  This scrapbook paper garland is so easy to make! All you need is a few sheets of paper, a star-shaped punch, glue, and fishing line, nylon thread, or any other white/clear cord to glue your paper to (even dental floss if you’re crafting late at night and grab the first thing you can find!).

garlandall

The first step is to cut stars out with your punch.

garlandstep1

Then fold two in half and glue the halves together. For this garland, I used two pieces of the same color and an accent for each bauble.

garlandstep2-a

Then put your thread or fishing line into the fold and glue the third star onto the first two. That’s it! Just repeat to make the garland as long as you want. I don’t know how many stars I used for this. A lot!

— Loryn

garlandgkr 

3D Origami Snowflake

20131202-203952.jpg

Lynne
The other day I was looking through pages and pages of Google images of origami figures for some new ideas when I saw this terrific dragon. Red Dragon Origami from Papercraft

I was keenly interested in how it was made and I began to search for instructions. I found that the process was called 3D origami and involved folding small rectangles of paper into triangular pieces that could be interlocked to build figures of amazing complexity.
Of course I turned to youtube and began to look for instructional videos. I find that I can learn better by watching than by reading complicated directions. So I will give links to a couple of videos that were very helpful in the process of making these intricate Lego-like pieces. There are many other videos and each one has something different to show. Watch as many as you can.

3D origami tutorial
3D origami tutorial 2

20131202-204014.jpg

I hoped that I could use this folding technique in our Christmas challenge and I found this video on how to make a snowflake with a little less than 50 pieces. It’s a good way to learn how the process works and still have something creative to show for your time. The video is well done, but I found that I did not pay enough attention to the position of the pieces as they were interlocked. The second color is placed differently than the first. If you look closely you will see that how the pieces are shown is how they are attached to the model.
3D origami snowflake

I made my first snowflake using two colors of copy paper as shown in the video to help me understand what I was doing, but I wanted a subtler change of color on my model. I have recently discovered the Copic airbrush system and on my second effort I used that system to achieve the color and effect I wanted. I really like using markers for airbrush painting. It is easy to switch colors quickly and there is very little mess to clean up. Here is a link to a video of the air spray system in action.
Copic airbrush system

I attached a button to the front of the star and then used a light coating of spray adhesive to adhere some glitter for a reflective shine. I used some fishing line to hang the ornament but ribbon or string would work just as well.

I hope you have fun as much fun making these snowflakes as I did and I will post again in four days with another project.

origami, ornament, Christmas, homemade, How to, DIY, star, paper

Ornament Advent: Day 16 Origami Star

origami, ornament, Christmas, homemade, How to, DIY, star, paper
Origami star ornament made from scraps of wrapping paper.


Lynne: I was hoping that since we had Teri Partridge as a guest author today with the Champagne Cork Angel, I would not be required to have an ornament. After some discussion about fair shares and obligations, here is my ornament.

While I was cruising the net this morning for an idea for our Ornament Advent, I found an origami Christmas Star that used wrapping paper scraps. Since most of my wrapping for Christmas is done, I have lots of small pieces of paper lying around and was eager to try it.

You will need 2, 6 x 6 inch squares of wrapping paper and this tutorial by Nikki, in Stitches. And that’s it. These are the clearest directions I’ve seen for origami folding and I was able to make 2 of these ornaments in about 30 minutes.

Once I was done with the origami figure, I added glitter and then hot-glued some vintage buttons to the front and back. I had these buttons stashed in a jar, but you could use whatever you have on hand. I added some fishing line to hang the star and marked off another day on the calendar.


origamistargawker2


View of copper star-burst necklace from the bottom of the pendant.

Crafty Challenge Six: Copper Star-burst Necklace

View of copper star-burst necklace from the bottom of the pendant.

We are back, baby!

After an additional week due to some time constraints, our Copper Crafty Challenge is complete. We had our final reveal among the Crafty Sisters this afternoon, and boy, we really seem to be at the top of our game for this challenge. I cannot wait for you to see all the projects. We are going to post one project a day, so keep coming back!

I waffled quite a bit on this challenge. I make a lot of jewelry and I wasn’t sure if that was where I wanted to go with this particular project. After a week and a half of indecision, I decided, why mess with a good thing, jewelry it would be.

Copper star-burst pendant and leaf chain.

Using a compass I played Spirograph on a copper disc and cut out the star burst pendant. Amazingly, the copper is thin and soft enough that you can cut the discs with heavy duty scissors. I hammered the star on both sides to give it some depth. I then curled the points of the star (I couldn’t see any other way to really blunt the points. Those suckers were sharp!) to keep from puncturing anyone wearing it or snagging your clothes. I attached the light green crystal bead in the middle with wire and did some wire-wrapped crystals (also light green in color) for the dangles at the bottom of the pendant.

Close-up of the star-burst pendant.

The chain is made up of hammered copper ovals and more wire-wrapped crystals. I did  make all the jump rings and the clasp out of wire as well. The wire is standard 18 gauge copper wire from the hardware store.

All the hammering was done on an anvil that my dad made me for Christmas several years ago and with a series of hammers that he made for me 2 years ago. I started all the holes with a punching awl then enlarged then with a Dremel tool and a diamond tipped drill bit. I filled all the edges with a mini file to be sure that you wouldn’t slice yourself open on the sharp edges caused by the scissors.

The star-burst was actually the second pendant I made for this necklace. I wasn’t all that happy with the first one I had made. I showed it around and the other Crafty Sisters and my M-I-L (who joined us from my house this week) thought it was great, which just goes to show how hyper-critical I can be about my own work.

First copper pendant I made.
This pendant is made of a copper plumbing pipe fitting.

Side view of the alternate copper pendant.

I did make a pair of earrings to go along with the necklace (my usual M.O.) and I think they turned out rather well.

Copper leaf earrings.

I really like how the hammered ovals came out looking like leaves. The hammering causes the copper to curl a little and I liked the affect so much that I left it and used the same affect in the star-burst pendant.

Close-up of the hammered copper leaf.

That is my completed project! It was a fairly easy process all in all and one that I found rather fun (until my arm got tired of all the hammering). I cannot wait for the next challenge. In the meantime, I have promised this necklace to my M-I-L and and am going to take the earrings apart to make a matching bracelet instead as she does not have pierced ears. So, back to my craft table to work on some more copper!

Happy Crafting!

Kristin

This post is featured on Todays Creative Blog.

Christmas Ornament Countdown: It’s the Final Countdown

So we have arrived at Christmas! I hope everyone is having at wonderful holiday. For those of you who have been following along with our ornament countdown adventure, you know that Cheri and I have been showcasing our ornament creations this year. We have been alternating days which is about all we had time for with our preparations for Christmas as well. We have gathered them all together here in one post for easy viewing.

First Day: Lucky Stars

Glass ball full of origami lucky stars.
Made by Kristin

Second Day: Scrapbook Paper Balls

Spiral ornaments made from scrapbook paper.
Made by Cheri

Third Day: Beaded Glass Ball

Glass ball covered in beaded mesh.
Made by Kristin

Fourth Day: Cardboard Tube Snowflakes

Snowflakes made from paper tubes.
Made by Cheri

Fifth Day: Sequins and Pins

Stryofoam egg decorated with pins, beads and sequins.
Made by Kristin

Sixth Day: Wire-wrapped Spider

Wire wrapped spider
Made by Kristin

Seventh Day: Teeny Tiny Places

Winter scenes inside tiny toy bubbles.
Made by Cheri

Eighth Day: Buttons, Buttons Everywhere!

Styrofoam ball covered in small white buttons.
Made by Cheri

Ninth Day: Crochet Wreath

Small wreath crocheted of cotton yarn.
Made by Kristin

Tenth Day: Scrapbook Paper Origami Stars

Scrapbook paper 3D origami stars.
Made by Kristin

Eleventh Day: Chinese Fortune

Glass ball full of Chinese fortunes and glitter.
Made by Cheri

Twelfth Day: Wire-wrapped Ice Fairy

Wire-wrapped snow fairy holding a snowflake.
Made by Kristin

Thirteenth Day: Steam Punk Felt Bird

Felt bird with wire-wrapped crown, wings and tail in steam punk fashion.
Made by Cheri

Fourteenth Day: Wire Wrapped Joy

Word "Joy" wire-wrapped inside wire circle.
Made by Cheri

It has been a wonderful craft experience to work in so many mediums. Cheri and I had a great time creating all of these amazing ornaments and look forward to another showcase for next year (which will include all the Crafty Sisters, not just us two).

Happy Holidays from Kristin!

Paper Star Christmas Tree Topper

Paper Star Tree Topper
Paper Star Christmas Tree Topper

Lynne: We crafty sisters have been making ornaments all month, but we are not the only ones. Last week, I went to the Pear Tree Gallery to attend Teri Partridge‘s class on making a tissue paper star.

The ornament is not difficult to make, but it is repetitive and good company with good conversation speeds the whole process. Of course that meant Teri had to talk a little louder while giving instructions, but she is a retired middle-school teacher and up to any task.

Materials you will need:

tissue paper

white glue

white colored pencil

scissors

CD for a circle template (or something similar in size)

binder clips

12 to 20 inches of 18 or 20 gauge wire

pliers

buttons or bells

wet cloth or sponge

You need about 14 circles of cut tissue paper for the completed star. Stack your tissue paper so that you can cut all of the circles at once. We used an old CD to draw around as a template for the circles. Hold the cut-out circles together with small binder clips to keep from having to constantly adjust them. Cut into the circles at the 12, 6, 3 and 9 positions of the clock and then cut halfway between each of those quarters. Make sure the cut does not go all the way to the middle. You need the center section to hold the paper on the wire. The photo below should help with my directions.

Paper Ornament Tree Topper

Have a little glue poured out on a throwaway lid, a dampened sponge or cloth to wipe your fingers free of glue, a white colored pencil (a darker color could mark the paper and show through the point), and the cut circles and you are ready to begin.

Position your pencil with the tip in the middle of each cut and roll the tissue paper around it to make a point. Slide the pencil out and put a little glue on the edge to keep the point from unrolling. Use the 3rd or 4th finger of your hand for the glue and you will not have to keep wiping the glue off the index finger you are using to roll the paper.

When you have all fourteen of the circles finished, you are ready to put the ornament together. Cut your wire anywhere from 12 to 20 inches long depending on how many spirals you want to make and how long a hanger you want. Make a loop in the wire to hold the circles in place. The loop should be several inches from one end of the wire depending on how long you want the hanger to be. You can also use a button or a bell to make a stronger stop to keep the paper from sliding upwards when you tighten the star.

Make a hole with a needle or ice pick in the middle of the circles. String the first 7 circles onto the non-looped end of the wire with their points down and string the other 7 circles with the points up. You want the star to have the top points pointing down and the bottom points pointing up to give the ornament its circular shape. Use a bell or a button pushed up tight to the bottom circle and make another loop to hold the bell on. Arrange the circles so the points show to best advantage and make sure the circles are bunched tightly together to make it pouf out properly. Secure the bottom bell and cut the wire or make some spirals or twists if you like. Bend the wire on the top to form a hanger and you have your star ornament.

Paper Star Ornament
The ornament that I made in class with Teri Partridge.

When I got home, I liked the star so much I wanted to make a larger one as a topper for my tree. I made the circles slightly larger by using a 7″ plate as a template for the circles. Don’t go too big or the circles get too floppy and do not pouf right.

I needed heavier wire to make the ornament stand on its own at the top of the tree. I found some 12 gauge white electrical wire at the hardware store and took it to Cheri to have her bend the wire into the right shape. She used the neck of a champagne bottle to bend the wire into a coil to fit on the top of the tree.

Paper Star Ornament
Wire coiled around the neck of the champagne bottle.

The 12 gauge wire was harder to bend close enough to the paper circles, so we used pieces of cork above the stop loops in the wire to help hold them close together.

Paper Star Tree Topper
The cork holds the tissue paper circles tightly together.
Paper Star Tree Topper
The champagne bottle we used to coil the wire made a great stand for our photo.

The star looks great on the top of our tree and if you like the topper on the champagne bottle, it would make a great centerpiece for your holiday table.

Have yourself a merry holiday!

Paper Ornament Tree Topper
Our new paper star tree topper.
Paper Star Tree Topper

Christmas Ornament Countdown: Scrapbook Paper Origami Stars

At the beginning of this countdown I wrote up a list of 8 different media that I wanted to use to make ornaments. I have now arrived at paper. I found this wonderful video tutorial for how to make 12-point origami stars and made with some pretty scrapbook these are perfect for holiday ornaments and decorations.

Origami 12 point stars made from scrapbook paper.

I have found after making them that I have a few suggestions. I originally thought to make these with Christmas wrap, but found that the wrapping paper is just too thin and prone to tearing to be practical. I did have some really pretty scrapbook paper in some excellent colors that was a heavier weight. Don’t use cardstock as it will not fold easily once you get to several layers of paper. Anything in between wrap and cardstock would work very well. I also recommend using something to press the creases down such as a bone folder.

Origami 12 point star made from scrapbook paper.

To hang these as ornaments from my tree, I am going to pull a thread through the star with a doll needle (a really long needle) and attach a hook to the thread. Voila! a wonderful ornament form the tree or just beautiful to set on a table as decoration.

Origami 12 point paper star.

Happy Holidays from Kristin!

Origami 12 point star made from scrapbook paper.


This post was edited to fix the link to the tutorial. The old link had disappeared and I was able to find a new tutorial on YouTube.

Happy Crafting,

Kristin