Tag Archives: holiday decoration

napkin rings

Christmas Advent 2015 – Day 7 Napkin Rings

Loryn has been doing lots of entertaining lately and has the most awesome table. It is gigantic and sits our family very well. I decided that for this advent, I would make the table decor for Christmas family dinners. Today I made the napkin rings.

napkin rings

Materials:

  • Scrapbook paper
  • Tacky glue (white glue)
  • Foam sheets
  • Mod Podge
  • Sponge brush
  • Wax paper

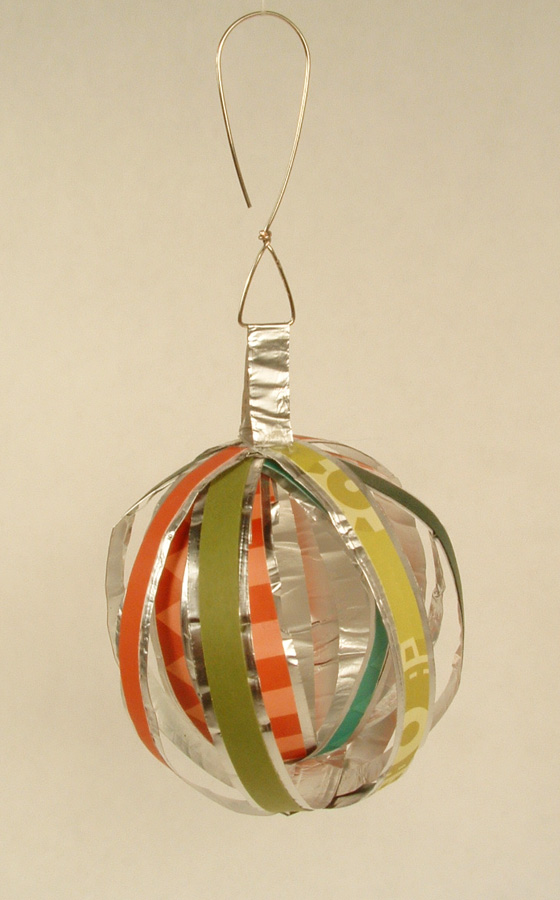
I cut strips of scrapbook paper in three different styles to 1 1/2″, 1″, and 1/4″ wide by 7″ long. I used a sponge brush and some watered down tacky glue to glue the papers one on top of the other. I then squeezed these flat between some wax paper and heavy books.

I cut 1 1/2″ by 6″ long strips of the foam sheets and once the paper strips were dry, I used some more watered down tacky glue and the sponge brush to glue them to the foam strips. I again squeezed these flat between my sheets of wax paper and heavy books.

I then trimmed the paper on one end to evenly match up to the foam and left a 1/2″ edge of paper on the other end. I smeared straight tacky glue on the inner side of the leftover edge of paper and a bit on the end of the foam and curled it around the tacky glue bottle (nicely doing double duty here) and glued the ends of the foam/paper strips together, making sure the paper strips lined up, wiping any excess glue away, and ensuring the rings formed good circles.

napkin rings

After the glue was dry, I used another sponge brush and covered the rings with one coat of Mod Podge. I am not too worried about durability and if I need to make more next year, I will gladly do so. This was fun and easy and only took a couple of hours.

I only show five of the rings above as the others were all still drying. I only made a few to start to be sure I liked how they turned out. I also used several colors of foam sheets to add a little more color. (I know the insides of the napkin rings will be hidden by the napkins themselves, but they do spend a lot of time on the table with nothing in them after everyone pulls their napkins out.)

Stay tuned for napkins and other table decorations coming soon!

Happy Crafting,

Kristin

Paper clip snowflakes

121513 001 121513 004

Cheri-I hope everyone is having a wonderful Holiday Season so far.

These are two ornament that I made from paper clips.

Supplies

Large paper clips

Round nose pliers

Grommets

Small gauge wire

Glue

I first started by experimenting  with different paperclip bends.  I knew that I wanted to make a snowflake so I made sure that I would have a way to connect them to each other. After I had a pattern I liked, I began to work on the connection. The grommets worked great for the 2nd snowflake as I had a loop to affix it to. The top one I decided to wire, after I wired it I put a drop of E-6000 on each wire. This stabilized the connection.

Hope you are enjoying our Christmas countdown and again Happy Holildays.


Ornament Advent: Day 22 Tissue Paper Garland

christmas advent 005

Cheri-Kristin and I always make similar projects and when I saw her garland from yesterday, I had to laugh. Without even being aware of it we both made garland. Her project is so pretty that it made me a little intimidated to post mine, but here goes anyway. I hope you like it.

Supplies

Tissue paper

Colorful thread

Sewing machine

Ribbon (optional)

This is such an easy project, if you can sew a straight line, you can make these. I stacked a bunch of tissue paper together and cut out several shapes. Circles, squares and rectangles of tissue. I started with the ribbon garland, and just placed one or two of the tissue paper objects underneath the zipper foot. For the garland without the the ribbon, all you do is run the thread over the tissue paper objects. For the tissue paper bows, just bunch up the tissue paper in the middle and sew over it.

It is really simple and sewing tissue paper and ribbon is a really awesome way to combine this medium together.

Merry Christmas


Ornament Advent: Day 20 Wrapping Paper Christmas Tree

ornament, holiday, Christmas, tree, scrapbook paper
Use scrap pieces of wrapping paper to make this ornament.

Lynne: I liked using scraps of wrapping paper to make my last ornament and I decided I would try to use up more of the pieces I have lying around. I found this tutorial on design and form with these terrific paper ornaments, but I don’t have that precision in my paper-cutting skills. Thus I drew a very loose, cartoon type tree and used that for my pattern.

You will need:

a 6 x 6 inch square piece of paper for the pattern

approximately 10, 6 x 6 inch square pieces of wrapping paper

a glue stick

When you draw the pattern, draw it full size and then fold it in half. This will be easier to do instead of trying to think of how one half of a tree will look. Don’t worry too much about how it looks. You will be surprised how good irregular lines will look in the finished ornament.
wrappingpapertree2

Glue the unprinted sides together and then start gluing to make a stack. Be sure to keep the folded edge straight so everything matches when the ornament is opened. I used a weight for a few minutes to make sure the glue would hold.

I traced around the pattern onto the stack and then began to cut. It seemed that more than three edges were too hard to cut, so cut what you can and then retrace the pattern from what has already been cut. When every edge has been cut, glue the two outside edges together and adjust the 3d figure until it is evenly spaced.

I added glitter and stuck an old hat pin in the top, but feel free to decorate any way you wish. I used a loop of fishing line for a hanger, but these ornaments will stand on their own if you want to use them in a centerpiece.

wrappingpapertree3

Happy Holidays and just one more ornament!

Ornament Advent: Day 18 Fortune Cookie Garland

Save your fortunes and make this holiday garland.

Cheri: My boys and I try to keep a standing date on Saturdays. We like to go and have lunch at a Chinese Restaurant in the small town where we live. I keep the fortunes as a keepsake. This is one of my favorite projects to make with them.

Supplies:

Fortune Cookie Fortunes

Glue or tape

Gold marker

How to:

Color a line around the slips with gold marker to dress it up a bit, and then glue/tape the fortunes into a circle, (make sure the fortune is on the outside). Attach them together and you have a great chain for the Christmas tree. I plan on continuing the chain throughout the year. Merry Christmas!

Fortune Cookie Garland

origami, ornament, Christmas, homemade, How to, DIY, star, paper

Ornament Advent: Day 16 Origami Star

origami, ornament, Christmas, homemade, How to, DIY, star, paper
Origami star ornament made from scraps of wrapping paper.


Lynne: I was hoping that since we had Teri Partridge as a guest author today with the Champagne Cork Angel, I would not be required to have an ornament. After some discussion about fair shares and obligations, here is my ornament.

While I was cruising the net this morning for an idea for our Ornament Advent, I found an origami Christmas Star that used wrapping paper scraps. Since most of my wrapping for Christmas is done, I have lots of small pieces of paper lying around and was eager to try it.

You will need 2, 6 x 6 inch squares of wrapping paper and this tutorial by Nikki, in Stitches. And that’s it. These are the clearest directions I’ve seen for origami folding and I was able to make 2 of these ornaments in about 30 minutes.

Once I was done with the origami figure, I added glitter and then hot-glued some vintage buttons to the front and back. I had these buttons stashed in a jar, but you could use whatever you have on hand. I added some fishing line to hang the star and marked off another day on the calendar.


origamistargawker2


Ornament Advent: Day 16 Champagne Cork Angel

Champagne Cork Angel

Our own wonderful watercolorist and art instructor Teri Partridge  of the Pear Tree Gallery always teaches a full week of ornament classes in the month of December. She has agreed to join us as a guest author and post an ornament or two in our Advent Challenge. This angel is so cute and so much fun to make. Her excellent tutorial can be found here.

Ornament Advent: Day 14 Dinosaur Dandies

dinosaurbuddiescheri2

Cheri: This little group of dinosaurs are all dressed in their finest silver and glitter and are ready to decorate your tree.

Supplies:

Toy dinosaurs

Silver paint

Glitter

Oven-bake clay, red and white

Eye hooks

Paint your dinosaurs. I think you could probably spray paint them, but it is pretty cold here and I don’t think it is a good idea to spray paint in the house. (LOL)

After they are painted, (maybe 2 coats), put another coat of paint or sealer on them, and while they are still wet, sprinkle them with glitter. You could probably put a pretty heavy coat on, but I wanted them to look like they had been “kissed” with snow.

Knead a small ball of white clay and red clay, make a small coil with the white clay and roll it into a circle. Then make a small white ball for the tip of the hat. Make a small Hershey’s kiss with the red clay and stick it to the white circle. Attach the pom-pom and bake the clay according to the instructions. After they are baked and cooled, apply a little clear sealer and sprinkle with glitter.

Attach the red hat to the dinosaur with hot glue and then decide if you would like them to be doing something. I made a music book for one of the dinosaurs to make him look like he was singing and the other one with the outstretched hands was given an ornament to hold. These were both hot glued on.

I hope you like the ornaments I have made for our Christmas Advent Countdown. Wow, Christmas will be here before we know it.

dinosaurbuddiescherigawker1

Ornament Advent: Day 12 Wire and Fabric Scrap Puppy

christmaspuppylynne1

Lynne: I made this ornament “Puppy Under the Christmas Tree” from a wire armature stuffed with fabric scraps and then covered the figure with more fabric strips to get the finished shape.

I had so much fun doing this ornament. I love wire armature figures but I was sure that I could never make one. However I happened to see a book by Carla Sonheim called Drawing and Painting Imaginary Animals and found a photo of a figure done with wire and fabric. I draw my own imaginary animals called Squiggles and I told myself to make a figure just like I drew a squiggle. And it worked.

I used ordinary, hardware store galvanized wire (a gauge soft enough to work with your hands) to make the armature. One long piece made up the legs, body and tail. I used a shorter piece to shape the head and ears. I had to add more volume to the body and head to hold the fabric stuffing so I wired on some spiral shapes. Just keep adding and shaping, until you’re satisfied.

Then I stuffed and covered the armature with torn fabric scraps. Their frayed edges look like fur and give the ornament a vintage look. I used strips 1/4 inch to 1/2 inch wide and about 8 inches long. The strips need to be narrow to follow the contours of the body without sagging open in a curve. If I needed longer strips I just tied two or three of the shorter strips together. The knots disappear into the wrapped fabric. I did not use any glue or stitching to hold the strips on. I used scissors to poke the ends under the previous strips and tried to make sure loose ends were started and finished in  places that would be covered over. Small scissors are perfect for stuffing the ends under earlier layers.

I had old hat pins in my stash and I used them for the eyes and ears, but you could use buttons or embroidery. I used a small scrap of Christmas ribbon to make the collar and bow and fishing line to make an ornament loop, but I have to warn you that one look in those puppy eyes and it will be very difficult to stick the needle and fishing line through.

I’m keeping this puppy out of the ornament box after Christmas. He’s going to sit on the table right beside my favorite chair.

christmaspuppylynneback

t

christmaspuppylynnegawker

Ornament Advent: Day 11 Foil and Scrapbook Paper Ball

I really wanted to make a simple ornament with aluminum foil. I have been wracking my brain trying to think of something and it hit me while I was driving home from work. I could make an awesome ball with strips of foil and paper.

Ball Christmas ornament made of strips of paper and aluminum foil

The ornament is a ball inside a ball. The style is reminiscent of a ribbon temari ball  that I made years ago. I cut strips of aluminum foil 1″ wide and strips of scrapbook paper 1/4″ wide (all the strips were roughly 12″ long). I folded the foil lengthwise to not quite in half. I then folded the other edge to give myself two nice, smooth edges. This made the foil strips about 3/8″ wide. I ran a bone folder over the foil strips to make them smooth and shiny. I glued the scrapbook strips to the foil strips and let them dry.

Paper and aluminum foil Christmas ornament.

After they were dry, I cut the strips to 10″ long, just to make them easier to handle. Then I wrapped the strips around a solid object (I used a small glass for the outer ball and the glue bottle for the inner ball), glued the ends down, and cut off the excess. I made four smaller rounds and 4 larger rounds. I made the inner ball first then added the larger strips to make the outer ball. I glued the top and bottom where the strips met.

Ball ornament made of strips of paper and aluminum foil.

I made a small circle of foil about 1/4″ wide and glued that to the top of the ball and attached a homemade hook and I was finished. I think the whole ornament took me about an hour to make.

I am really happy with it, although it is rather delicate. At least if it gets bent out of shape it is really easy to fix.

Happy crafting!

Kristin