Hey all! So, my SO and I went out for breakfast and then made a run to Joann’s this morning and I got the rest of the ribbon I needed to finish the ribbon garland. Of course, I go too much, so do not be surprised to see the ribbon in another project before this year’s advent is finished.
Materials:
Gold bead garland
Lots of ribbon
Scissors
In theory, this is an easy project as long as you have the time. It took me two days working about 10 hours total to finish 13 1/2′. I used a gold bead garland and tied 4″ strips of ribbon between each bead. My total yardage of ribbon was approximately 90 yards.
You can see from the image above that I tied two pieces of 6″ ribbon between each bead. I am very happy with the result. It is going to look great on the Christmas tree. The start of this post (from yesterday) is here.
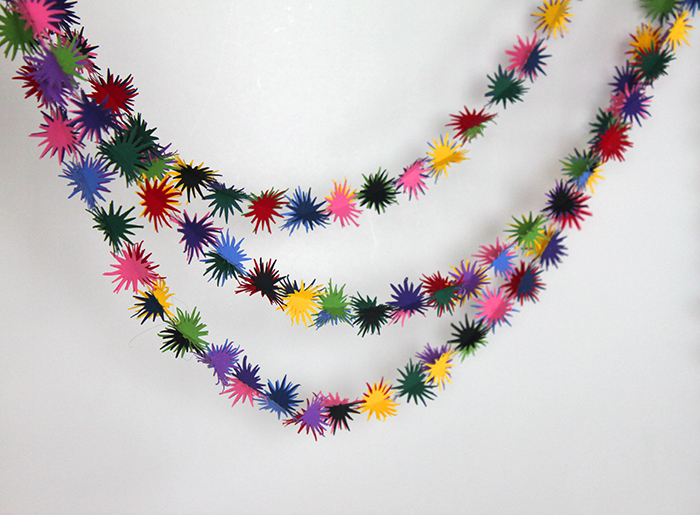
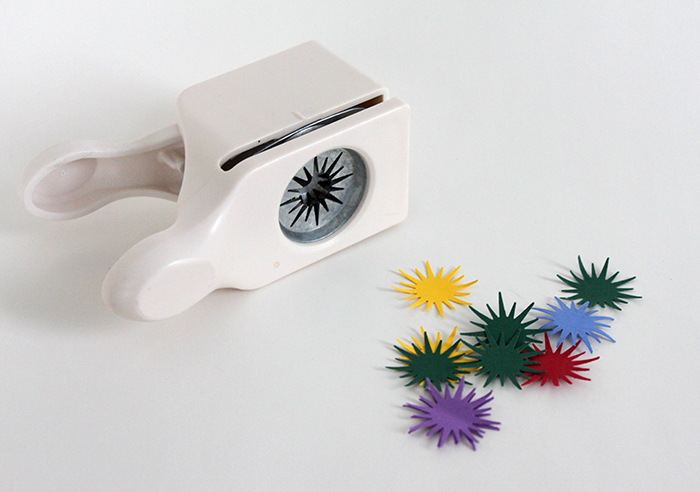
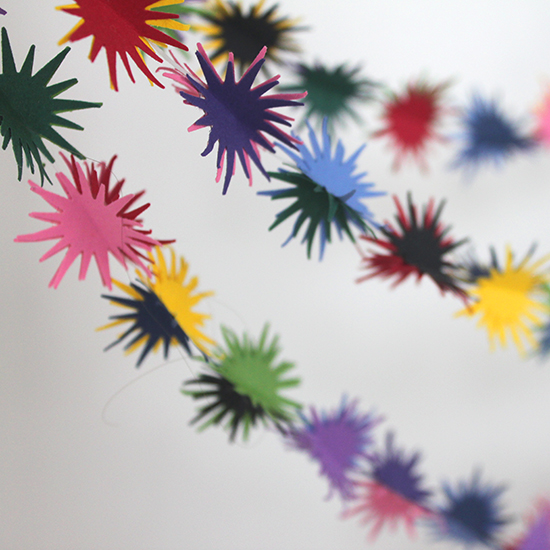
Loryn: This scrapbook paper garland is so easy to make! All you need is a few sheets of paper, a star-shaped punch, glue, and fishing line, nylon thread, or any other white/clear cord to glue your paper to (even dental floss if you’re crafting late at night and grab the first thing you can find!).
The first step is to cut stars out with your punch.
Then fold two in half and glue the halves together. For this garland, I used two pieces of the same color and an accent for each bauble.
Then put your thread or fishing line into the fold and glue the third star onto the first two. That’s it! Just repeat to make the garland as long as you want. I don’t know how many stars I used for this. A lot!
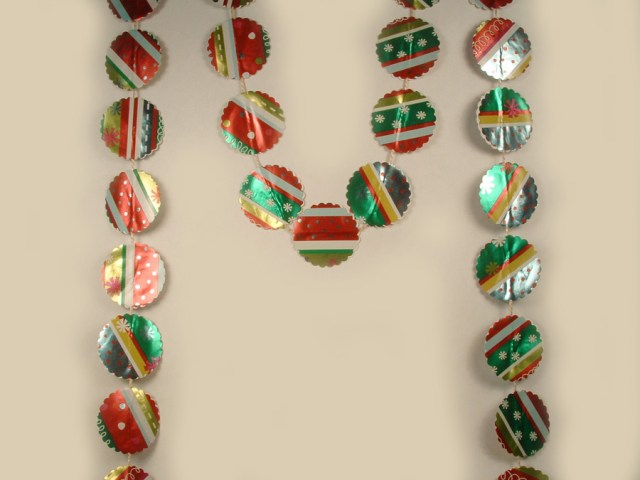
One of the greatest benefits of having a crafting family are how ideas are bounced, re-imaged, and re-shaped among us. I really love the Star Ornaments that Loryn made and I also just love the Chinese Fortune Garland that Cheri made. I decided to do something similar to Loryn’s stars and follow Cheri and make a garland. I am very happy with how it turned out!
Supplies:
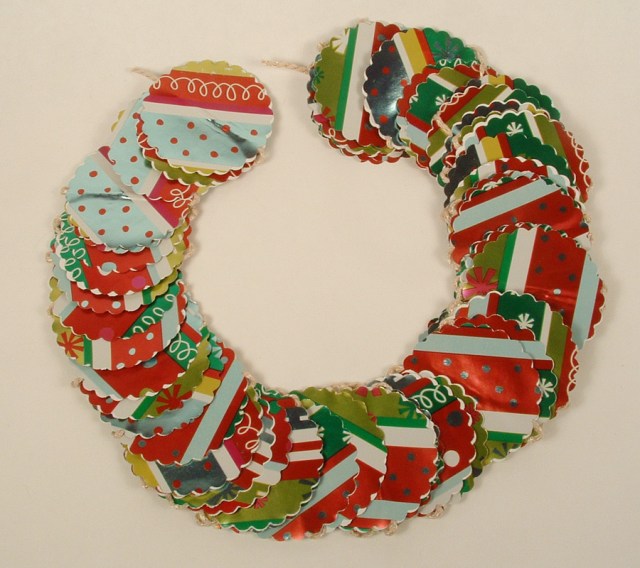
Christmas wrap
Paper punch (I used 2″ seal punch)
Glue stick or pen
Yarn, string, or ribbon
I had some really shiny Christmas wrap and also had this 2″ seal paper punch. I used the paper punch to cut around 120 pieces out of the Christmas wrap. I then pulled out some thick crochet thread that is a sort-of soft gold color and is ribbonish (flat and about 1/8″ thick). I spread glue on two cut-outs and glued the crochet thread between the two pieces. You do have to be sparing with the glue as the Christmas wrap is very thin. I left around 1/4″ of the yarn visible between the cut-outs.
My garland is around 12′ long and looks great on a tree! I think this whole garland took me around 45 minutes to make. The other nice thing about this garland is that once you fold up the shapes, it takes up so little space and stores very well.
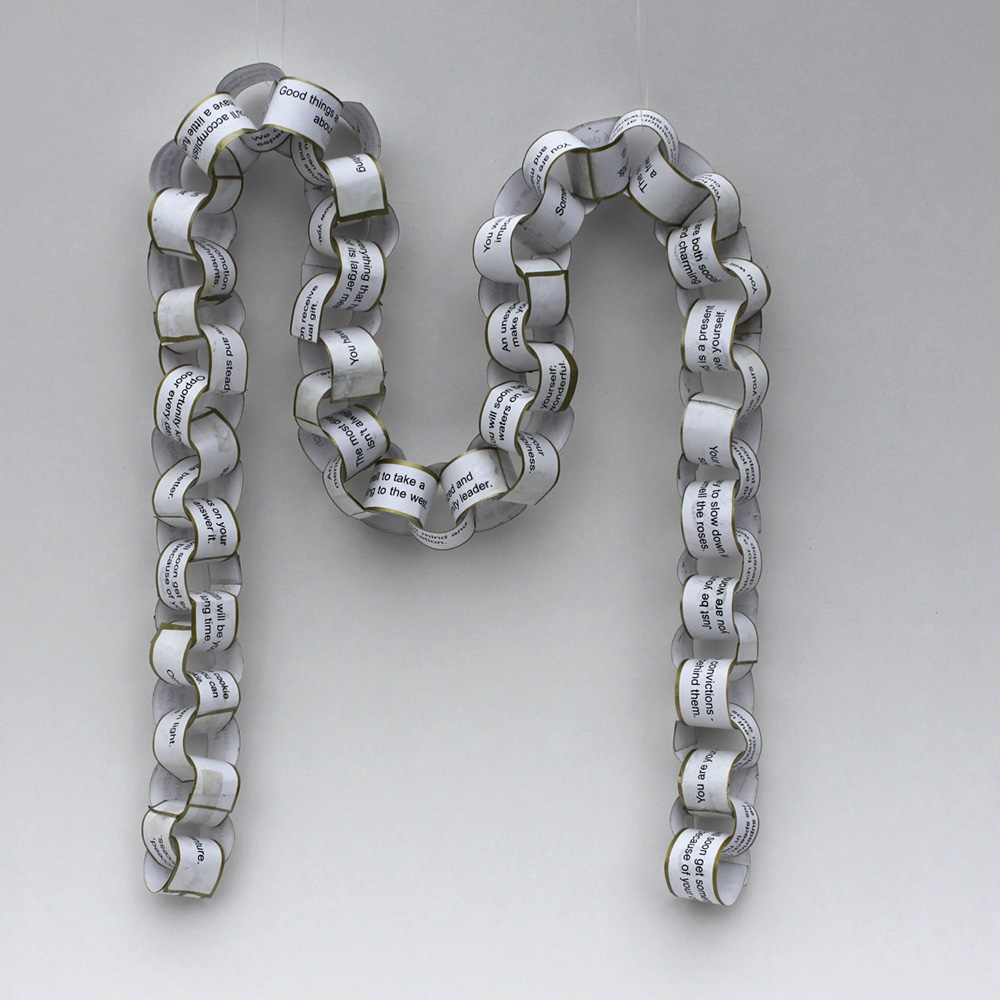
Cheri: My boys and I try to keep a standing date on Saturdays. We like to go and have lunch at a Chinese Restaurant in the small town where we live. I keep the fortunes as a keepsake. This is one of my favorite projects to make with them.
Supplies:
Fortune Cookie Fortunes
Glue or tape
Gold marker
How to:
Color a line around the slips with gold marker to dress it up a bit, and then glue/tape the fortunes into a circle, (make sure the fortune is on the outside). Attach them together and you have a great chain for the Christmas tree. I plan on continuing the chain throughout the year. Merry Christmas!
Loryn: I have some beautiful vintage Polish glass heart ornaments (one of Cheri’s fabulous garage sale finds!) that I’ve wanted to display, but I’ve worried about breaking the delicate ornaments. My cats especially love to bat ornaments around. While I was working on my Two-Hour Christmas Decoration Crafty Challenge, I realized that the same technique would be great for displaying delicate ornaments.
For this garland, I turned the points down so that each ornament has its own “groove” to sit in. This keeps them from sliding around and bumping into each other. I used an inexpensive 18 gauge galvanized wire.
I hung it across the archway between my front room and living room, where it looks beautiful, but is out of the way.
I used a screw to hold up each end. For more detailed directions on how to bend the points, see the photos below. The entire garland took less than an hour to make and hang. Once the wire was formed, I hung one end and carefully slid the ornaments into place before attaching the other end. A second pair of hands is helpful for this part!
If you have delicate ornaments that you’re afraid to display, this is a fun way to get to use them!
Frilly and festive tissue paper flowers for a Christmas tree garland.My white Christmas tree with its new garlands.
Lynne:Crafty Challenge 5 was a challenge for me. I don’t believe I have made any Christmas ornaments for several years and it was tough to get my mind back into that red and green groove.
I like long garlands and I like them to be lit. Strings of Christmas tree lights seemed to me to be the best way to start, so I bought a strand of 100 clear Christmas tree lights. I needed the light strand to be decorated and the longer I looked at them the more the bulbs looked like the centers of flowers. Why not put a flower around each light bulb? The flower I made for my Do It Best Purse in the hardware store challenge would be the perfect fit to go around the collars of the light bulbs.
I plugged in my strand of lights for two hours to check on how hot they would get. I could still hold them in my hand at the end of the two hours so I used red tissue paper. However, be safe and turn off your tree lights whenever you leave the house.
Tissue paper comes folded in its package. When you unfold the paper the creases are good guidelines for cutting the long strips. I cut through all of the layers at the same time, because there was less chance of the sheets slipping while they were still in the original folds. I used a rotary cutter and the resulting strips were about 3″ wide.
Crease from tissue paper being folded for packaging.
I folded the strip in half and then separated the layers into stacks of two strips each. (The number of layers can vary depending on how thick the paper is and how frilly you want the flowers.) I taped the unfolded edge with scotch tape. I put half the tape on one side then flipped the strip over and folded the tape up onto the other side. Then I used scissors to cut the folded edge of the strip into fringe.
Taping the long strips closed.Taping 2 layers of long strip.I used scissors to fringe the folded edge of the strips.
Once you’ve fringed the length of the strip, cut it into 5″ sections. 5 inches worked best for me but you can make the sections longer if you want fuller flowers. Take each 5″ section and roll it around one of the light bulb plastic holders. The holders are plastic and I found that a dab of hot glue when you first start to roll the flower is strong enough to hold the flower in place. Once you have the flower rolled use a piece of tape to keep it closed. I put a flower on every other light bulb and I was just able to finish the garland in two hours.
I liked the results so much that after the challenge was over I made another garland and bought a white Christmas tree to put them on.
Fold the 5" strip around the holder of the light bulb and tape it closed.Close-up of the flower.Another close-up because they look so pretty and festive.Frilly Flower Garland
We have just finished our Crafty Challenge 4 and are ready for number 5! This one is all about the time of year. From around now until Christmas, the Crafty Sisters begin to get secretive. We tend to stop discussing our projects with each other and mutter a lot, or at least I mutter a lot.
For us, this is crunch time for Christmas gifts and we do make a lot of them. In this vein, Crafty Challenge 5 is all about Christmas Decorations. We did need to limit this somehow and due to the whole Christmas crunch time I mentioned, the best idea was an actual time limit. So, the challenge is to create a Christmas decoration in less than two hours. We even set a specific time. December 4th – 10am until 12pm is the making time and the unveiling will be at 12:30pm. We can think all we want and purchase the supplies in the meantime, we just cannot start making the decorations until 10am.
To get us in a holiday mood, I thought some examples of a few of our past Christmas decorations was in order. So, get your mind in gear and get thinking (but don’t get making yet!).
Chenille pipe cleaner door wreath made by Cheri.Garland by Kristin, Choir Bird and Winter A-Frame by Cheri.Choir bird made by Cheri.Miniature A-Frame winter scene made by Cheri.Snowman ornament made by Cheri.Ornament door wreath made by Kristin.Painted bird ornaments made by Cheri.Silver ornament and twig door decor made by Cheri.
If you have any questions about any of the above decorations or would like to know how they were made, ask us! You can email us in the Contact Us section of the blog.
These were all decorations I had in my Christmas storage and I realize that almost all of them were made by Cheri. You can definitely see who we will be comparing ourselves to. Wish us luck and you get crafting!