I previously bought a box of plastic rhinestones with pointed backs for a project that did not work out, so I have re-purposed them as a wonderful Christmas ornament.
Materials:
Styrofoam ball (3″)
Pointed back rhinestones
Superglue
Small piece of wire
To start this project, I made a loop with the small piece of wire and pressed it into the Styrofoam ball and super glued it to provide a place to put the tree hook.
Next, I started pressing in the pointed backs of the rhinestones to form small depressions in the Styrofoam ball. I then placed a drop or two of super glue in the depression and added a rhinestone. I kept working circles around the foam ball to the bottom and I was done.
This will look absolutely fabulous on our Christmas tree. The lights will just make it glitter and glow!
Day 11! Today I made some pine cones out of chenille pipe cleaners. Specifically, I made them out of chenille bump stems in a lovely light brown color.
Materials:
Chenille bump stems (brown)
Large wooden beads
Felt (brown)
Scissors
Tacky Glue
Superglue
First, I made leaflets with the chenille stems as shown above to create layers of pine cone scales. Next, I glued a bead on the underside of one layer and glued another layer to the bead, as show below, using tacky glue. This can take a little bit of time as you want to let the tacky glue dry really well before you add another layer of leaflets.
I was working on three at once, so I kept them all in a neat pile with their corresponding beads.
I will say that the wooden beads in the middle of the picture worked the best. Made a nice sturdy and pretty pine cone.
Then, I cut individual scales from the felt to make the tops of the pine cones. I glued these with the tacky glue into sets of three. I put 6-7 of these trios on each pine cone. I put I also cut 1/4″ x 3/4″ strips of felt in the same color and glued them into rolls to make the stems of the pine cones.
You can see above where I glued the stems to the top of the pine cones and then added the felt leaflets around the stem.
Once everything had dried, I them touched up all the connecting points with super glue to make sure that everything would stay together and form a strong bond. At this point, you could easily add a tree hook to the top and hang them from the tree. That would look really nice. I have another purpose for these that you will see in about a week.
I have to apologize for yesterday. I did not manage to get a project posted. Turns out working on 4 different ones at the same time causes some difficulty in getting even one finished.
My project for Wednesday, December 9, is a crochet garland with ribbon woven into it.
Materials:
Yarn
Ribbon
Crochet hook (I used an “H” size)
Darning Needle
I used two different yarns, one a very light red with some satiny effect and the other a nice off-white cotton. I crocheted 22′ (yes, really, that does say 22 feet) of double crochet foundation stitch. The link goes to a really good and detailed demonstration for how to do this stitch. I just did one row of this and then tied off my yarn. Next I measured out 24 feet of narrow ribbon in red and white. I then threaded this onto my darning needle and wove the red ribbon in between my crochet stitches. Once this was done, I wove the white ribbon through, this time in the opposite pattern, as you can see below. I tied off my ribbons and I was done!
With the red and white colors, I got a really great peppermint/candy cane effect and I am really happy with it.
Loryn has been doing lots of entertaining lately and has the most awesome table. It is gigantic and sits our family very well. I decided that for this advent, I would make the table decor for Christmas family dinners. Today I made the napkin rings.
Materials:
Scrapbook paper
Tacky glue (white glue)
Foam sheets
Mod Podge
Sponge brush
Wax paper
I cut strips of scrapbook paper in three different styles to 1 1/2″, 1″, and 1/4″ wide by 7″ long. I used a sponge brush and some watered down tacky glue to glue the papers one on top of the other. I then squeezed these flat between some wax paper and heavy books.
I cut 1 1/2″ by 6″ long strips of the foam sheets and once the paper strips were dry, I used some more watered down tacky glue and the sponge brush to glue them to the foam strips. I again squeezed these flat between my sheets of wax paper and heavy books.
I then trimmed the paper on one end to evenly match up to the foam and left a 1/2″ edge of paper on the other end. I smeared straight tacky glue on the inner side of the leftover edge of paper and a bit on the end of the foam and curled it around the tacky glue bottle (nicely doing double duty here) and glued the ends of the foam/paper strips together, making sure the paper strips lined up, wiping any excess glue away, and ensuring the rings formed good circles.
After the glue was dry, I used another sponge brush and covered the rings with one coat of Mod Podge. I am not too worried about durability and if I need to make more next year, I will gladly do so. This was fun and easy and only took a couple of hours.
I only show five of the rings above as the others were all still drying. I only made a few to start to be sure I liked how they turned out. I also used several colors of foam sheets to add a little more color. (I know the insides of the napkin rings will be hidden by the napkins themselves, but they do spend a lot of time on the table with nothing in them after everyone pulls their napkins out.)
Stay tuned for napkins and other table decorations coming soon!
Hey all! So, my SO and I went out for breakfast and then made a run to Joann’s this morning and I got the rest of the ribbon I needed to finish the ribbon garland. Of course, I go too much, so do not be surprised to see the ribbon in another project before this year’s advent is finished.
Materials:
Gold bead garland
Lots of ribbon
Scissors
In theory, this is an easy project as long as you have the time. It took me two days working about 10 hours total to finish 13 1/2′. I used a gold bead garland and tied 4″ strips of ribbon between each bead. My total yardage of ribbon was approximately 90 yards.
You can see from the image above that I tied two pieces of 6″ ribbon between each bead. I am very happy with the result. It is going to look great on the Christmas tree. The start of this post (from yesterday) is here.
I made it to day 3 of the Christmas countdown! This feels a bit monumental, as we have been absent from craft blogging for so long.
Today, I made little tree ornaments out of foam sheets (Foamies) in various shades of green.
First my materials:
The materials I used to make my foam tree ornament.
Small plastic snowflakes
Head pins with eyes
Jump rings
Tiny jingle bells
4 sheets of green Foamie sheets
Wire cutters and pliers
Pointed yarn darning needle
Circle cutter (Thank you Martha Stewert)
Superglue (not pictured)
I used my circle cutter to cut out 24 circles of various sizes of green foam from 1″ to 2″ in diameter. I then poked a hole in the center of the plastic snowflakes and the green circles with the darning needle. Using the head pins, I slid on one snowflake, one circle, and another snowflake, twisted a loop and cut the wire. I ended up making 24 of these and then using the jump rings, I strung them together for a total of eight green circles on each ornament. I attached a single jingle bell to the last foam circle with a jump ring to add a little fun and noise.
Lastly, I cut three more circles at 1 1/2″ diameter and cut them in half. I glued these into cones with superglue and then slid another snowflake on a headpin, then poked the headpin through the bottom of the cone, made a loop at the top of the cone and attached an ornament hook. I used another jump ring to attach the cone to the rest of the tree ornament and Voila! I was finished.
Pretty green tree ornament.
I am very happy with how these turned out. My one recommendation is to use a circle cutter as cutting these out by hand makes them look very lopsided and wrong. The circle cutter makes them perfect and even.
Hello! Kristin here. We are all still around. We had taken a break to work on lots of other projects (houses mostly) and we are back for the holiday advent!
Lynne and I put up our Christmas tree on Sunday and found that it needed a new tree topper. Our previous tree topper was part of our 2011 Christmas event Paper Star Christmas Tree Topper.
We did this project together and we had a great time. Our materials list:
Styrofoam ball
Heavy wire
10″ Bamboo skewers – package of 100
Spray Glue
Spray Paint
Heavy bamboo skewer – 1
Wire cutters
Glitter
Green florist tape
Wire
Tacky glue
I took the old topper apart and we reused the spiral wire from it and stuck it through the Styrofoam ball. At this point, I was using a lint roller to hold the topper to see what it looked like. This changed very quickly to something else that would actually hold the star up straight while we worked on it.
Spiky Styrofoam ball!
We switched to one of Lynne’s weights (painted milk bottle filled with bb’s) to hold the star. A recommendation that we have after having finished the star, once you stick the bamboo skewer in the ball, pull it back out and dab the end in glue (Alene’s Tacky Glue) to hold the skewers in place. Otherwise, you will be picking up and replacing skewers every time you move the star.
We cut around 20-30 skewers in half and the rest in thirds with the wire cutters. When cutting the skewers, slant the wire cutters to make an angle for ease of stabbing into the Styrofoam ball. Also, put the shorter skewers in first and then the longer ones to avoid stabbing your hand or the need for a leather glove. (Always good to learn from someone else’s experience).
Starting the spray paint.
We then started spray painting the star with Lynne’s awesome Copic markers and air compressor to make them work as spray paint. This was long and did not need to be done, and didn’t cover the star nearly as well as we had hoped. We decided that this did not work and bought a $3 bottle of spray paint and sprayed it gold. Worked so much better! Then you spray the star with the spray glue and dust with glitter.
Spray painted gold!
The ball has been spray painted gold and covered with glitter. Lynne then covered the bottom part of the heavy skewer with green florist tape (matched the tree) to hide the length that goes into the tree and is wired down.
Gold spiky star on our tree!
The topper is now on top of the tree. Lynne and Loryn did this part as I had already driven home after the Thanksgiving break. It is wired to the top of the tree to keep it straight.
Our beautiful tree with all homemade decorations.
Our beautiful tree is now complete! The ornaments and garlands are all homemade and have been previously posted on The CraftySisters. It looks just wonderful!
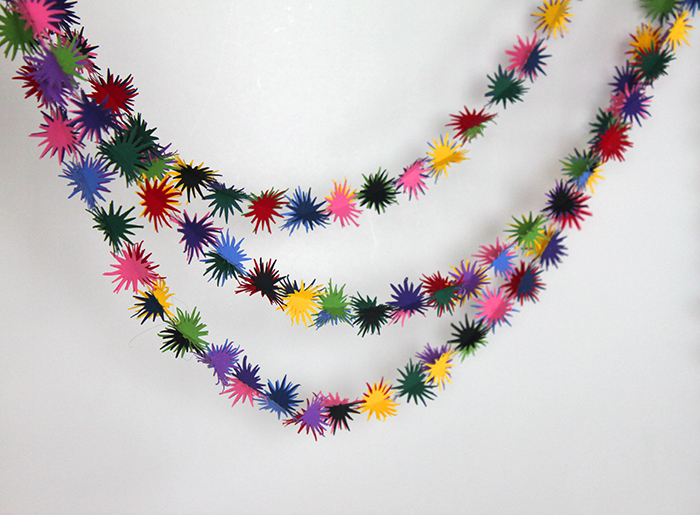
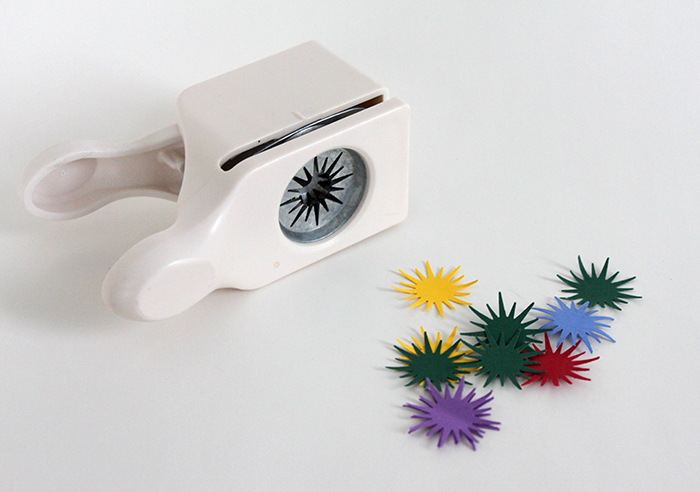
Loryn: This scrapbook paper garland is so easy to make! All you need is a few sheets of paper, a star-shaped punch, glue, and fishing line, nylon thread, or any other white/clear cord to glue your paper to (even dental floss if you’re crafting late at night and grab the first thing you can find!).
The first step is to cut stars out with your punch.
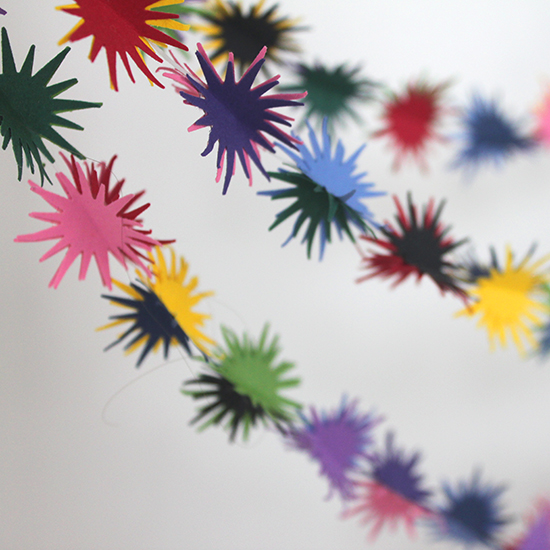
Then fold two in half and glue the halves together. For this garland, I used two pieces of the same color and an accent for each bauble.
Then put your thread or fishing line into the fold and glue the third star onto the first two. That’s it! Just repeat to make the garland as long as you want. I don’t know how many stars I used for this. A lot!
Okay, I am 2 days late with this post, but you will have to forgive me, between class, a major migraine, and a massive snowstorm, I have been a little bogged down.
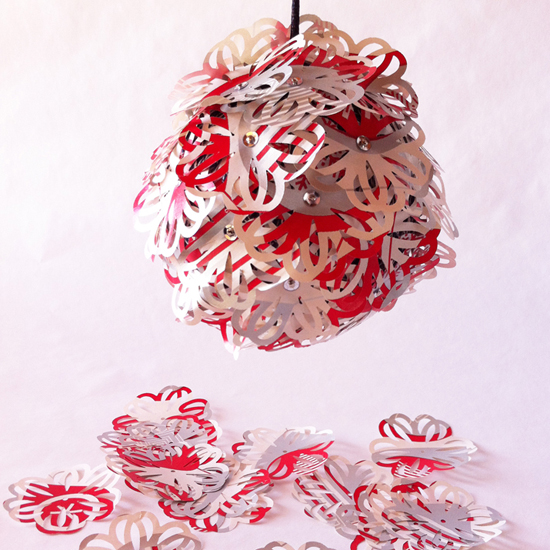
In my last post, I used this wonderful paper punch and I just have not been able to resist using it again. This time, I used gift-wrap for the paper cut-outs. I have discussed before my one-time hobby of making temari balls. I have massive amounts of supplies left over from this hobby and I raid it regularly for other projects. For this project, I nabbed a wrapped ball that I had already made. I use stuffing and wrap it with loads of sewing thread. I was a little more proactive this time and added my hanger before I got started adding the paper punch-outs.
I cut out loads of the paper punch-outs and used beading pins and sequins to attach them to the ball. I started at the bottom of the ball and went around in a spiral adding paper punch-outs as I went around and up the ball.
It is a really easy ornament to make and only took me about a 1/2 hour. This does not include the time it took me years ago to make the thread-wrapped ball, but that only took me about 20 minutes at most. You could also use a foam ball for your base as well.
I am really happy with how the ornament turned out.