Tag Archives: tree

paper circle ornamnet

Christmas Advent 2015 – Day 10 Paper Circle Ornament

Day 10 and I am neck deep in crafting supplies. My house is truly a disaster. Maybe my final advent  picture should be of the absolute mess I have made.

Today is a very simple and easy ornament you can do with your kids.

Materials:

  • Scrapbook paper
  • Paper cutter (scissors work just fine too)
  • Tacky glue
  • Ribbon

paper circle ornamnet

I cut strips of paper in varying lengths between 4″ and 7″ long and 1/2″ and 1″ wide and in varying colors, then formed circles and glued the edges together. Then I selected the circles I thought looked best together and glued these together making sure the glued edges where on top of each other. Once they were dry, I tied a ribbon to the top, dabbed a bit of glue on the ribbon knot so that it did not come undone and attached a tree hook.

All done!

This one is so easy I felt I needed to pay a cat tax.

kitty picture

My dopey cat wondering why I will not sit still.

Happy Crafting!

Kristin

confetti in glass ball

Christmas Advent – Day 8 Confetti Ball

Day 8 and I went for an easier project today as I am working on two of the future advent projects already. The snowflake confetti I bought has come is so handy throughout this year’s advent and even a small bag of it was a LOT of confetti. I am just now halfway through with the bag.

confetti in glass ball

Materials:

  • Clear glass ornament ball
  • Snowflake confetti
  • Glitter
  • Ribbon
  • Thin wire
  • Jump ring
  • Pliers

I pulled the top off the ornament and filled it full of snowflake confetti and glitter, then put the top back on the ball. I did fold up the arms of the snowflake confetti before I stuffed it inside. I then took the thin wire and made a loop then threaded some pieces of ribbon on it. I then used a jump ring to connect it to the ball. Done!

confetti in glass ball

Placemats and another awesome wreath are in the works. You should see them soon!

Happy Crafting,

Kristin

Three green foam tree ornaments.

Christmas Advent 2015 – Day 3 Foam Tree Ornament

I made it to day 3 of the Christmas countdown! This feels a bit monumental, as we have been absent from craft blogging for so long.

Today, I made little tree ornaments out of foam sheets (Foamies) in various shades of green.

First my materials:

Photo of materials used.
The materials I used to make my foam tree ornament.
  • Small plastic snowflakes
  • Head pins with eyes
  • Jump rings
  • Tiny jingle bells
  • 4 sheets of green Foamie sheets
  • Wire cutters and pliers
  • Pointed yarn darning needle
  • Circle cutter (Thank you Martha Stewert)
  • Superglue (not pictured)

I used my circle cutter to cut out 24 circles of various sizes of green foam from 1″ to 2″ in diameter. I then poked a hole in the center of the plastic snowflakes and the green circles with the darning needle. Using the head pins, I slid on one snowflake, one circle, and another snowflake, twisted a loop and cut the wire. I ended up making 24 of these and then using the jump rings, I strung them together for a total of eight green circles on each ornament. I attached a single jingle bell to the last foam circle with a jump ring to add a little fun and noise.

Lastly, I cut three more circles at 1 1/2″ diameter and cut them in half. I glued these into cones with superglue and then slid another snowflake on a headpin, then poked the headpin through the bottom of the cone, made a loop at the top of the cone and attached an ornament hook. I used another jump ring to attach the cone to the rest of the tree ornament and Voila! I was finished.

Green foam tree ornament.
Pretty green tree ornament.

I am very happy with how these turned out. My one recommendation is to use a circle cutter as cutting these out by hand makes them look very lopsided and wrong. The circle cutter makes them perfect and even.

Three green foam tree ornaments.
Just as easy to make three as it is to make one!

Happy Crafting,

Kristin

Christmas Ornament Advent Countdown

20131207-115213.jpg

20131207-115229.jpg

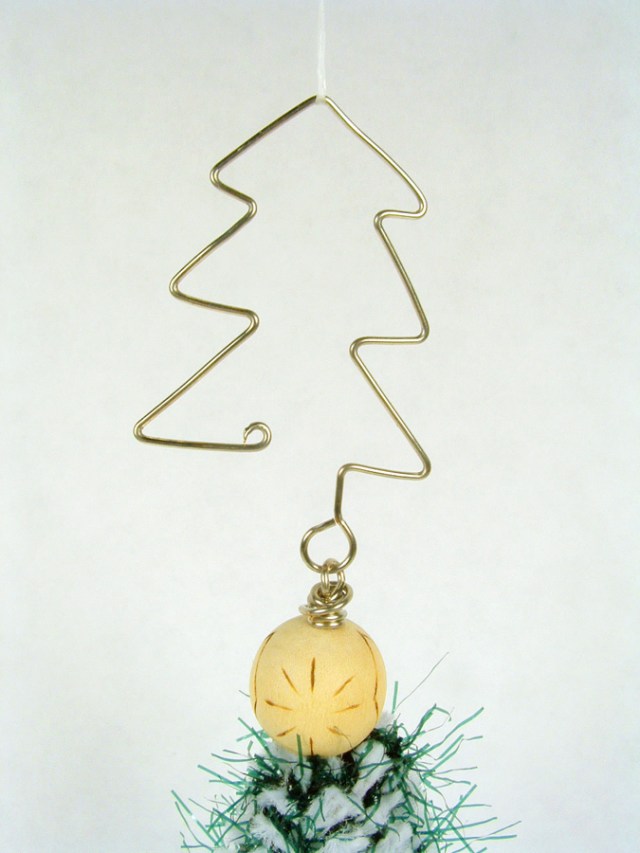
Lynne : This is my second ornament for our 2013 countdown. I am in love with trees right now and have been drawing them over and over so it seemed natural to find an ornament that looked like a tree. I was browsing through google images and I found this article from Just Something I Made by Cathe Holden about how to make bottle brush trees. Since I do not have much need for bottle brushes any more I was delighted to find that she uses rope and wire for her trees and shapes them with scissors. And as a bonus I could use my Copic airbrush system to color the trees.

Cathe Holden website:
Just Something I Made by Cathe Holden

Here is the tutorial:
Handmade Colorful Bottle Brush Trees

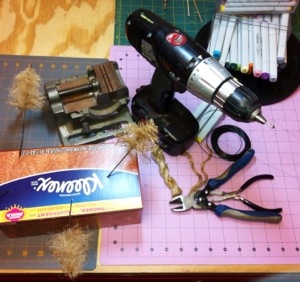
You will need these things:
Wire
Wire cutters
Rope (sisal, jute, or any twisted fiber)
Drill
Hook (shaped from a wire coat hanger or from a small S-hook)
Vise (or something that will hold the wires securely when twisting them with the drill)
Pliers
Copic airbrush (optional)

20131207-114727.jpg

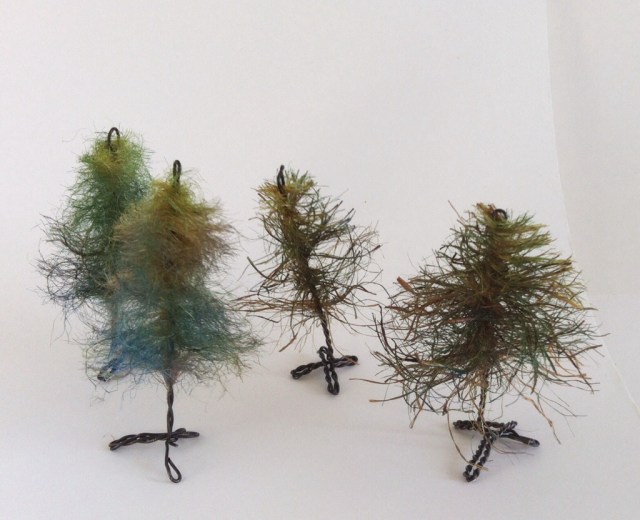
I already had some jute, but when I untwisted the fibers I thought they were too fuzzy and too fragile. I made a trip to the hardware store and found some thick rope that is used on farms. (I remember swinging on the hay ropes as a child. When my grandparents weren’t looking of course.) I cut my rope into lengths of 3 to 4 inches and then began to untwist the fibers. When I had an amount that looked like it would make a full Christmas tree I laid the fiber between the wires as described in the tutorial. It is so nice that you can make two at once by cutting on the diagonal.

I didn’t have a wire coat hanger to make into a hook for the drill because I don’t like the sound they make rattling in the closet. So I took an S-hook and straightened one end so that it would fit into the drill. You can see it in the drill in the photo. I put the wire ends in my vise and inserted the hook in the top of the wire and the wire began to spiral just like it was supposed to. I noticed that the fiber also tangles and you do need to spend some time straightening and combing the fibers to approximate the shape of your tree. Then I used small scissors to cut the final shape. It’s best to do this over something you can throw away because the fibers are very small and sticklish.

When I had the shape I wanted I looked for something to hold them while I spray painted them and found an empty Kleenex box. The wires poked in easily and the setup worked, but I think I’d rather have had a piece of styrofoam. I’m sure we’ll have some after unwrapping presents and I intend to save a piece for a painting stand.

To color the trees I used mostly blues and yellows and finished with a dark green. I start with the lightest yellow and spray the whole tree. Then I concentrate yellow on the ends of the branches using what yellows look good on the fibers. I then use blues from the lightest to the darkest making sure that the lightest yellows remain as free as possible of the blues. The yellows and blues make a lovely variety of shades of green as they are sprayed one on top of the other. I use a dark green to deepen the shadows between the branches to create more depth in the tree. I touch up the yellow and the tree is almost done.

I bent the stem wire with pliers into an X-shape for the bases, but you could use cork or wood or just about anything for a base.

These trees look so good and once you have everything laid out, they work up very quickly. I hope you have as much fun making them as I did.

Christmas tree ornament made of chenille pipe cleaners.

Ornament Advent: Day 19 Chenille Tree

I knew from the beginning that I would just have to make a tree ornament for this Christmas advent. I have had one in mind, but I had no idea to execute it. I watched Loryn’s and Cheri’s tree ornaments get posted and loved each of them. My goal was to keep the ornament very simple and easy to make. This whole ornament probably took me about 30 minutes and I was Google Talking (can I use that that way?) with Mom which slows me down as we each share what we are project we are working on.

Christmas tree ornament made of chenille pipe cleaners.

I used chenille pipe cleaners, cut in half, then wrapped candy cane style for the form of my tree. I know I keep mentioning temari lately, but I have a ton of supplies leftover and so I used some really cool fuzzy green thread from my temari stash to wrap around the chenille pipe cleaners. I really liked how the fuzzy thread looks like the needles on a pine tree. I tied the ends of the thread and glued my knots to ensure that they wouldn’t come loose.

Christmas tree ornament made of pipe cleaners.

I grabbed all the thread wrapped pipe cleaners in one group. ran some silver wire down the middle, and approximately 1″ in on the pipe cleaners, wrapped the silver wire around the group to hold it together. Then I bent all the wires down over the silver wrapping so that just the wire stuck out the top. I used this bit of wire to string the wooden star bead and make the loop for the hanger. At this point, it you didn’t put the hanger on the ornament, it actually looks really cool just as a decoration for your table, although I would recommend putting something under it as the pipe cleaners are a bit scratchy.

Ornament hook made to look like a Christmas tree.

I love the hanger I made for this ornament. Whoever said that you needed to have plain hooks for your ornaments? I made the hanger out of more silver wire, just bending it into shape and curling the end so you didn’t poke yourself with it.

Ornament hook made of wire to look like a Christmas tree.

Happy crafting!

Kristin

Felt Christmas Tree ornament

Ornament Advent: Day 7 Felt Tree and Wreath

Today’s ornament was a massive lesson in frustration. Or rather, the ornament that you don’t see was. My original idea for an ornament failed spectacularly. My craft table is covered with parts, bits, and pieces. Around 10:00pm I realized that it was never going to work. Then began the frantic search. I dug through all of my supplies in the hope for a lightning strike. I didn’t get one until I was texting my sister that I was ready to give up. Right after I hit send, it hit me.

Felt Christmas Tree ornament

I love felt and I had a lot of fun last year with the pins and sequins ornament I made, so why not combine the two. The base of this ornament is a ball I made for temari. Temari is a Japanese art form that I played with a few years ago and kept all my supplies (go figure). You make the ball by taking a very large handful of stuffing and wrapping it with thread (one way to make the ball anyway). A lot of thread. You keep winding the thread around and around and around the stuffing until you get a round ball. This particular ball was my attempt to create a flattened ball to showcase a design on the front and back. I never did get around to completing the temari, but it gave me an excellent form to create my Christmas ornament.

Felt wreath side of the ornament

Next, I cut strips of felt around 1/2″ to 3/4″ wide and started cutting these strips into triangle pieces. Then I took my piles of pins and sequins and pinned the triangles to the ball to make the images of the wreath and tree. I used some fuzzy white thread to make a sort of frame to separate the two images by sewing it around and around the ball. I made a quick hook and voila! I was finished.

Side view of Christmas ornament
Here you can see the fuzzy white thread.

I really like the effect of the multiple colors of green for the Christmas tree and the stars in the wreath really make it pop. You could use anything for the form of the ornament, Styrofoam would be very easy. I imagine a Santa Claus/reindeer ornament would be very cute. Anyone want to try it? Send us your picture and we will post it! I would love to see someone else’s version.

Christmas tree side of ornament

Just goes to show that necessity really is the mother of invention.

Happy Crafting!

Kristin

Bird Paper Mache Tree Crafty Sisters Challenge

Crafty Challenge 7: Paper Mache Tree with Nesting Bird

Bird Paper Mache Tree Crafty Sisters Challenge
Bird nesting in a tree.

Cheri: I find it really interesting that every project we do, I always think that it is the best one yet, but this project was one of the best. I like working with paper. It has endless possibilities and can be made into practically anything. I knew I wanted to make a tree with a nest and a bird, as this is a theme that I have been exploring lately.

To begin, I made a base for the tree with paper covered wire. To make the base, I cut about nine lengths of wire around 9 inches long. I took a longer piece of wire and wrapped it around the base and slowly coiled my way up the tree. I left some of the wire sticking out of the bottom to make the roots and some sticking out of the top to make the limbs.

I then took some pages from an old book, (Gone with the Wind), and ripped them into strips. I  paper-mached the strips onto the tree, the bird and the branches.

For the nest, I cut very thin slices of paper and formed them with glue using the bottom of a small bowl as a form. I let it dry and when I took  it out it looked amazingly like a real nest. At this point I was not really sure if I wanted to paint it or not, but after talking it over with my son, Justin, we felt that it would look nice if I did a light watercolor wash on it. This really made the text pop and was just the right touch.

I was very pleased with how it looked when it was completed and it really came out how I wanted it to look. And somehow it seems fitting to turn paper back into a tree.

Paper Mache Tree Crafty Sisters Challenge
Tree with nest removed.
Paper Mache Bird Nest Crafty Sisters Challenge
Close up of nest and bird.
Paper Mache Bird Tree Crafty Sisters Challenge
Another view.
Paper Mache Bird Nest Tree Wire Crafty Sisters Challenge
Nesting bird and tree.