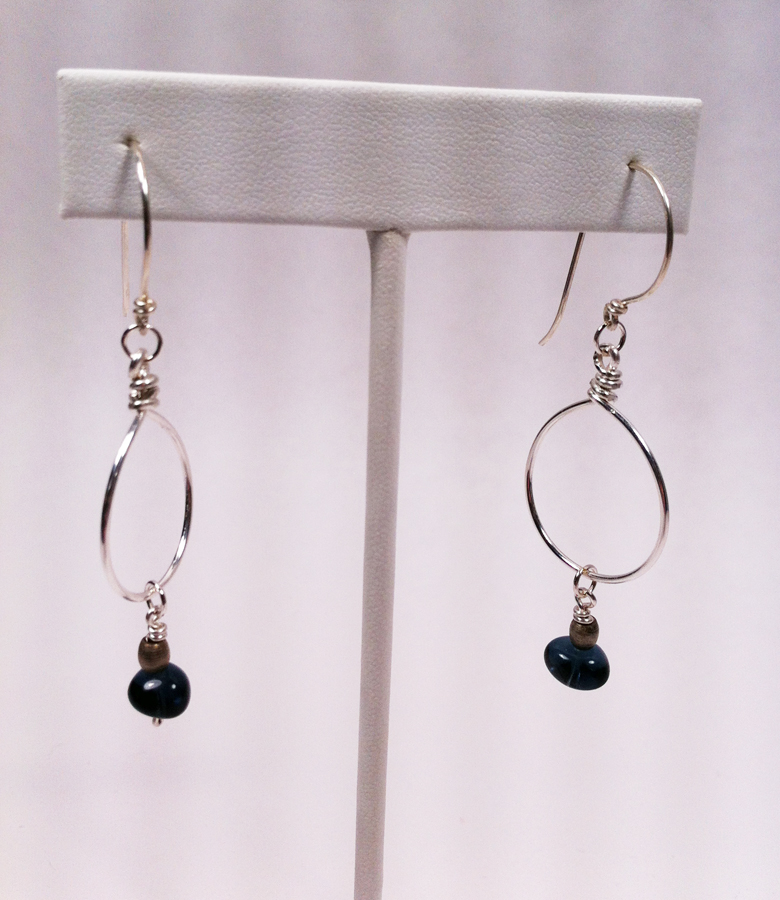
I love matching earring and necklace sets. As far as I am concerned, you can never have too many.
I made the following earrings and necklace out of sterling silver for the earwires, wire hoops, and necklace hook, blue glass and zinc tube beads for the drops of the earrings, blue coral, blue glass, zinc tube beads and white seed beads for the necklace.
You cannot see it, as it is the back of the necklace, but I used a small length of sterling silver chain to make the necklace a variable length. I wear a LOT of blue and wanted to be able to wear this with many different styles of shirt.
I had to make a necklace and earring set for myself for Christmas this year. I realized that I do not have any holiday jewelry and that just seemed to be a very strange oversight on my part. So, here are my Christmas ball earrings and tree pendant. I am really happy with how they turned out. I did a happy dance!
I used sterling silver 18 gauge wire for the tree and ball shapes, 26 gauge for the garlands, and 21 gauge for the ear wires. I have some really pretty glass red florets, glass green diamond shapes, and silver delicas that I used to make the garlands.
The pendant was a lot of fun to make. I just used a pair of flat-nose pliers to make the shape, bending it until I liked the general style.
I just love the Christmas ball earrings. I did hammer the 18-gauge wire after I made the ball shapes.
I am so happy with how these turned out and will be wearing them to work tomorrow (probably every other day until Christmas too).
Lynne : This is my second ornament for our 2013 countdown. I am in love with trees right now and have been drawing them over and over so it seemed natural to find an ornament that looked like a tree. I was browsing through google images and I found this article from Just Something I Made by Cathe Holden about how to make bottle brush trees. Since I do not have much need for bottle brushes any more I was delighted to find that she uses rope and wire for her trees and shapes them with scissors. And as a bonus I could use my Copic airbrush system to color the trees.
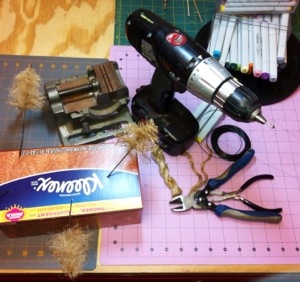
You will need these things:
Wire
Wire cutters
Rope (sisal, jute, or any twisted fiber)
Drill
Hook (shaped from a wire coat hanger or from a small S-hook)
Vise (or something that will hold the wires securely when twisting them with the drill)
Pliers
Copic airbrush (optional)
I already had some jute, but when I untwisted the fibers I thought they were too fuzzy and too fragile. I made a trip to the hardware store and found some thick rope that is used on farms. (I remember swinging on the hay ropes as a child. When my grandparents weren’t looking of course.) I cut my rope into lengths of 3 to 4 inches and then began to untwist the fibers. When I had an amount that looked like it would make a full Christmas tree I laid the fiber between the wires as described in the tutorial. It is so nice that you can make two at once by cutting on the diagonal.
I didn’t have a wire coat hanger to make into a hook for the drill because I don’t like the sound they make rattling in the closet. So I took an S-hook and straightened one end so that it would fit into the drill. You can see it in the drill in the photo. I put the wire ends in my vise and inserted the hook in the top of the wire and the wire began to spiral just like it was supposed to. I noticed that the fiber also tangles and you do need to spend some time straightening and combing the fibers to approximate the shape of your tree. Then I used small scissors to cut the final shape. It’s best to do this over something you can throw away because the fibers are very small and sticklish.
When I had the shape I wanted I looked for something to hold them while I spray painted them and found an empty Kleenex box. The wires poked in easily and the setup worked, but I think I’d rather have had a piece of styrofoam. I’m sure we’ll have some after unwrapping presents and I intend to save a piece for a painting stand.
To color the trees I used mostly blues and yellows and finished with a dark green. I start with the lightest yellow and spray the whole tree. Then I concentrate yellow on the ends of the branches using what yellows look good on the fibers. I then use blues from the lightest to the darkest making sure that the lightest yellows remain as free as possible of the blues. The yellows and blues make a lovely variety of shades of green as they are sprayed one on top of the other. I use a dark green to deepen the shadows between the branches to create more depth in the tree. I touch up the yellow and the tree is almost done.
I bent the stem wire with pliers into an X-shape for the bases, but you could use cork or wood or just about anything for a base.
These trees look so good and once you have everything laid out, they work up very quickly. I hope you have as much fun making them as I did.
Hammered copper necklace with verdigris patina.Hammered copper pendant necklace.
Cheri: It felt so good to get back to a challenge after our winter hiatus. And this challenge couldn’t have been better. I think we were all a little excited and a bit apprehensive when this project was initiated. After playing with the copper for awhile, knew whatever I made, it would most likely be jewelry. This is when I let the metal do the talking. I had a ball peen hammer and a small vice with a flat edge and I went to town banging on some copper. I was pleasantly surprised with how pretty the copper became after being hammered. Metal can lose what small elasticity it has in it after it has been work-hardened so I really wanted to make sure that I did not overdo the hammering or it would become brittle. After I had mastered the shape I wanted, I decided to do some research on adding a patina. I came across an article that said I could add blue to the copper by suspending the piece over a bowl of ammonia in a closed container. This was super easy, just be careful with the odor, it can be a bit overwhelming. The patina on my piece took about 12 hours to achieve and I think it came out pretty nice.
Hammered copper rings with button-hole style closure-clasp.
I punched holes with a hole punch and used copper wire to embellish the pendant and make the chain. I also hammered the copper wire to give it a rustic look. The rings were made by hammering a small strip of copper and then coiling it around a mandrel. I put two holes in the upper end and two holes in the under part. This had a button hole effect when I used a bead to bring the two pieces together and basically tied them with brass wire.
The copper turned out to be an awesome material to work with and I look forward to making many more pieces.
New and interesting shapes for ear wires are very popular lately. My favorites are the almond-shaped ear wires.These have been featured all over the web and television. The first time I really noticed them was on Emily Deschanel in the television series “Bones.” They are elegant and fun and are actually very easy to make.
For demonstration purposes and because it photographs a little easier, I made these ear wires out of heavier 18 gauge sterling silver half-hard wire. I usually use lighter 21 gauge sterling silver half-hard wire, but I wanted something that would be very visible in the photos.
Bend the wire to 90º.
Using flat nose pliers (although you can use the rosary pliers for the whole project if you prefer) I bent the wire at 3/4″ to a 90º angle.
Wrap a loop with the rosary pliers.
Then I used rosary pliers (also called round-nose pliers) to make a loop by placing the pliers above the bend on the short wire and wrapping it around the nose of the pliers.
Finish wrapping the short end of the wire around the stem.
Holding onto the loop with the rosary pliers, I use the flat nose pliers to twist the short end of the wire around the stem (below the loop). By having only 3/4″ of wire for the loop, there is no wire to trim and you are good to continue on to the next step.
Wrap the wire around a mandrel or other object approximately 1" in diameter.
Here I used a mandrel that my father made me for Christmas a few years ago (Aren’t fathers wonderful?). The widest end of the mandrel is 1″ in diameter and the thinnest end is 1/2″ in diameter. For these ear wires, I wrapped around the widest point of my mandrel at 1″. I just made one wrap around the mandrel and as the wire is half-hard, it stretches back out to an incomplete circle when I let it go as shown in the photo below.
Wire just removed from the mandrel will stretch out to form an incomplete circle.Here is the finished view of the almond ear wire.
Next, I bend the circle at the half-way point to create the top of the almond and lightly stretch out the two halves to create the full almond shape. I also bend the wire-wrapped loop to hang correctly down from the almond. I then use a small file to smooth the cut made by the wire cutters so it won’t catch in your ear when you put it through.
To show the ear wires in action, I made the matching earrings to a necklace I made from pretty pink glass florets, red pearls and crackled white quartz beads. The pendant is a piece of dyed jasper that I wire wrapped to hang it from the necklace.
I hope this helps you to create your own almond ear wires, or inspires you to create your own new shape entirely!
Cheri: On to Kristin’s gift. Kristin and Lynne went to Lake Michigan several months ago to camp and had a fantastic time. Lynne brought me back some rocks as I am a pretty avid rock lover.
The rocks were really nice and flat and round. I was very intrigued by them because I had just read a tutorial on how to drill rocks on craftgawker and I felt that I really needed to try it out. It was a little touch and go, but I did manage to get holes in several of them.
As I looked at the rocks, I knew that I wanted to make Kristin a necklace. I also wanted to make it a little more personal, so I made a “K” out of wire and then flattened the wire. I looped the initial into the hole with a jump ring. I had a ball chain that I thought looked very nice with the wire and put that on it.
It would also look pretty cool with a thin piece of leather cord. I was really pleased with how it turned out and I think Kristin was really thrilled with it too.
Loryn: I’ve collected handmade Christmas trees for over ten years, ever since Cheri made me one for Christmas. Since then, she’s given me one just about every year, and Kristin has contributed to my collection, too. I’m always amazed at how unique each tree is! The one above is made from chenille pipe cleaners that came from a 1950s chenille tree that was badly damaged. Cheri remade them into my tree and a wreath for Kristin.
Glass Garland Tree
This tall beauty is made from a vintage glass bead garland wrapped on a foam form, then embellished with more vintage glass ornaments.
Felt Tree
This felt tree started my whole collection. Cheri made it from an old army blanket, a brass tube, and a wood scrap. It’s so simple and cute!
Papercraft Tree
A few years ago, Cheri did a bunch of paper sculptures, and she made this little tree out of paper.
Pink Feather Boa Tree
I wore nothing but black throughout my teens and 20s, but when I got into my 30s, I fell for pink in a big way. This crazy feather boa tree is an homage to my love of pink. It’s wrapped around a felt form and decorated with small ornaments pinned into the foam. The white base is an old piece of ironstone of mine that makes a perfect stand for the tree.
Silver Tinsel Tree
This is one of my favorites. Cheri made it the year that we put together a vintage aluminum tree. It had almost a hundred branches in all different sizes, and we drove ourselves crazy assembling it. Her pipecleaner version makes me smile every time I see it.
Kristin's Beaded Tree
Kristin made me this elegant beaded tree. I love how naturalistic the branches look.
Mobile Tree
Here’s Cheri’s Alexander Calder tree. Simple and fun!
Wooden Ornament Picture Tree
I collect wooden ornaments, so Cheri made this great tree to add to my collection. I love how she paired the ornaments with that great paper.
Charlie Brown Tree
Last, but not least is this adorable Charlie Brown tree. She made it from wire, florist’s tape, and a branch from a fake tree. Just a year later, they were all over stores, but none as nice as this one!
I love my Christmas tree collection, and I hope to keep adding to it every year (hint, hint)!