Category Archives: Homemade

finished wreath

Paper Wreath – Color for the Winter Blahs

finished wreath

Good Afternoon!

I hope everyone survived their holidays. I had a lovely month of December, but as some may have noticed, I only made it to December 16th with our advent. I just ran out of energy and time to keep up with the daily projects and make Christmas presents for my family. I still have the projects in my workbook, so you will probably see them at some point in the future.

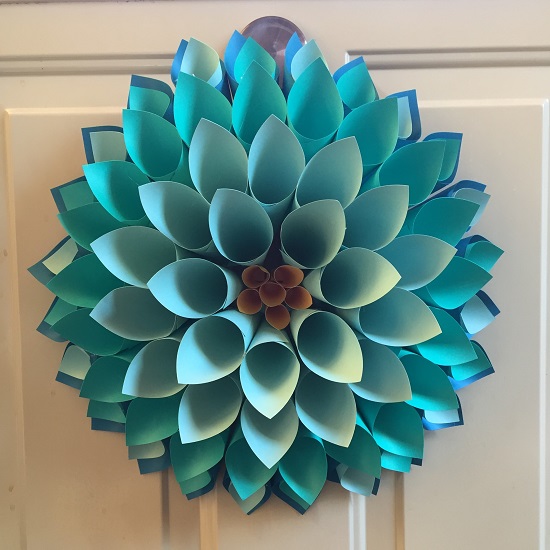
Winter has finally hit our area and we have real snow. I like the white better than the blah of brown and gray, but I really needed a spot of color in my house to brighten up my day, so my new spring wreath was born.

Materials:

  • 6″ cardboard circle
  • wire for the wreath hanger
  • paper cutter
  • scrapbook paper
  • hot glue gun and glue sticks

6 inch cardboard circle

First, cut out your 6″ cardboard circle. My circle cutter only goes up to 5 1/2″ so, I added about a half inch to the outside of the mark and cut there with scissors.

attach wire hanger

Next, use some floral wire to make the hanger, poke it through the cardboard and leave the long ends to be inside the wreath where they won’t be seen.

cutting scrapbook paper into squares

Then, cutting the scrapbook paper. The cones of the flower wreath are made up of 4″ pieces of scrapbook paper. For easy accounting:

  • 24 – 4″ pieces dark color
  • 24 – 4″ pieces medium color
  • 24 – 4″ pieces light color
  • 15 – 3″ pieces medium color (optional)
  • 15 – 3″ pieces light color (optional)
  • 6 – 2″ pieces yellow

This came out to 6 sheets of 8 1/2″ x 11″ each of the dark, medium, and light colors and one sheet of yellow.

roll cones around object to get curve started

It makes rolling the cones much easier if you start the curve before you begin gluing. I took my ring mandrel and wrapped my squares of paper around it to get the curve started. You could use anything for this, a bottle of glue would work, just as an example.

how to roll the cones

Then, you add a little hot glue to one corner of the paper.

hold cone after gluing for a few seconds

Finally, you curl the opposite corner over the glue to make a cone and hold for a few seconds for the glue to set.

Pro for Hot Glue – It dries very quickly

Con for Hot Glue – It is VERY hot and you end up with strings to clean up

I made all of my cones at one time then started attaching them to the wreath. They stack neatly together to save space and it was a lot of fun to quickly put the wreath together after all the prep work.

put glue on very tip of the back side of the cone

For attaching the cones to the cardboard, you want a tiny bit of hot glue on the narrow tip of the cone.

start gluing tips of cones to edge of cardboard circle

Start gluing your cones to the cardboard, keeping the wide ends of the cone touching and the cones perpendicular to the edge of the cardboard. The tips with the glue will not touch each other.

first round of cones in place

Above you can see my first round of the dark color and the mess of hot glue. Don’t worry, no one will see this part once it is finished.

for all further rounds of cones, flatten the bottom of the cone to provide a place for the glue

For the second and all consecutive rings, you will need to flatten the tip of the cone a bit and put the glue on the flat edge. This makes attaching the cone to the cardboard ring much easier.

second round done, starting the third

Above, my second ring of medium color is done and I have started on the third ring with my light color.

third round done

Third ring is done.

fourth round done

Fourth ring in the same light color is done and I am ready to start the yellow ring of the flower center.

yellow center of flower done

With the yellow ring, I ended up having to squeeze a finger through the cone to press the glue down. There is very little space in there for a hand.

3 inch cones glued inside the outer ring of 4 inch cones

This part is optional, but if you did cut the 3″ squares, here is where you glue them inside the 4″ cones. For this wreath, I alternated the light and medium colors and put them inside the outer dark ring color. Using more hot glue, put a dab on the 3″ cone and press to the inside of the 4″ cone.

Finally, there is the clean up of the hot glue strings. This doesn’t take long, but it is definitely a necessary step.

finished wreath

And Voila! A lovely spring wreath to add a pop of color to your home and door.

side view of completed flower wreath

Above you see a side view of the wreath.

red paper cone wreath

Here is the first paper flower wreath I made Tuesday. It is in red tones and I used a 2″ x 12″ strip of yellow paper to make the flower center. I cut a 2″ circle of red paper, glued the yellow spiral to this and then glued it into the center of the flower. I much prefer the look of my new teal version with the center being made of small yellow cones.

Also, you can see in the red toned wreath, I put my 3″ cones in the third ring instead of the first. You can make every wreath different by where you add final touches. You could even put them inside every cone on your wreath and make a really intricate flower.

Have fun and play with color. Let me know how yours turns out!

Happy Crafting,

Kristin

TealCompleted

finished napkins

Christmas Advent 2015 – Day 15 Napkins

As part of my Christmas table decorations, I made some homemade napkins. I consider myself a very amateur sewer. If it involves straight stitches, I can probably do it. These are nice and easy turned out really well.  I am very happy with them. I made them like the tutorial here. The only difference with mine was that I did two rounds of top stitching at the end.

finished napkins

Materials:

  • 14 fat quarters
  • 3 yards of fabric
  • coordinating thread
  • rotary cutter
  • sewing machine
  • pins

Following the tutorial linked above, I ironed all my fabric, cut out my pieces (I cut mine 21″ x 14″), and pinned them right sides together.

fabric all cut out
Fabric all cut with my rotary cutter.
napkins all pinned together
Fabric all pinned together and ready for sewing.

I sewed around each napkin leaving a 3″ space open to turn the napkins right-side out. Next, I cut the corners off, making sure not to cut the seam. After turning the napkins right-side out, I picked out the corners of the napkins with a large darning needle. The chopstick method the tutorial mentions works well too.

sewing topstitching
I did two rounds of top stitching.

I ironed the napkins and then sewed the top-stitching, closing up the hole in the process. I did sew two rounds of top stitching as I like the finished look it gives the napkins.

finished napkin

I did my happy dance when I got my first one finished and had to send a photo to my mother and sister.

finished napkins

I am really happy with the look of all the different colors. Pick your favorite color to use at dinner!

finished napkins in homemade napkin rings

The napkins look great in my homemade napkin rings. In the picture above, you can see the fabric I used for the backside of all the napkins. I wanted something to tie them all together as a set.

Happy Crafting!

Kristin

finished rhinestone covered ornament

Christmas Advent 2015 – Rhinestone Ornament

I previously bought a box of plastic rhinestones with pointed backs for a project that did not work out, so I have re-purposed them as a wonderful Christmas ornament.

Materials:

  • Styrofoam ball (3″)
  • Pointed back rhinestones
  • Superglue
  • Small piece of wire

finished rhinestone covered ornament

To start this project, I made a loop with the small piece of wire and pressed it into the Styrofoam ball and super glued it to provide a place to put the tree hook.

Next, I started pressing in the pointed backs of the rhinestones to form small depressions in the Styrofoam ball. I then placed a drop or two of super glue in the depression and added a rhinestone. I kept working circles around the foam ball to the bottom and I was done.

start of gluing rhinestones to foam ball almost done gluing rhinestones to foam ball

This will look absolutely fabulous on our Christmas tree. The lights will just make it glitter and glow!

Happy Crafting!

Kristin

side view of completed wreath

Christmas Advent 2015 – Day 13 Icicle Wreath

Halfway done now, which means 12 days to Christmas! Start singing!

Years ago, I found in my possession some 12″ plastic icicles with loops on one end. By “some” I mean around 400 of them. I have used a few for my own holiday decorations, but there was no way I was going to use all of them easily. I also had a foam wreath form and I decided to use this and the icicles to make a wreath.

Materials:

  • Icicles (mine are plastic, wood dowels would work as well)
  • Foam circle
  • Silver spray paint
  • Green paint and brush
  • Tacky Glue
  • Hobby lichen in various shades of green
  • Mod Podge Acrylic Spray
  • 12″ piece of heavy wire (about 15 gauge)

finished wreath

First, I pressed the plastic icicles into the outside of wreath form, removed them, dabbed tacky  glue into the hole, and pressed the icicle back into the hole. I did this all around the wreath form alternating so that one was close to the front edge of the wreath and the next was close to the backside edge of the wreath. After this, I left the wreath for a couple of days to make sure the glue was dried really well.

icicles glued into foam circle

icicles glued into foam circle

Then, I covered my outdoor, cheapy, plastic patio table with wax paper and laid out my wreath in preparation for painting. I sprayed the icicles with the silver spray paint. I did a very light coat as I wanted the bubbles in the plastic to show through. I also just wanted to hint at the silver color. Once it was dry, I flipped the wreath over and sprayed the other side.

You should also add the hook for the wreath here. I did mine later and it was much more complicated to add. It would have been so much easier to do it before I started adding the lichen. I bent the heavy gauge wire into a hook and wrapped it around the wreath form with a hook at the top to hang it.

silver spray paint, last coat

silver spray, first coat

Fortunately, we have had some beautiful weather here and spraying outside has been very easy and enjoyable. I did not have to do this in the garage.

Next, I started squeezing on tacky glue and then adding the lichen to the foam wreath form, mixing the colors and styles of lichen that I had. This took several days as I took my time, and again, made sure that the glue had plenty of time to dry. I would gently shake the wreath occasionally to dislodge any loose pieces and add glue and more lichen where needed.

acrylic spray, first coat

Once the glue had dried, I carried my wreath back out to my wax covered table and sprayed Mod Podge Acrylic Spray. This gave a nice top coat and helps to hold the lichen in place.

close-up view of finished wreath

Then, I hung it (I knew it was big, and I was pleasantly surprised to find that it fit on my door, I will be hanging it from my loft later) and took some final photos.

I am still trying to use materials I have in my house and spend as little money as possible on this advent event. The lichen we had was from about 10 years ago when my husband and I made some set pieces for our role playing gaming. We hadn’t used it in years, so I finished it off with this project. Plus, it suits us, our hobby of role playing games and artistic talent all in one wreath! I like it!

side view of completed wreath

Happy Crafting!

Kristin


finished mini tree

Christmas Advent 2015 – Day 12 Mini Christmas Tree

Today I am finally able to post a project I have been working off and on for days. I have been working on four different projects at the same time. I had so much gluing and painting, that while one was drying, I worked on another project.

I am so very happy with how my mini Christmas tree turned out that I did a little dance after the final photo shoot.

Materials:

  • Bamboo skewers
  • Green ribbon in various colors
  • Styrofoam ball
  • Tacky glue
  • Super glue
  • Brown paint and paint brush
  • Fine green grass turf
  • Green felt
  • Mod Podge Acrylic Spray

finished mini tree

I cut up five spools of various green ribbon (I said in a previous post that you would probably see this ribbon again as I had bought too much of it). They are all six yard spools that I bought for $0.50 each at Joanns. I cut 30 pieces in each color in 3″, 4″, and 5″ long strips. I split these between the three trunks of the tree.

I stuck the bamboo skewer in the Styrofoam ball for stability and handling and started tying on ribbons with simple overhand knots. The ribbons are tied on with the longest, 5″, tied at the bottom, then the 4″, and finally the 3″ pieces at the top. I mixed up the colors as I went along.

ribbon being tied onto bamboo skewer

Once I had all the ribbons tied, I pushed them all to the blunt end of the bamboo skewer. I dabbed a bit of super glue to the top ribbon to ensure they would not come off the skewer. I added another drop of super glue to the bottom ribbon so they would not slide down.

Next, I cut the Styrofoam ball in half and tested the appearance with the be-ribboned skewers stuck in the half ball.

trees done, stuck in unfinished styrofoam ball

After a successful test, I knew that I would need some weights added to the bottom to keep it from easily falling over. I grabbed four of my small magnets and drew around them on the underside of the half ball. Then, I cut out the Styrofoam and inserted the weight/magnet. Once I had all four cut out, I glued the weights/magnets into the Styrofoam holes.

styrofoam ball cut in half, cutting holes to insert weights

I painted the trunks (the exposed bamboo skewers) and the Styrofoam half ball brown. When the paint dried, I covered the top of the Styrofoam half ball with watered-down tacky glue and then coated it with the fine green grass turf (this is used for dioramas and small figures and is fine green dust essentially, you can find this easily at Hobby Lobby).

After the glue dried, I lightly brushed the green turf to remove and loose bits. Quite a bit came off, don’t worry, this is normal. I sprayed the turf covered dome with the Mod Podge Acrylic Spray so that no more of the turf would come off of it. The brown paint showed through and looked like real life pine trees where the grass is thinning due to fallen pine needles. (I actually added a little more brown paint after adding the turf as well, as I really liked this effect.)

Then, I cut a piece of the green felt to fit the bottom of the turf dome and using Tacky Glue, glued it to the bottom of the dome. This would keep it from scratching on any surfaces.

Finally, everything was dry and I stuck my be-ribboned skewers back into the turf covered dome and Voila! It was done.

finished mini tree

Happy Crafting!

Kristin

finished pinecones

Christmas Advent 2015 – Day 11 Chenille Pinecones

Day 11! Today I made some pine cones out of chenille pipe cleaners. Specifically, I made them out of chenille bump stems in a lovely light brown color.

Materials:

  • Chenille bump stems (brown)
  • Large wooden beads
  • Felt (brown)
  • Scissors
  • Tacky Glue
  • Superglue

individual layers of pine cone scales

First, I made leaflets with the chenille stems as shown above to create layers of pine cone scales. Next, I glued a bead on the underside of one layer and glued another layer to the bead, as show below, using tacky glue. This can take a little bit of time as you want to let the tacky glue dry really well before you add another layer of leaflets.

how I glued the layers together with a wooden bead

I was working on three at once, so I kept them all in a neat pile with their corresponding beads.

layers glued together and beads I used

I will say that the wooden beads in the middle of the picture worked the best. Made a nice sturdy and pretty pine cone.

felt pieces cut and pasted for top layer of scales

Then, I cut individual scales from the felt to make the tops of the pine cones. I glued these with the tacky glue into sets of three. I put 6-7 of these trios on each pine cone. I put  I also cut 1/4″ x 3/4″ strips of felt in the same color and glued them into rolls to make the stems of the pine cones.

finished pine cones stacked on top of each other

You can see above where I glued the stems to the top of the pine cones and then added the felt leaflets around the stem.

Once everything had dried, I them touched up all the connecting points with super glue to make sure that everything would stay together and form a strong bond. At this point, you could easily add a tree hook to the top and hang them from the tree. That would look really nice. I have another purpose for these that you will see in about a week.

Happy Crafting!

Kristin

paper circle ornamnet

Christmas Advent 2015 – Day 10 Paper Circle Ornament

Day 10 and I am neck deep in crafting supplies. My house is truly a disaster. Maybe my final advent  picture should be of the absolute mess I have made.

Today is a very simple and easy ornament you can do with your kids.

Materials:

  • Scrapbook paper
  • Paper cutter (scissors work just fine too)
  • Tacky glue
  • Ribbon

paper circle ornamnet

I cut strips of paper in varying lengths between 4″ and 7″ long and 1/2″ and 1″ wide and in varying colors, then formed circles and glued the edges together. Then I selected the circles I thought looked best together and glued these together making sure the glued edges where on top of each other. Once they were dry, I tied a ribbon to the top, dabbed a bit of glue on the ribbon knot so that it did not come undone and attached a tree hook.

All done!

This one is so easy I felt I needed to pay a cat tax.

kitty picture

My dopey cat wondering why I will not sit still.

Happy Crafting!

Kristin

crochet garland

Christmas Advent 2015 – Day 9 Crochet Peppermint Garland

I have to apologize for yesterday. I did not manage to get a project posted. Turns out working on 4 different ones at the same time causes some difficulty in getting even one finished.

My project for Wednesday, December 9, is a crochet garland with ribbon woven into it.

Materials:

  • Yarn
  • Ribbon
  • Crochet hook (I used an “H” size)
  • Darning Needle

crochet garland

I used two different yarns, one a very light red with some satiny effect and the other a nice off-white cotton. I crocheted 22′ (yes, really, that does say 22 feet) of double crochet foundation stitch.  The link goes to a really good and detailed demonstration for how to do this stitch. I just did one row of this and then tied off my yarn. Next I measured out 24 feet of narrow ribbon in red and white. I then threaded this onto my darning needle and wove the red ribbon in between my crochet stitches. Once this was done, I wove the white ribbon through, this time in the opposite pattern, as you can see below. I tied off my ribbons and I was done!

crochet garland

With the red and white colors, I got a really great peppermint/candy cane effect and I am really happy with it.

Happy Crafting!

Kristin

confetti in glass ball

Christmas Advent – Day 8 Confetti Ball

Day 8 and I went for an easier project today as I am working on two of the future advent projects already. The snowflake confetti I bought has come is so handy throughout this year’s advent and even a small bag of it was a LOT of confetti. I am just now halfway through with the bag.

confetti in glass ball

Materials:

  • Clear glass ornament ball
  • Snowflake confetti
  • Glitter
  • Ribbon
  • Thin wire
  • Jump ring
  • Pliers

I pulled the top off the ornament and filled it full of snowflake confetti and glitter, then put the top back on the ball. I did fold up the arms of the snowflake confetti before I stuffed it inside. I then took the thin wire and made a loop then threaded some pieces of ribbon on it. I then used a jump ring to connect it to the ball. Done!

confetti in glass ball

Placemats and another awesome wreath are in the works. You should see them soon!

Happy Crafting,

Kristin

napkin rings

Christmas Advent 2015 – Day 7 Napkin Rings

Loryn has been doing lots of entertaining lately and has the most awesome table. It is gigantic and sits our family very well. I decided that for this advent, I would make the table decor for Christmas family dinners. Today I made the napkin rings.

napkin rings

Materials:

  • Scrapbook paper
  • Tacky glue (white glue)
  • Foam sheets
  • Mod Podge
  • Sponge brush
  • Wax paper

I cut strips of scrapbook paper in three different styles to 1 1/2″, 1″, and 1/4″ wide by 7″ long. I used a sponge brush and some watered down tacky glue to glue the papers one on top of the other. I then squeezed these flat between some wax paper and heavy books.

I cut 1 1/2″ by 6″ long strips of the foam sheets and once the paper strips were dry, I used some more watered down tacky glue and the sponge brush to glue them to the foam strips. I again squeezed these flat between my sheets of wax paper and heavy books.

I then trimmed the paper on one end to evenly match up to the foam and left a 1/2″ edge of paper on the other end. I smeared straight tacky glue on the inner side of the leftover edge of paper and a bit on the end of the foam and curled it around the tacky glue bottle (nicely doing double duty here) and glued the ends of the foam/paper strips together, making sure the paper strips lined up, wiping any excess glue away, and ensuring the rings formed good circles.

napkin rings

After the glue was dry, I used another sponge brush and covered the rings with one coat of Mod Podge. I am not too worried about durability and if I need to make more next year, I will gladly do so. This was fun and easy and only took a couple of hours.

I only show five of the rings above as the others were all still drying. I only made a few to start to be sure I liked how they turned out. I also used several colors of foam sheets to add a little more color. (I know the insides of the napkin rings will be hidden by the napkins themselves, but they do spend a lot of time on the table with nothing in them after everyone pulls their napkins out.)

Stay tuned for napkins and other table decorations coming soon!

Happy Crafting,

Kristin