I love matching earring and necklace sets. As far as I am concerned, you can never have too many.
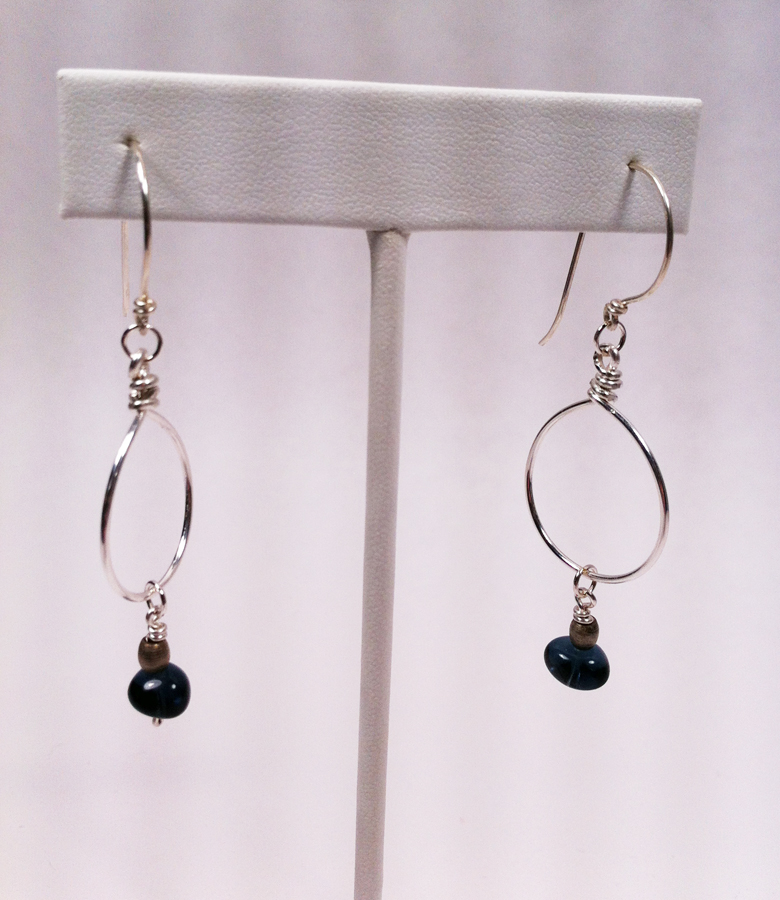
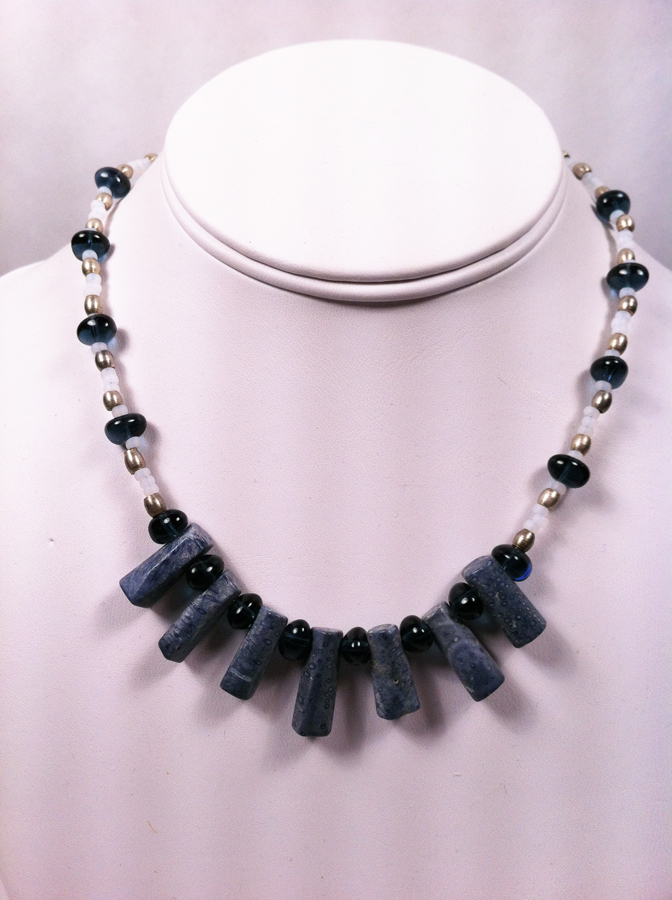
I made the following earrings and necklace out of sterling silver for the earwires, wire hoops, and necklace hook, blue glass and zinc tube beads for the drops of the earrings, blue coral, blue glass, zinc tube beads and white seed beads for the necklace.
You cannot see it, as it is the back of the necklace, but I used a small length of sterling silver chain to make the necklace a variable length. I wear a LOT of blue and wanted to be able to wear this with many different styles of shirt.
I had to make a necklace and earring set for myself for Christmas this year. I realized that I do not have any holiday jewelry and that just seemed to be a very strange oversight on my part. So, here are my Christmas ball earrings and tree pendant. I am really happy with how they turned out. I did a happy dance!
I used sterling silver 18 gauge wire for the tree and ball shapes, 26 gauge for the garlands, and 21 gauge for the ear wires. I have some really pretty glass red florets, glass green diamond shapes, and silver delicas that I used to make the garlands.
The pendant was a lot of fun to make. I just used a pair of flat-nose pliers to make the shape, bending it until I liked the general style.
I just love the Christmas ball earrings. I did hammer the 18-gauge wire after I made the ball shapes.
I am so happy with how these turned out and will be wearing them to work tomorrow (probably every other day until Christmas too).
So some of our Crafty Sisters have been a little distracted lately and it took an extra week to get our projects posted this week. (I cannot complain as it has been me a couple of times who has been distracted.)
Our found item that must be used in our challenge was resistors. Out of the Crafty Sister storage came a canister full of old resistors. We divided them up and got to work.
Resistors just seem to lend themselves towards jewelry and I was inclined to follow. My foremost concern was an interesting pendant.
My entire necklace is made of resistors, even the hook and eye clasp. The wired ends make wire-wrapping a breeze.
This is a very simple necklace to make and only took me about 2 hours. Most of that time was spent messing with the style and shape of the pendant.
I am pleased with how this turned out and will probably wear it from time to time.
I have so many unfinished projects. I was looking through the pile of them with my mother-in-law last weekend and I couldn’t believe how much material I had there. So much of it needed to be cut up completely. However, some of it just needed to be finished. I pulled a few pieces out and am really making an effort to get them finished and here is the first finished project!
The necklace is made with sterling silver for the wraps and clasp, dark blue/teal pearl beads for the front part of the necklace and clear blue cube beads for the back part of the necklace.
I just loved the clear blue cube beads and knew when I bought them that I wanted to wire wrap them in a strand. I started this necklace about 2 years ago and since then, I add another cube bead every now and then, but I was never quite happy with how simplistic the blue cube beads looked by themselves. I bought the blue/teal pearls last year and looked at them a lot with no real idea what to do with them. I started putting them together and just love how the finished necklace turned out! The contrast of the dark pearl with the light blue cubes just pleases me immensely.
Of course, I had to make earrings to go with the necklace. I like making matching sets of jewelry. I really like the trio of pearls below the cube bead. They swing and bounce quite happily when worn.
I also made the clasp. I decided I wanted something with a little more oomph than my standard clasp and made an almond-shaped clasp that had a blue cube bead wrapped in the eye half of the the clasp. I really liked how it turned out and will probably make more clasps like this one in the future.
So, one unfinished project down, an infinite more to go. Mom (Craftysister Lynne) suggested I make a list and cross off my newly finished project, but I said that would just remind me of how many unfinished projects I still have yet to complete.
Hammered copper necklace with verdigris patina.Hammered copper pendant necklace.
Cheri: It felt so good to get back to a challenge after our winter hiatus. And this challenge couldn’t have been better. I think we were all a little excited and a bit apprehensive when this project was initiated. After playing with the copper for awhile, knew whatever I made, it would most likely be jewelry. This is when I let the metal do the talking. I had a ball peen hammer and a small vice with a flat edge and I went to town banging on some copper. I was pleasantly surprised with how pretty the copper became after being hammered. Metal can lose what small elasticity it has in it after it has been work-hardened so I really wanted to make sure that I did not overdo the hammering or it would become brittle. After I had mastered the shape I wanted, I decided to do some research on adding a patina. I came across an article that said I could add blue to the copper by suspending the piece over a bowl of ammonia in a closed container. This was super easy, just be careful with the odor, it can be a bit overwhelming. The patina on my piece took about 12 hours to achieve and I think it came out pretty nice.
Hammered copper rings with button-hole style closure-clasp.
I punched holes with a hole punch and used copper wire to embellish the pendant and make the chain. I also hammered the copper wire to give it a rustic look. The rings were made by hammering a small strip of copper and then coiling it around a mandrel. I put two holes in the upper end and two holes in the under part. This had a button hole effect when I used a bead to bring the two pieces together and basically tied them with brass wire.
The copper turned out to be an awesome material to work with and I look forward to making many more pieces.
After an additional week due to some time constraints, our Copper Crafty Challenge is complete. We had our final reveal among the Crafty Sisters this afternoon, and boy, we really seem to be at the top of our game for this challenge. I cannot wait for you to see all the projects. We are going to post one project a day, so keep coming back!
I waffled quite a bit on this challenge. I make a lot of jewelry and I wasn’t sure if that was where I wanted to go with this particular project. After a week and a half of indecision, I decided, why mess with a good thing, jewelry it would be.
Using a compass I played Spirograph on a copper disc and cut out the star burst pendant. Amazingly, the copper is thin and soft enough that you can cut the discs with heavy duty scissors. I hammered the star on both sides to give it some depth. I then curled the points of the star (I couldn’t see any other way to really blunt the points. Those suckers were sharp!) to keep from puncturing anyone wearing it or snagging your clothes. I attached the light green crystal bead in the middle with wire and did some wire-wrapped crystals (also light green in color) for the dangles at the bottom of the pendant.
The chain is made up of hammered copper ovals and more wire-wrapped crystals. I did make all the jump rings and the clasp out of wire as well. The wire is standard 18 gauge copper wire from the hardware store.
All the hammering was done on an anvil that my dad made me for Christmas several years ago and with a series of hammers that he made for me 2 years ago. I started all the holes with a punching awl then enlarged then with a Dremel tool and a diamond tipped drill bit. I filled all the edges with a mini file to be sure that you wouldn’t slice yourself open on the sharp edges caused by the scissors.
The star-burst was actually the second pendant I made for this necklace. I wasn’t all that happy with the first one I had made. I showed it around and the other Crafty Sisters and my M-I-L (who joined us from my house this week) thought it was great, which just goes to show how hyper-critical I can be about my own work.
This pendant is made of a copper plumbing pipe fitting.
I did make a pair of earrings to go along with the necklace (my usual M.O.) and I think they turned out rather well.
I really like how the hammered ovals came out looking like leaves. The hammering causes the copper to curl a little and I liked the affect so much that I left it and used the same affect in the star-burst pendant.
That is my completed project! It was a fairly easy process all in all and one that I found rather fun (until my arm got tired of all the hammering). I cannot wait for the next challenge. In the meantime, I have promised this necklace to my M-I-L and and am going to take the earrings apart to make a matching bracelet instead as she does not have pierced ears. So, back to my craft table to work on some more copper!
Cheri: On to Kristin’s gift. Kristin and Lynne went to Lake Michigan several months ago to camp and had a fantastic time. Lynne brought me back some rocks as I am a pretty avid rock lover.
The rocks were really nice and flat and round. I was very intrigued by them because I had just read a tutorial on how to drill rocks on craftgawker and I felt that I really needed to try it out. It was a little touch and go, but I did manage to get holes in several of them.
As I looked at the rocks, I knew that I wanted to make Kristin a necklace. I also wanted to make it a little more personal, so I made a “K” out of wire and then flattened the wire. I looped the initial into the hole with a jump ring. I had a ball chain that I thought looked very nice with the wire and put that on it.
It would also look pretty cool with a thin piece of leather cord. I was really pleased with how it turned out and I think Kristin was really thrilled with it too.
-Cheri:Craft challenge 2 was a blast. The $5.00 limit adds an interesting twist to the challenge. But I wasn’t too worried about it. Here in Logansport we have a really cool old hardware store. I think they have some of the same merchandise that they had when they opened maybe 60 odd years ago. I spent a good hour pouring over the store, opening drawers and looking in all the little nooks and crannies.
I had so many ideas I knew I was going to have a hard time congealing them into one piece. I have a tendency to overdo things so I decided I was going to get a few items and work with them for a little bit to see what I could come up with. I picked up a variety pack of O rings, a retaining ring, a spring, a small flange washer and wire. I have spent probably the last 20 years making things with wire so I was pretty sure if all else failed, I would be able to make something with the wire.
I divided the O rings up into sizes and worked with the large ones to see what I could make. I eventually hit upon the idea of twisting the circles to create a centerpiece for a necklace. I made wire links from wrapping the wire around a pencil and cutting them apart, and formed the longer pieces of wire by making a loop on each end. I was thrilled with the outcome and I think that the hardware store may become one of my favorite places to go for jewelry supplies.
The twisted O ring loop supports the two pendant loops.