After much whining (and an exhaustive search), I have realized that however convenient it may be, I just cannot take photos of my projects that I like with my iPhone. Some people may be able to do it, I am just not one of them. I did have to search my house pretty thoroughly for my real camera, it was in hiding. It is fairly old (Fujifilm FinePix), but it still takes good photos. I am much happier with the results for today.
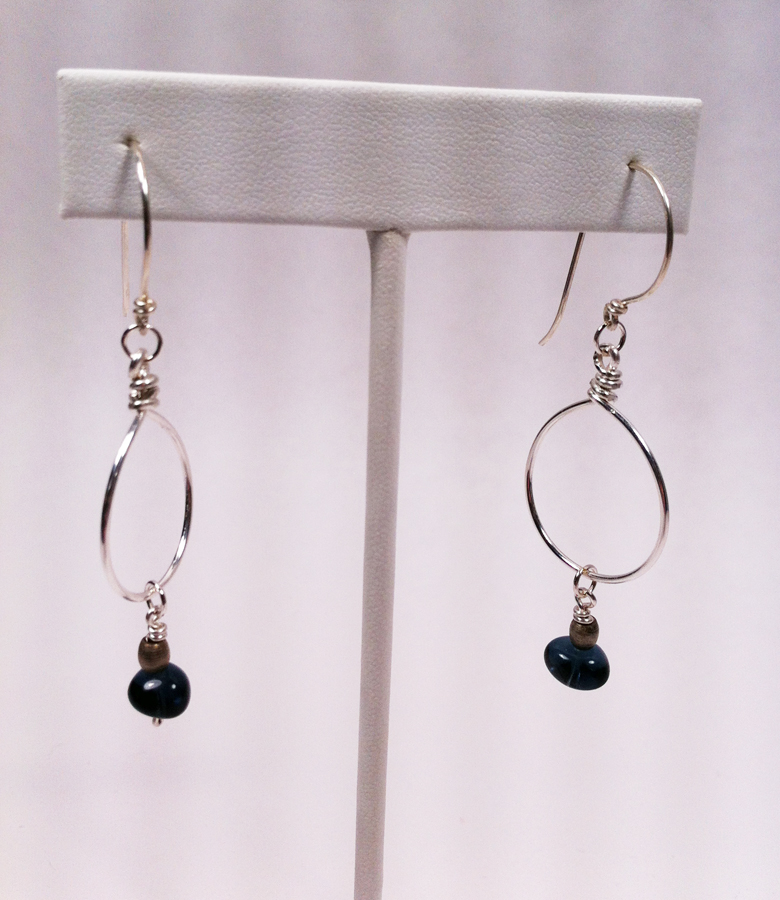
If you have been watching the news, you would have seen the massive cold weather system that tromped all over the Midwest yesterday and the extreme cold that has followed it. Due to this, my place of employment closed for the day and I have had a wonderful day at home, staying out of the cold. After a big breakfast and some lazing around, I made these wonderful hoop earrings with a zigzag in the center.
I am really happy with how these turned out. They are made out of 21 gauge sterling silver wire. I wrapped the hoop around a mandrel to make the main frame of the earrings. Then I used a 4″ piece of the same wire to make the zigzag which is connected to the hoop frame with 26 gauge sterling silver wire. After the zigzag was wrapped to the frame, I used a plastic mallet to harden the hoop and zigzag so that they wouldn’t get bent too easily.
I have been slowly adding to my metalsmithing supplies and have finally reached a point where I am able to make rings (well, almost, I do not have a ring mandrel yet). I made my very first 4mm sterling silver, hammered ring today. As it is my first attempt, I already see many things that I can improve upon, but for a first try, it isn’t half bad, especially since it fit from the beginning. I did not have to make any size adjustments. I will have no qualms about wearing it until I make a better one.
After putting my photo lights to rest, I realized that the inside of the ring could have used some polishing and the outside could have used some additional polishing, but you get the idea.
I have had this idea for a ring for years. It is to be my anniversary ring. I thought that it would be much more fun to make one rather than to buy one. No, this is not it, but it is the first step in my plans. Now, I just have to practice making rings. It is going to be a fun year getting everyone’s ring sizes for Christmas presents next year!
I love matching earring and necklace sets. As far as I am concerned, you can never have too many.
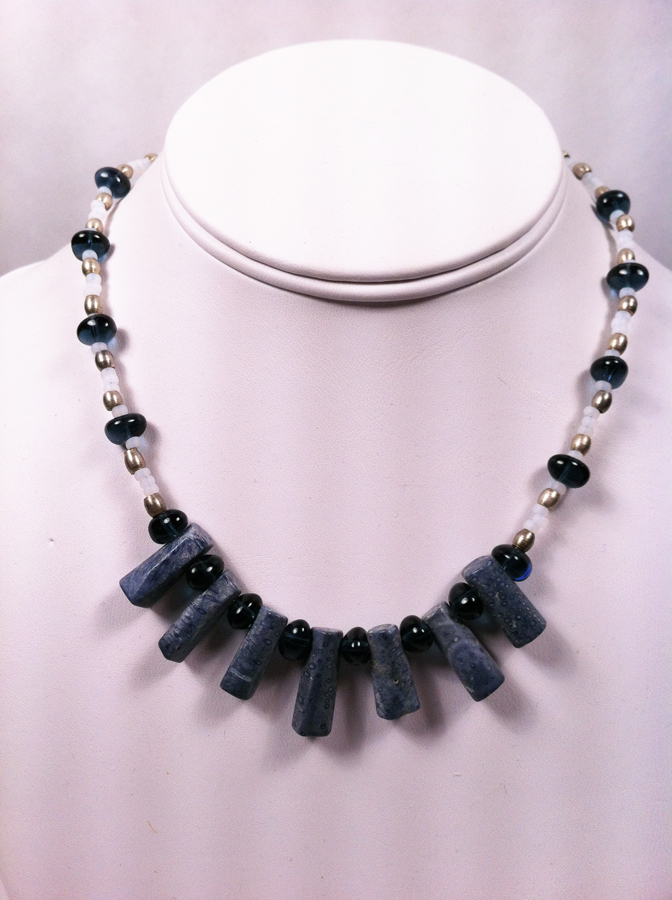
I made the following earrings and necklace out of sterling silver for the earwires, wire hoops, and necklace hook, blue glass and zinc tube beads for the drops of the earrings, blue coral, blue glass, zinc tube beads and white seed beads for the necklace.
You cannot see it, as it is the back of the necklace, but I used a small length of sterling silver chain to make the necklace a variable length. I wear a LOT of blue and wanted to be able to wear this with many different styles of shirt.
I had to make a necklace and earring set for myself for Christmas this year. I realized that I do not have any holiday jewelry and that just seemed to be a very strange oversight on my part. So, here are my Christmas ball earrings and tree pendant. I am really happy with how they turned out. I did a happy dance!
I used sterling silver 18 gauge wire for the tree and ball shapes, 26 gauge for the garlands, and 21 gauge for the ear wires. I have some really pretty glass red florets, glass green diamond shapes, and silver delicas that I used to make the garlands.
The pendant was a lot of fun to make. I just used a pair of flat-nose pliers to make the shape, bending it until I liked the general style.
I just love the Christmas ball earrings. I did hammer the 18-gauge wire after I made the ball shapes.
I am so happy with how these turned out and will be wearing them to work tomorrow (probably every other day until Christmas too).
I have so many unfinished projects. I was looking through the pile of them with my mother-in-law last weekend and I couldn’t believe how much material I had there. So much of it needed to be cut up completely. However, some of it just needed to be finished. I pulled a few pieces out and am really making an effort to get them finished and here is the first finished project!
The necklace is made with sterling silver for the wraps and clasp, dark blue/teal pearl beads for the front part of the necklace and clear blue cube beads for the back part of the necklace.
I just loved the clear blue cube beads and knew when I bought them that I wanted to wire wrap them in a strand. I started this necklace about 2 years ago and since then, I add another cube bead every now and then, but I was never quite happy with how simplistic the blue cube beads looked by themselves. I bought the blue/teal pearls last year and looked at them a lot with no real idea what to do with them. I started putting them together and just love how the finished necklace turned out! The contrast of the dark pearl with the light blue cubes just pleases me immensely.
Of course, I had to make earrings to go with the necklace. I like making matching sets of jewelry. I really like the trio of pearls below the cube bead. They swing and bounce quite happily when worn.
I also made the clasp. I decided I wanted something with a little more oomph than my standard clasp and made an almond-shaped clasp that had a blue cube bead wrapped in the eye half of the the clasp. I really liked how it turned out and will probably make more clasps like this one in the future.
So, one unfinished project down, an infinite more to go. Mom (Craftysister Lynne) suggested I make a list and cross off my newly finished project, but I said that would just remind me of how many unfinished projects I still have yet to complete.
New and interesting shapes for ear wires are very popular lately. My favorites are the almond-shaped ear wires.These have been featured all over the web and television. The first time I really noticed them was on Emily Deschanel in the television series “Bones.” They are elegant and fun and are actually very easy to make.
For demonstration purposes and because it photographs a little easier, I made these ear wires out of heavier 18 gauge sterling silver half-hard wire. I usually use lighter 21 gauge sterling silver half-hard wire, but I wanted something that would be very visible in the photos.
Bend the wire to 90º.
Using flat nose pliers (although you can use the rosary pliers for the whole project if you prefer) I bent the wire at 3/4″ to a 90º angle.
Wrap a loop with the rosary pliers.
Then I used rosary pliers (also called round-nose pliers) to make a loop by placing the pliers above the bend on the short wire and wrapping it around the nose of the pliers.
Finish wrapping the short end of the wire around the stem.
Holding onto the loop with the rosary pliers, I use the flat nose pliers to twist the short end of the wire around the stem (below the loop). By having only 3/4″ of wire for the loop, there is no wire to trim and you are good to continue on to the next step.
Wrap the wire around a mandrel or other object approximately 1" in diameter.
Here I used a mandrel that my father made me for Christmas a few years ago (Aren’t fathers wonderful?). The widest end of the mandrel is 1″ in diameter and the thinnest end is 1/2″ in diameter. For these ear wires, I wrapped around the widest point of my mandrel at 1″. I just made one wrap around the mandrel and as the wire is half-hard, it stretches back out to an incomplete circle when I let it go as shown in the photo below.
Wire just removed from the mandrel will stretch out to form an incomplete circle.Here is the finished view of the almond ear wire.
Next, I bend the circle at the half-way point to create the top of the almond and lightly stretch out the two halves to create the full almond shape. I also bend the wire-wrapped loop to hang correctly down from the almond. I then use a small file to smooth the cut made by the wire cutters so it won’t catch in your ear when you put it through.
To show the ear wires in action, I made the matching earrings to a necklace I made from pretty pink glass florets, red pearls and crackled white quartz beads. The pendant is a piece of dyed jasper that I wire wrapped to hang it from the necklace.
I hope this helps you to create your own almond ear wires, or inspires you to create your own new shape entirely!