Tag Archives: crafty challenge

Purse Project

bag 021713 003Purse project

Cheri-Okay, I do have to admit, it was hard. It was really hard to try to top the purse I made last year. It may not be as nice, but it does fill my needs.

Supplies

Sewing machine

2 belts-khaki

pillow sham

fabric

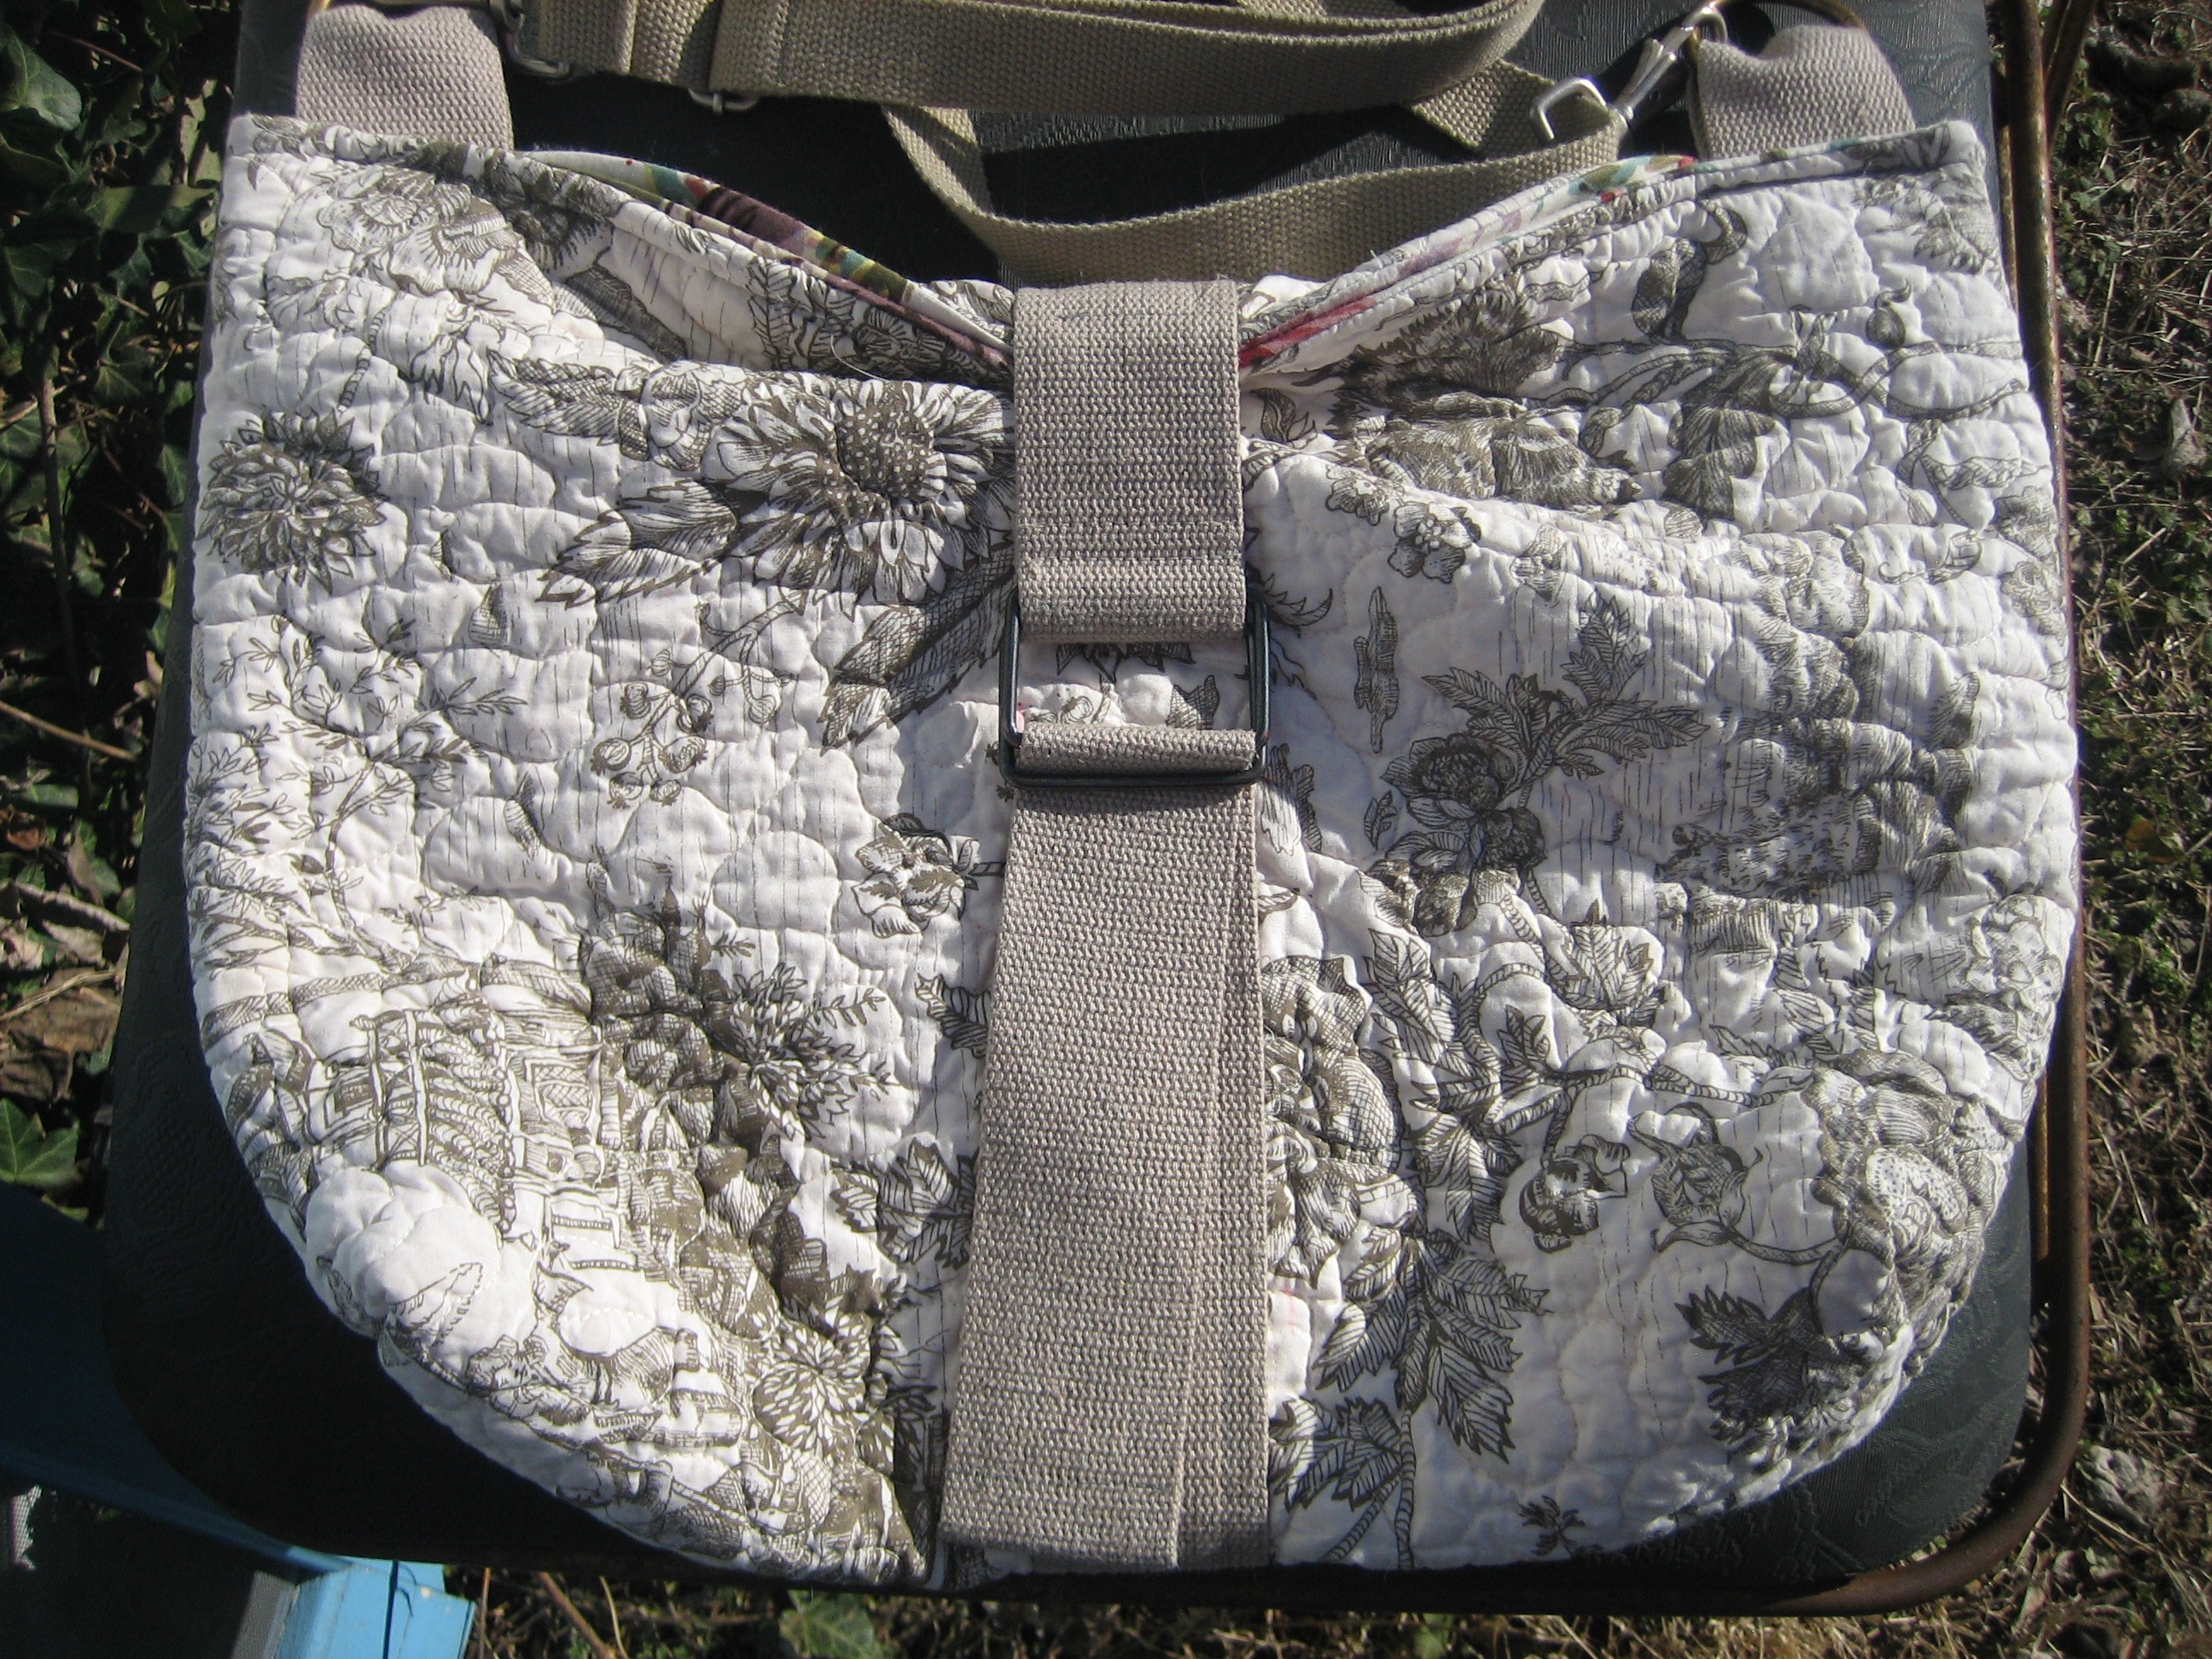
Pillow shams make great purses. The shams are often quilted and they are normally the right size.

Wash and dry the sham, and lay out flat. Cut off the back fabric and lay a coordinating fabric on top. Cut the fabric to fit. Put the fabric and sham right side to right side and sew around the entire sham leaving a small opening so you can turn it right side out.

After you have turned it right side out, put the fabric together again with the right sides together. Sew up each side to make a sack. You could make a tote by just adding handles at this point, but I like to make my bag a bit more interesting.

When I am at sales I have a tendency to pick up webbed belts. Not only is the hardware handy but I like to use the fabric on purses. I took a belt that was wide and sewed it all around the purse. I used the clasp part for the purse closure. I also used what I had cut off to make loops to hold the handle.

In the end I am really pleased with the finished product. I would like to make an organizer to put inside of it. This would make it even more functional.

bag 021713 004

Headwarmer challenge

Hat from a sweater.

Supplies:

Sweater- I found a beautiful wool sweater at Goodwill for under $2.00. Stripes make measuring easier

Scissors

Ruler

Sewing machine

Embroidery needle and floss

Lay out the sweater and cut all the seams. This will give you a good idea of how much fabric you have to work with. Fold the fabric over in to an inside out rectangle. Sew along the top and the back. This will give you a tube that is closed at one end.

Turn right side out and grab the two corners at the top of the hat. Sew through the triangles created and then tie your thread very tight. This will give you some very cute kitty ears.

Turn up the hem and tack in several places with needle and embroidery floss. I made several knots all the way around.

Flowers

Place a cup on the wrong side of the fabric and mark with a marker. Cut out the circles. Embroider a running stitch around the outside of the circle. Gather it up, this makes a yo-yo. Run a stitch around the outside of the yo-yo and pull tight to make the flower petals. Do this 8 times or the number of petals you would like. Sew a button in the center to make a center.

Attach the flowers evenly around the outside of the hat.

And there you go, a beautiful, unique and very warm hat that any little kitty/flower girl would love.

hat 009

Completed hat

hat 006

Close up of flowers


Ornament Advent Day 6: Sunday Comics Christmas Ball

christmascomicsornamnet6

Cheri: I love comics, funnies, and cartoons. And I really love using comics for craft projects. This one is a favorite of mine. I hope you like it.

Supplies:

Sunday Funnies

Circle template (cup, glass, anything circular and in whatever size you would like, my circles were about 2 ½ inches in diameter).

Glue (any kind is fine).

Cardstock, (just a small circle is needed).

6 inches of ribbon

Instructions:

Fold the Sunday paper up so you can cut as many circles at once as possible. Then cut all of the circles in half. When you roll the paper, you want the circular edge to be the outer rim of the cone. Make about 45 cones and lay them aside.

Cut a smaller circle from the cardstock, this is just for a base to glue to.

Lay your cones around the cardstock circle, with the points touching, when you like how it looks, put a small amount of glue on each one and glue down. Place the next row of cones, try to put these in the little valleys created by the first row. You will be using a few less. Finally, glue one straight into the center, there should be a small spot for it. Do the same on the other side of the circle of cardstock.

Look at your ornament, and if you notice any thin spots just glue another cone into the spot. If you would like, you can glue more cones inside of the first cones. This gives the ornament a rose bud look.

What a fun project to make with the funnies, just make sure you read them first.

Merry Christmas

funnypapercones


christmascomicsornamnetgawker4


Day two “Ornament Advent Countdown”.

Cheri-December 12, 2012. Day two of “The Crafty Sisters Advent Ornaments“.
Snowflake ornament made with Tinker Toys

This is a super simple ornament to make and it really is pretty neat. It may not make the best ornament as it is a little large but it would be a great tree topper or a wall hanging.

All you need to do is get some Tinker Toys and pegs. I found some orphaned ones at a garage sale last summer and decided to give them a new life.

The design fell in to place pretty easily and then, I just hot glued the pieces together.

The hard part for me was the painting. Spray paint seemed to be the best way to go, but the paint soaked right in to the Tinker Toys. After several coats (and a patchy finish), eventually I finished painting it with acrylic paint and glittered it.

This was a fun project and the possibilities are endless.

Merry Christmas-Cheri

snowflake12212 009


tinkertoyornamentgawker

Wreath of copper leaves

Crafty Challenge 11: Copper Fall Wreath

Hello Again! I feel like I have been incommunicado for a very long time. All the Crafty Sisters got together last weekend for our latest Crafty Challenge. This challenge was to make a fall wreath.

Wreath of copper leaves
The wreath is 15″ tall and 13″ wide.

Due to everything in our house breaking down all at the same time, I was under a bit of a money crunch so I knew whatever I made, I had to have all the supplies already on hand. It helped that as soon as we started talking about a fall wreath, I was picturing a leaf wreath made of copper. And as some of you might remember, we did that wonderful Copper Crafty Challenge a while back and I still had a lot of the copper discs leftover from the copper necklace I made. The discs are remarkably easy to cut with heavy-duty scissors and I knew that they would make beautiful leaves.

Here you can really see the oily effect that burnishing the leaves created.

So, I started cutting and cutting and cutting. I had some very interesting dimples in my fingers from the force of cutting the copper discs, but I had some amazing maple leaf shapes. I also knew that I wanted to burnish the leaves to create different colors. I pulled out my trusty propane torch and proceeded to burn the crap out of one of the leaves. I learned very quickly that you only wanted to brush the copper leaves with heat very quickly. If you wanted a deeper color, you just kept running the torch over the copper quickly and letting it cool a second and repeat to the color desired. Thankfully, the blackened portions just wipe off and you can burnish again to your hearts content. I then bent the leaves very gently with a pair of pliers to give them some depth.

I did not coat the copper leaves with anything as I really will like the aging effect on the copper.

I made the ring the leaves are attached to as well, the wreath frame that is. I had a length of copper pipe (again left over from the Copper Challenge that I never used) and I ran a wire through the pipe and bent it all in a circle. I used the wire to make a hanger at the top of the frame. It turned out that the length of pipe was not long enough, but as I originally planned to let the pipe show through in some places, I would just make sure the leaves covered the wire parts of the wreath frame. I then used one of my hammers and my anvil to flatten the pipe to make the leaves attach better.

Here you can see the depth of the copper leaves.

I knew that my personal soldering abilities were not good enough to be able to place the leaves exactly where I wanted them so I switched my connecting component to hot glue. This worked out very well and I was able to place the leaves precisely where I wanted each one to go. I then flipped the wreath over and poured hot glue all over the frame where it connected to the leaves. This gave the wreath lots of stability and now absolutely nothing moves.

Photo showing wreath hanging from my loft
This is where I hang my wreathes in the house.

I am so happy with my wreath and it is now hanging in my house and just looks gorgeous. I did have a good laugh at the unveiling though. You will find out when more wreaths are posted! Amazingly, working with all that cut copper, I never did cut myself. This may be the first project in a while that didn’t end with a few bandaged fingers.

Happy Crafting,

Kristin!

Chair Challenge

Cheri- It doesn’t seem to matter how much time we have for a challenge, I seem to always wait until the last minute to complete it.

Over the years, I’ve collected several chairs that need to be painted/redone.  I started with 3 chairs that I’ve had for a while and decided to try a different technique on each one. If I didn’t like how my chair was coming along, I’d move on to a different one.

The camp chair was my third try. It was a garage sale find and was a lot more unique than my other attempts. The bad part of the project, was that the canvas needed to be replaced. For a folding chair, this is a pretty major fix as the chairs stability depends on the canvas seat and the back.

After pulling off the canvas, I was amazed by the wonderful wooden skeleton the chair had. of course now I was faced with the daunting task of showing off the chair without covering it up too much.

After mulling it over in my head for a bit, I decided that something transparent would be best for the back. It just happened that I  picked up some unused medical tubing at another garage sale that would be perfect for the back of the chair. I dremelled about 12 holes on each side of the back. Then I took the tubing and wrapped it around the chair, tacking it in each place that had previously been drilled.

The back of the chair looked great, next came the seat. I first tried to use the tubing again, but the tubing needs to be held tight and this chair folds. I had some leather in my material stash and dug it out. It was a perfect fit to replace the canvas seat of the chair.

It needs a few more tweaks, but the finished product came out pretty cool.


Photo of a garage stuffed to the rafters.

Crafty Challenge 9: Chair Repair

Photo of a garage stuffed to the rafters.

Every single one of the Crafty Sisters has at least one chair in their house or in storage that is in desperate need of a repair/makeover. This challenge is all about getting one chair checked off our projects to complete list.

This time, part of the challenge is to document the whole process for you, our readers. You will get to see the befores and afters, as well as the steps we took (and possible failures we had to overcome) to complete the challenge.

Because this is a bit more time consuming than some of our other challenges, we are giving ourselves three weeks to finish this Crafty Challenge. We have until June 23rd to complete our Chair Repair Challenge!

All the Crafty Sisters have a storage space that looks like the photo above. Finding only one chair that needs to be repaired and made over is the hard part, so wish us luck!

Begin!

Happy Crafting,

Kristin

Pendant made of resistors.

Crafty Challenge 8: Resistor Necklace and Pendant

So some of our Crafty Sisters have been a little distracted lately and it took an extra week to get our projects posted this week. (I cannot complain as it has been me a couple of times who has been distracted.)

Our found item that must be used in our challenge was resistors. Out of the Crafty Sister storage came a canister full of old resistors. We divided them up and got to work.

Resistors just seem to lend themselves towards jewelry and I was inclined to follow. My foremost concern was an interesting pendant.

Pendant made of resistors.

My entire necklace is made of resistors, even the hook and eye clasp. The wired ends make wire-wrapping a breeze.

Necklace made up entirely of electronic resistors.

This is a very simple necklace to make and only took me about 2 hours. Most of that time was spent messing with the style and shape of the pendant.

I am pleased with how this turned out and will probably wear it from time to time.

Happy Crafting!

Kristin

Bird Paper Mache Tree Crafty Sisters Challenge

Crafty Challenge 7: Paper Mache Tree with Nesting Bird

Bird Paper Mache Tree Crafty Sisters Challenge
Bird nesting in a tree.

Cheri: I find it really interesting that every project we do, I always think that it is the best one yet, but this project was one of the best. I like working with paper. It has endless possibilities and can be made into practically anything. I knew I wanted to make a tree with a nest and a bird, as this is a theme that I have been exploring lately.

To begin, I made a base for the tree with paper covered wire. To make the base, I cut about nine lengths of wire around 9 inches long. I took a longer piece of wire and wrapped it around the base and slowly coiled my way up the tree. I left some of the wire sticking out of the bottom to make the roots and some sticking out of the top to make the limbs.

I then took some pages from an old book, (Gone with the Wind), and ripped them into strips. I  paper-mached the strips onto the tree, the bird and the branches.

For the nest, I cut very thin slices of paper and formed them with glue using the bottom of a small bowl as a form. I let it dry and when I took  it out it looked amazingly like a real nest. At this point I was not really sure if I wanted to paint it or not, but after talking it over with my son, Justin, we felt that it would look nice if I did a light watercolor wash on it. This really made the text pop and was just the right touch.

I was very pleased with how it looked when it was completed and it really came out how I wanted it to look. And somehow it seems fitting to turn paper back into a tree.

Paper Mache Tree Crafty Sisters Challenge
Tree with nest removed.
Paper Mache Bird Nest Crafty Sisters Challenge
Close up of nest and bird.
Paper Mache Bird Tree Crafty Sisters Challenge
Another view.
Paper Mache Bird Nest Tree Wire Crafty Sisters Challenge
Nesting bird and tree.
Copper Bracelet Hammered Crafty Sisters

Crafty Challenge 6: Hammered Cuff Bracelet

Copper Bracelet Hammered Crafty Sisters
Hand-hammered cuff bracelet.

Lynne:

I have been accused of shooting down the last few ideas for crafty challenges, so when Loryn came up with the idea of using some scrap copper discs in the garage I couldn’t very well argue. I have had those discs for the last 20 years and had never been able to find a good use for them and now I was backed into using them in a challenge.

I searched the internet and found this video on YouTube. The most exciting thing to me was the minimal need for specialty tools. Of course, when you are not using many tools, skill is always a bigger factor in the finished project. I pulled out a vise, a wrench and a ball peen hammer and set to. I will tell you now that ear plugs are a very good idea.

We have another sister who lives out of state and she was here visiting. She had brought some tools and a willingness to hammer out some ideas. Together the two us managed to hammer a small bowl with turned edges. Turning that outer edge under is not so easy but I found that brute strength is not the best idea. A small hammer with a light touch goes a long way as a hard hammer hit will put a tear in the copper.

Copper Craft Challenge Crafty Sisters Hammered
The diameter of our discs was jut 3" so the bowl is very small.
Copper Craft Challenge Crafty Sisters Hammered
Here is the bowl as seen from the bottom showing the turned edge.

I folded copper, hammered copper, cut copper and cursed copper, but I could not manage to make any progress until last Saturday. I just seemed to make one good hit with the hammer and the copper began to do what I wanted it to do. Failure does lead one to success as long as you keep trying.

I ended up cutting a rectangle from two copper discs for the two halves of a cuff bracelet. I turned the long edges under and then hammered the finished rectangles into a roughly oval wrist-fitting shape.

One of my failed projects was a ring that was too wide for my finger and I had tossed it into the growing scrap heap. However, when I needed a bridge to hold the two bracelet halves together the too wide ring was perfect. All I had to do was hammer the ring flat, punch holes in it, punch matching holes in the other two pieces and connect them all with paper fasteners (not really sturdy but the deadline was twenty minutes away) and there was my bracelet.

For my first piece of hammered metal work I was extremely happy, and despite all my complaining I have become intrigued with the process and am going to do some more work with copper.
Lynne

Hammered Copper Cuff Bracelet Crafty Sisters
Hammered copper cuff bracelet.