Category Archives: Christmas Ornaments

Ornament Advent: Day 5 Tiny Paper Stars

tinystarsfinal

Loryn — I see a lot of ornaments made the way these are – just glue three or more circles together – but I thought they would be really fun made with a star paper punch. They make tiny ornaments, just a few inches tall, and they’re perfect for a miniature tree.

tinystars

My paper punch is from Martha Stewart crafts. I cut a few stars from different colored scrapbooking papers, then folded each one down the middle. Glue three together around a piece of embroidery floss, then put beads on the bottom.

tinystarsfin

I like the single bead better than the one with two beads. Bells would be fun, too. They need some weight to make them hang right. The ornaments take just a few minutes to make, so you could decorate a mini tree in no time!

— Loryn

tinystarsgawk

Ornament Advent: Day 4 Pop Up Sticky Notes

popupornament

Lynne: I was surfing the web hoping to find an idea for our Advent Countdown when I came upon this great video from EepyBird. I fell in love with the sticky note pinwheels and started to think how I could modify one into an ornament. I needed a pad of pop up sticky notes, a glue stick, a darning needle, monofilament fishing line, micro glitter, spray adhesive and two buttons.

EepyBird.com counts out twelve pairs of pop up sticky notes and then glues the endnotes of the stack to each other. The structure is rotated three times to make the pinwheel. I must admit that I had to watch the video several times before I understood how the turns were done. If I watched where the doubled edges were each time the figure was turned, I could manage the proper sequence. Their excellent tutorial video is here.

The resulting structure holds its shape enough to roll down an incline, but not well enough to hang on a tree. I decided to gather the fins (the doubled edges) to prevent the pinwheel from coming apart. I used a large-eyed darning needle (sharp enough to go through the paper) with about 20 inches of fishing line. I used fishing line since it is invisible and I had a spool in my craft drawer. Using the needle to punch a hole about 1/8 inch from the edge (see photo below), draw the thread of fishing line through each fin until all the fins are gathered in a circle. Pull the line tight and knot the ends. Don’t cut the thread.

I used the two buttons to cover the hole in the middle of the pinwheel. Thread one of the buttons onto your fishing line and then push the needle through to the other side of the pinwheel. Gather these fins the same way, add the other button and tie a knot to keep everything together.

I used spray adhesive and micro glitter to add some holiday sparkle. For the hanger, I made a loop with the fishing line and attached it to two fins (see photo below) for the best balance.

I really like how the pinwheel looks and was especially pleased to make something with such an unusual material.

popupornament2

Gold ring Christmas ornament

Christmas Ornament Advent: Day 3 Gold Rings

Gold rings2

So, I make jewelry. In my collection of jewelry supplies are all sorts of materials and findings for really old projects that I just cannot get rid of. I guess you could call me a supply hoarder (I don’t feel too bad about this as I think Cheri has a bigger collection). Ask anyone in my family and they will tell you that I am a museum for clothes and supplies (I still have some beads from my very first Fire Mountain order around 20 years ago, and crap did I just make myself feel old). Anyway, the gold rings I used in this Christmas ornament have been in a drawer for years. I made a pair of earrings for my M-I-L out of them and of course, I did my usual M.O. and bought way too many supplies and was stuck with a bag full of various sizes of gold jump-rings.

For this project, I laid down some wax paper and pulled out my bottle of bead glue (super glue). I used some tweezers to place the rings where I wanted them and glued the whole piece together. I like the project so much that I think I am going to make a set of earrings with a similar shape for the holiday season. The ornament is around 3 inches top to bottom and side to side, not including the hook.

Gold ring Christmas ornament

This is a very simple project and looks great on a Christmas tree. The jump-rings are available at most craft stores in the jewelry supply section.

Happy crafting!

Kristin

Day two “Ornament Advent Countdown”.

Cheri-December 12, 2012. Day two of “The Crafty Sisters Advent Ornaments“.
Snowflake ornament made with Tinker Toys

This is a super simple ornament to make and it really is pretty neat. It may not make the best ornament as it is a little large but it would be a great tree topper or a wall hanging.

All you need to do is get some Tinker Toys and pegs. I found some orphaned ones at a garage sale last summer and decided to give them a new life.

The design fell in to place pretty easily and then, I just hot glued the pieces together.

The hard part for me was the painting. Spray paint seemed to be the best way to go, but the paint soaked right in to the Tinker Toys. After several coats (and a patchy finish), eventually I finished painting it with acrylic paint and glittered it.

This was a fun project and the possibilities are endless.

Merry Christmas-Cheri

snowflake12212 009


tinkertoyornamentgawker

Ornament Advent: Woven Paper Heart Ornament

heart

Loryn – The Crafty Sisters are kicking off our Advent Ornament Challenge! For each day of December up til Christmas, we’ll be posting a fun and easy ornament that you can make.

First up is this woven heart ornament. I remember making these in Girl Scouts in the early ’80s. I was fascinated by the technique. Weave the paper together, and it makes a basket. Magic!

To make the ornament, first pick out your paper. Back in the Girl Scouts, we used construction paper, but I had some double sided scrapbooking paper on hand that worked great. Use a medium weight paper, not too thin or they won’t hold up, and not too thick or you won’t be able to do the weaving. Fold the paper over the 3 1/2″ mark, then trim off the rest.

heartfold

Then you’ll want to cut two pieces that are 3 1/2″ long (one side of the fold only) by 2″ wide. Then fold one of them the other way so the reverse print is showing.

heartready

Then shape the top of each piece into a semi-circle, for one part of the heart. Cut two slits into each piece, starting at the fold. The slits need to be more than 2″ long. You’ll end up with this:

heartslits

Now you’re ready to start weaving. The technique isn’t your standard over-under-over-under. Instead, you need to put the “under” pieces through the middle of the alternating piece. Here, I’m starting by inserting the gray piece into the middle of the pink:

heartstart

Then the pink ones need to go through the middle of the gray on the next row. It’s best to do the first two on each side, then finish up the last three.

heartweave2

When you get to the last ones, you’ll see why the paper still needs to be flexible! Keep at it, and you’ll end up with this:

heartweave3

Now all you have to do is push the pieces into shape and add the finishing touches.

heartopen

To give them a bit more finish, I put a small grommet onto each side of the heart, to thread the ribbon through. I used about 10″ of white ribbon and tied them off with square knots. Fill them with candy for a simple Christmas gift!

— Loryn

heartgkr


Christmas Ornament Countdown: It’s the Final Countdown

So we have arrived at Christmas! I hope everyone is having at wonderful holiday. For those of you who have been following along with our ornament countdown adventure, you know that Cheri and I have been showcasing our ornament creations this year. We have been alternating days which is about all we had time for with our preparations for Christmas as well. We have gathered them all together here in one post for easy viewing.

First Day: Lucky Stars

Glass ball full of origami lucky stars.
Made by Kristin

Second Day: Scrapbook Paper Balls

Spiral ornaments made from scrapbook paper.
Made by Cheri

Third Day: Beaded Glass Ball

Glass ball covered in beaded mesh.
Made by Kristin

Fourth Day: Cardboard Tube Snowflakes

Snowflakes made from paper tubes.
Made by Cheri

Fifth Day: Sequins and Pins

Stryofoam egg decorated with pins, beads and sequins.
Made by Kristin

Sixth Day: Wire-wrapped Spider

Wire wrapped spider
Made by Kristin

Seventh Day: Teeny Tiny Places

Winter scenes inside tiny toy bubbles.
Made by Cheri

Eighth Day: Buttons, Buttons Everywhere!

Styrofoam ball covered in small white buttons.
Made by Cheri

Ninth Day: Crochet Wreath

Small wreath crocheted of cotton yarn.
Made by Kristin

Tenth Day: Scrapbook Paper Origami Stars

Scrapbook paper 3D origami stars.
Made by Kristin

Eleventh Day: Chinese Fortune

Glass ball full of Chinese fortunes and glitter.
Made by Cheri

Twelfth Day: Wire-wrapped Ice Fairy

Wire-wrapped snow fairy holding a snowflake.
Made by Kristin

Thirteenth Day: Steam Punk Felt Bird

Felt bird with wire-wrapped crown, wings and tail in steam punk fashion.
Made by Cheri

Fourteenth Day: Wire Wrapped Joy

Word "Joy" wire-wrapped inside wire circle.
Made by Cheri

It has been a wonderful craft experience to work in so many mediums. Cheri and I had a great time creating all of these amazing ornaments and look forward to another showcase for next year (which will include all the Crafty Sisters, not just us two).

Happy Holidays from Kristin!

Upcycled Felt Star Ornaments with Blanket Stitch Tutorial

Loryn:  I love working with wool felt, and one of the best ways to get it inexpensively is to felt wool sweaters from the thrift store. After I made the Felted Wool Stockings, I had lots of small pieces of felt left. Cheri and Kristin’s Ornament Countdown inspired some wool felt ornaments.

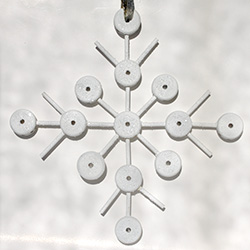
I cut three simple star shapes from card stock and used them as a template. Click here for a PDF Star Ornament Template  that you can download.

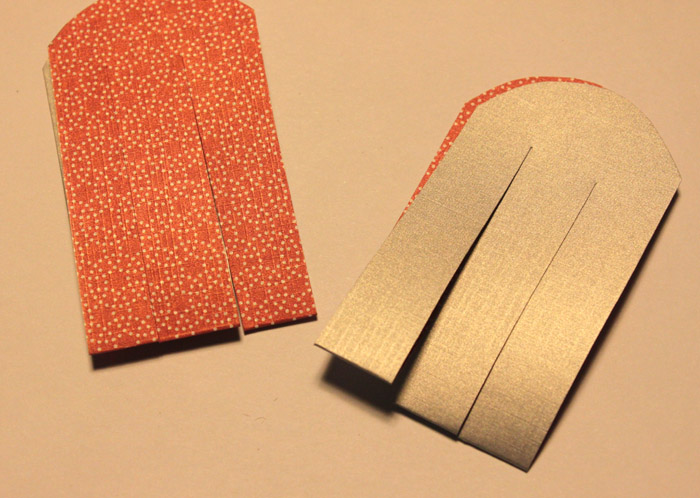
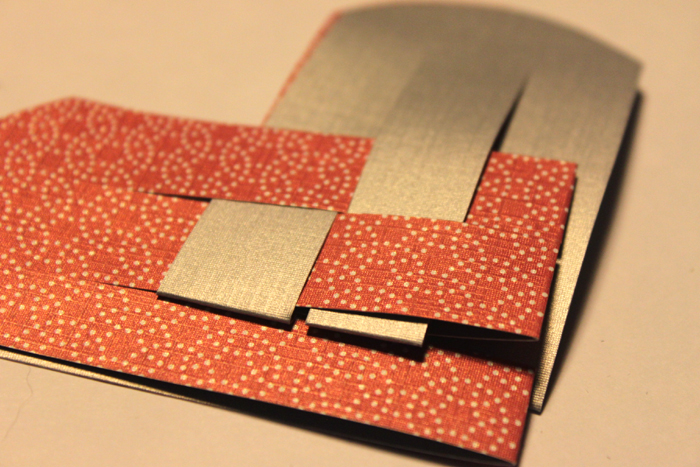
For your first step, layout your template. If you have a patterned fabric, play around with the direction of the pattern to find one that you like best before pinning.

Cut two of each piece, and you’re ready to start stitching. I used No. 6 pearl cotton thread in a yellow gold color. Sew with a single strand, and use a much longer piece of thread than you think you will need.

For your first stitch, start on the wrong side of your top star and bring the needle and thread through to the right side. Wrap the thread around the edge, bring the needle through in the same spot, and draw the loop snug.

All of the stitches will be started from the front side of the stars. Try to space them evenly, but don’t worry about being perfect.

To make the blanket stitch, insert your needle, bring the thread around the needle, then pull it taut.

Essentially, you’re making a knot on the edge of the fabric. Pull it snug, and repeat the stitches until you get to the point of the star.

To sew the points, make three stitches by bringing the needle up at the same spot each time, one stitch on the right side, one at the point, and one on the left side. Keep stitching until you’ve finished four of the five points.

It’s easier to stuff the finished points and main body while one point is unsewn. I used plain old polyfill, leaving the fill really loose. Small leftover felt scraps also make good stuffing material.

Stitch the remaining point, leaving a small opening to stuff the final point. Once it’s stuffed, finish sewing the seam and make a knot with your needle. Don’t cut the thread yet, though. Run the needle through the inside of one of the arms, and bring it out at the point where you want to put the hanging loop. Make a knot, measure out a hanging loop, then make two more knots to finish the hanging loop. Hide your thread, and you’re done!

This process would work great for all kinds of shapes, like trees, bells, or circles, and they look great hanging on matching stockings!

Christmas Ornament Countdown: Steam Punk Felt Bird

Christmas Ornament Countdown
Steam punk felt bird Christmas ornament.

Cheri: This little bird is all decked out in his Christmas Regalia. He is just not satisfied with being just a bird, he felt the need to dress for the occasion. And when I say dress for the occasion, he really did. He has a lovely crown, quite nice decoration on his tail feathers and he is wearing some very nice wing bracelets.

The body of this little bird is felt that has been sewn together and stuffed. I then took several pieces of different colored wire and used it in place of feathers. He is a little bit of a steam punk bird with all his attire. I hope you like him as much as I do.

Christmas Ornament Countdown
Felt bird.

Merry Christmas from Crafty Sister Cheri.

Christmas Ornament Countdown
All dressed up in steam punk.

Display Ornaments on a Wire Garland

Loryn:  I have some beautiful vintage Polish glass heart ornaments (one of Cheri’s fabulous garage sale finds!) that I’ve wanted to display, but I’ve worried about breaking the delicate ornaments. My cats especially love to bat ornaments around. While I was working on my Two-Hour Christmas Decoration Crafty Challenge, I realized that the same technique would be great for displaying delicate ornaments.

For this garland, I turned the points down so that each ornament has its own “groove” to sit in. This keeps them from sliding around and bumping into each other. I used an inexpensive 18 gauge galvanized wire.

I hung it across the archway between my front room and living room, where it looks beautiful, but is out of the way.

I used a screw to hold up each end. For more detailed directions on how to bend the points, see the photos below. The entire garland took less than an hour to make and hang. Once the wire was formed, I hung one end and carefully slid the ornaments into place before attaching the other end. A second pair of hands is helpful for this part!

If you have delicate ornaments that you’re afraid to display, this is a fun way to get to use them!


Glass Heart Garland
Hang your precious ornaments safely.

Christmas Ornament Countdown: Wire-wrapped Ice Fairy

I love Cheri’s Chinese Fortune ornament. It will just glitter and shine next to the lights on the Christmas tree.

For an ornament last week, I did an homage to my stepfather’s sequin and pin ornament and for today I am doing one for my sister. Loryn has this ornament that she received from our grandmother (Memom – the other two sisters’ that make up The Crafty Sisters, mom) in 1981. As we were growing up Memom would give us each a Hallmark ornament for Christmas. One of the joys of decorating our tree was being able to hang the ornaments that were yours. This one in particular was a lovely Ice Fairy holding a snow flake.

Hallmark ornament from 1981 of an Ice Fairy holding a snowflake.
This is the original ornament. Unfortunately not ours, as this one still has her wings and snowflake.

I have many memories of this ornament and I know that my sister has even more. Unfortunately, time has not really been kind to the poor fairy. She has lost her wings and snowflake, but she is still a lovely ornament so she is hung on the tree every year. Here is my version of the ornament:

Wire version of the ice fairy.

I made her with silver wire. I started with the arms, wired on the neck and head and then continued with the rest of the body. Then I made the snowflake and wired it onto one of the hands and adjusted the other hand to hold it. The wings were made next and each is wired separately to her shoulders. I added her hair last.

Wire version of the ice fairy.

Happy Holidays from Kristin!