Tag Archives: christmas

Christmas Ornament Advent Countdown

20131207-115213.jpg

20131207-115229.jpg

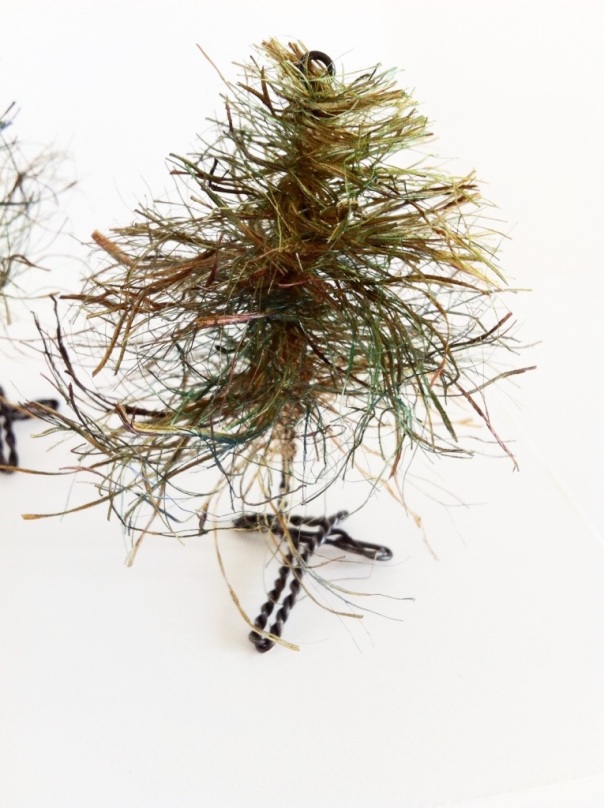
Lynne : This is my second ornament for our 2013 countdown. I am in love with trees right now and have been drawing them over and over so it seemed natural to find an ornament that looked like a tree. I was browsing through google images and I found this article from Just Something I Made by Cathe Holden about how to make bottle brush trees. Since I do not have much need for bottle brushes any more I was delighted to find that she uses rope and wire for her trees and shapes them with scissors. And as a bonus I could use my Copic airbrush system to color the trees.

Cathe Holden website:
Just Something I Made by Cathe Holden

Here is the tutorial:
Handmade Colorful Bottle Brush Trees

You will need these things:
Wire
Wire cutters
Rope (sisal, jute, or any twisted fiber)
Drill
Hook (shaped from a wire coat hanger or from a small S-hook)
Vise (or something that will hold the wires securely when twisting them with the drill)
Pliers
Copic airbrush (optional)

20131207-114727.jpg

I already had some jute, but when I untwisted the fibers I thought they were too fuzzy and too fragile. I made a trip to the hardware store and found some thick rope that is used on farms. (I remember swinging on the hay ropes as a child. When my grandparents weren’t looking of course.) I cut my rope into lengths of 3 to 4 inches and then began to untwist the fibers. When I had an amount that looked like it would make a full Christmas tree I laid the fiber between the wires as described in the tutorial. It is so nice that you can make two at once by cutting on the diagonal.

I didn’t have a wire coat hanger to make into a hook for the drill because I don’t like the sound they make rattling in the closet. So I took an S-hook and straightened one end so that it would fit into the drill. You can see it in the drill in the photo. I put the wire ends in my vise and inserted the hook in the top of the wire and the wire began to spiral just like it was supposed to. I noticed that the fiber also tangles and you do need to spend some time straightening and combing the fibers to approximate the shape of your tree. Then I used small scissors to cut the final shape. It’s best to do this over something you can throw away because the fibers are very small and sticklish.

When I had the shape I wanted I looked for something to hold them while I spray painted them and found an empty Kleenex box. The wires poked in easily and the setup worked, but I think I’d rather have had a piece of styrofoam. I’m sure we’ll have some after unwrapping presents and I intend to save a piece for a painting stand.

To color the trees I used mostly blues and yellows and finished with a dark green. I start with the lightest yellow and spray the whole tree. Then I concentrate yellow on the ends of the branches using what yellows look good on the fibers. I then use blues from the lightest to the darkest making sure that the lightest yellows remain as free as possible of the blues. The yellows and blues make a lovely variety of shades of green as they are sprayed one on top of the other. I use a dark green to deepen the shadows between the branches to create more depth in the tree. I touch up the yellow and the tree is almost done.

I bent the stem wire with pliers into an X-shape for the bases, but you could use cork or wood or just about anything for a base.

These trees look so good and once you have everything laid out, they work up very quickly. I hope you have as much fun making them as I did.

Envelope Rosette.

120313 127 120313 125

Cheri-I cannot believe that it is Christmas Advent already. Time to get back in the swing of ornament making.

In the last few months I have picked up another collection and this is an incredibly cheap one. I have begun to collect envelopes. Not for stamps, or anything like that, I  collect them for the inside. the envelopes have amazing graphics that are printed on the inside. They are quite beautiful, and a great source for interesting paper, and I am always looking for a craft to make with is.

This is where my ornament comes in.

Supplies:

Interesting paper

Scissors

circle template

glue

Start by cutting out circles from the patterned paper and cut them into four pieces. Then roll them into a cone and glue the edges together. I made 18 for the outer rosette and 13 for the inner rosette. Glue them together on the edges and form a rosette. Do the same with the smaller circles and put them on both sides. For the inner part of the rosette, I cut small strips from a different envelope and and curled it. There you go. Very easy and cost me nothing to make, but what an impact the pattern makes.

How simple can it be? Hope you like it and if you have any questions make sure to e-mail us.


Miniature Beaded Velvet Stocking Ornament

velvetornament

Loryn:  I’ve been doing a lot of sewing and beading for Christmas this year, and I wanted to make an ornament that would come together pretty quickly. I used a scrap of vintage silk and rayon velvet. This miniature stocking is perfect for tiny scraps that you might have lying around – I used less than 5 square inches for the stocking. I sewed it by hand because the fabric is so slippery, but you could use a machine if your fabric isn’t so touchy. I had planned to make a cuff, but it was too small to fold over the stocking body. That’s why I made a simulated cuff with the beads. I also made the toe way too big, so I cut it off and reshaped the bottom. Little pieces like this are fun because even when it goes wrong, you can still end up with a cute result.

velvetornamentdet

Here you can see the beaded detail. I used number 15s and gold delicas for a little sparkle. I sewed the beads on in groups of three. The stocking is very cute, and you could easily make a dozen to decorate a small tree! — Loryn

velvetorn2

velvetornamentgawker

3D Origami Snowflake

20131202-203952.jpg

Lynne
The other day I was looking through pages and pages of Google images of origami figures for some new ideas when I saw this terrific dragon. Red Dragon Origami from Papercraft

I was keenly interested in how it was made and I began to search for instructions. I found that the process was called 3D origami and involved folding small rectangles of paper into triangular pieces that could be interlocked to build figures of amazing complexity.
Of course I turned to youtube and began to look for instructional videos. I find that I can learn better by watching than by reading complicated directions. So I will give links to a couple of videos that were very helpful in the process of making these intricate Lego-like pieces. There are many other videos and each one has something different to show. Watch as many as you can.

3D origami tutorial
3D origami tutorial 2

20131202-204014.jpg

I hoped that I could use this folding technique in our Christmas challenge and I found this video on how to make a snowflake with a little less than 50 pieces. It’s a good way to learn how the process works and still have something creative to show for your time. The video is well done, but I found that I did not pay enough attention to the position of the pieces as they were interlocked. The second color is placed differently than the first. If you look closely you will see that how the pieces are shown is how they are attached to the model.
3D origami snowflake

I made my first snowflake using two colors of copy paper as shown in the video to help me understand what I was doing, but I wanted a subtler change of color on my model. I have recently discovered the Copic airbrush system and on my second effort I used that system to achieve the color and effect I wanted. I really like using markers for airbrush painting. It is easy to switch colors quickly and there is very little mess to clean up. Here is a link to a video of the air spray system in action.
Copic airbrush system

I attached a button to the front of the star and then used a light coating of spray adhesive to adhere some glitter for a reflective shine. I used some fishing line to hang the ornament but ribbon or string would work just as well.

I hope you have fun as much fun making these snowflakes as I did and I will post again in four days with another project.

Side view of wreath

2013 Christmas Advent: Paper Wreath

Happy Holidays!

Hello, and yes we are still alive. We are doing our annual Christmas Advent. This year we are covering Christmas Decorations. I decided to to do a Christmas wreath and have been playing with paper lately and thus my Christmas Paper Wreath was made.

Finished paper wreath

For supplies:

Foam wreath shape, burlap ribbon, scrapbook paper (paper cutter optional), pins, sequins, paper punch (twine and bells optional)

Supplies needed for paper wreath

The paper punch I chose cuts out a 2 1/2″ shape, so I cut my scrapbook paper into 3″ swathes. This I then ran through my paper punch and cut out my florets.

Paper punch

Once I had all my florets, I wrapped the foam wreath with the burlap ribbon. I used pins to hold the burlap in place (I was trying to keep my supplies to a minimum, but you could use hot glue here if you preferred).

Burlap wrapped foam wreath

I attached the hanger and bells at the very end, but realistically, this would have been the best time. It worked just fine adding these at the end of the project, but I could have hidden them better had I tied them around the wreath before adding the florets.

Next, I started attaching the florets. I have to tell you about my error now. I bought large head beading pins for this project and thought they would be large enough that they would hold the florets by themselves. However, once I tried to hold the florets in place with the pins I discovered that I was wrong. I needed something to go between the pinheads and the florets. You could use just about anything, I chose to use silver sequins. I imagine that small beads would also have been lovely.

Once you put the pin through the floret, use your fingers to bend the floret up into a flower cup shape. This is what gives the florets three dimensions.

Attaching florets to wreath

Just keep pinning the florets to the wreath all the way around, being sure to cover the inside and outside of the wreath.  I made sure that none of the florets were flat on the wreath. I would pull up the edges of the nearby florets so that the edges were all up and none were flat.

Here you can see the burlap ribbon under the florets, but once the wreath is complete, you cannot see the burlap from a regular distance away.

Paper Wreath Close Up with Burlap2

I love the way it turned out. It looks great hanging on my front door.

Side view of wreath

Finished paper wreath

Happy crafting!

Kristin

Paper Wreath Close Up CG

Christmas garland made of wrapping paper.

Ornament Advent: Day 23 Christmas Wrap Garland

One of the greatest benefits of having a crafting family are how ideas are bounced, re-imaged, and re-shaped among us. I really love the Star Ornaments that Loryn made and I also just love the Chinese Fortune Garland that Cheri made. I decided to do something similar to Loryn’s stars and follow Cheri and make a garland. I am very happy with how it turned out!

Christmas garland made of wrapping paper.

Supplies:

Christmas wrap

Paper punch (I used 2″ seal punch)

Glue stick or pen

Yarn, string, or ribbon

Christmas garland made of Christmas wrap and shaped into a wreath.

I had some really shiny Christmas wrap and also had this 2″ seal paper punch. I used the paper punch to cut around 120 pieces out of the Christmas wrap. I then pulled out some thick crochet thread that is a sort-of soft gold color and is ribbonish (flat and about 1/8″ thick). I spread glue on two cut-outs and glued the crochet thread between the two pieces. You do have to be sparing with the glue as the Christmas wrap is very thin. I left around 1/4″ of the yarn visible between the cut-outs.

Christmas Wrapping Paper Garland

My garland is around 12′ long and looks great on a tree! I think this whole garland took me around 45 minutes to make. The other nice thing about this garland is that once you fold up the shapes, it takes up so little space and stores very well.

Christmas Garland made of wrapping paper.

Happy Holidays and Happy Crafting!

Kristin

Thread ball draped with glass seed beads sewn into ribbon.

Ornament Advent: Day 15 Beaded Ball

Gonna Go Back in Time!

Thread ball draped with seed beads

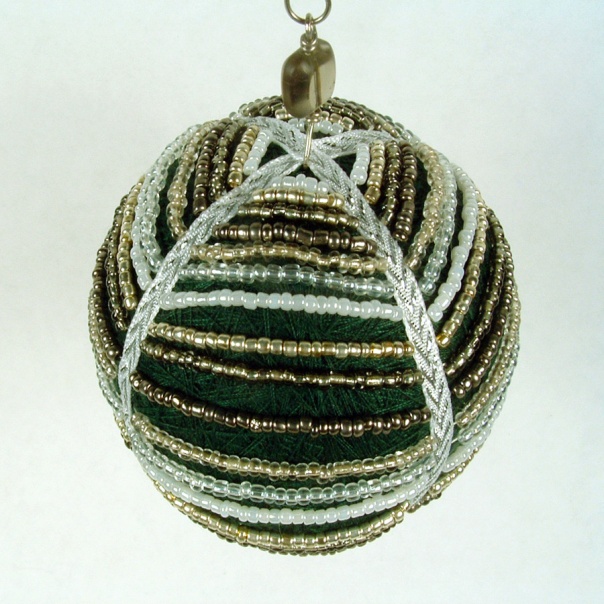
So, I was not feeling at all well this weekend and missed my Saturday post for the Ornament Advent. To make up for it, I decided to splurge and make a slightly more difficult ornament. For this ornament, I once again raided my temari ball stash and used one of the green balls for the base. It is around 3″ in diameter. I then wrapped the ribbon around the ball tacking it down first with pins and then with basting stitches.

Thread ball draped with glass seed beads sewn into ribbon.

The beads are from the giant spinner of seed beads that Mom and I bought to take with us when we went camping (yes, we like to craft while camping). I strung the beads and crossed under the ribbon, trying to make a slight draping effect while doing so. It was interesting how much heavier the ball got by the time I was finished. All those glass beads weigh more than you would think.

Green thread ball draped with stands of seed beads.

I then decided that I needed a bead topper and found a lovely smoky gray glass bead in my oddments and leftovers drawer that looks great. I made the hook and I was ready to go.

Green thread ball draped with seed beads.

I am really pleased with how this one turned out.

Happy Crafting,

Kristin

Felt Christmas Tree ornament

Ornament Advent: Day 7 Felt Tree and Wreath

Today’s ornament was a massive lesson in frustration. Or rather, the ornament that you don’t see was. My original idea for an ornament failed spectacularly. My craft table is covered with parts, bits, and pieces. Around 10:00pm I realized that it was never going to work. Then began the frantic search. I dug through all of my supplies in the hope for a lightning strike. I didn’t get one until I was texting my sister that I was ready to give up. Right after I hit send, it hit me.

Felt Christmas Tree ornament

I love felt and I had a lot of fun last year with the pins and sequins ornament I made, so why not combine the two. The base of this ornament is a ball I made for temari. Temari is a Japanese art form that I played with a few years ago and kept all my supplies (go figure). You make the ball by taking a very large handful of stuffing and wrapping it with thread (one way to make the ball anyway). A lot of thread. You keep winding the thread around and around and around the stuffing until you get a round ball. This particular ball was my attempt to create a flattened ball to showcase a design on the front and back. I never did get around to completing the temari, but it gave me an excellent form to create my Christmas ornament.

Felt wreath side of the ornament

Next, I cut strips of felt around 1/2″ to 3/4″ wide and started cutting these strips into triangle pieces. Then I took my piles of pins and sequins and pinned the triangles to the ball to make the images of the wreath and tree. I used some fuzzy white thread to make a sort of frame to separate the two images by sewing it around and around the ball. I made a quick hook and voila! I was finished.

Side view of Christmas ornament
Here you can see the fuzzy white thread.

I really like the effect of the multiple colors of green for the Christmas tree and the stars in the wreath really make it pop. You could use anything for the form of the ornament, Styrofoam would be very easy. I imagine a Santa Claus/reindeer ornament would be very cute. Anyone want to try it? Send us your picture and we will post it! I would love to see someone else’s version.

Christmas tree side of ornament

Just goes to show that necessity really is the mother of invention.

Happy Crafting!

Kristin

Crafty Challenge 5: Two Hour Christmas Decor

We have just finished our Crafty Challenge 4 and are ready for number 5! This one is all about the time of year. From around now until Christmas, the Crafty Sisters begin to get secretive. We tend to stop discussing our projects with each other and mutter a lot, or at least I mutter a lot.

For us, this is crunch time for Christmas gifts and we do make a lot of them. In this vein, Crafty Challenge 5 is all about Christmas Decorations. We did need to limit this somehow and due to the whole Christmas crunch time I mentioned, the best idea was an actual time limit. So, the challenge is to create a Christmas decoration in less than two hours. We even set a specific time. December 4th – 10am until 12pm is the making time and the unveiling will be at 12:30pm. We can think all we want and purchase the supplies in the meantime, we just cannot start making the decorations until 10am.

To get us in a holiday mood, I thought some examples of a few of our past Christmas decorations was in order. So, get your mind in gear and get thinking (but don’t get making yet!).

Photo of white Christmas wreath.
Chenille pipe cleaner door wreath made by Cheri.
Photo of yarn garland, Choir Bird and winter A-Frame house.
Garland by Kristin, Choir Bird and Winter A-Frame by Cheri.
Photo of bluebird singing carols.
Choir bird made by Cheri.
Photo of winter A-Frame scene.
Miniature A-Frame winter scene made by Cheri.
Photo of snowman ornament.
Snowman ornament made by Cheri.
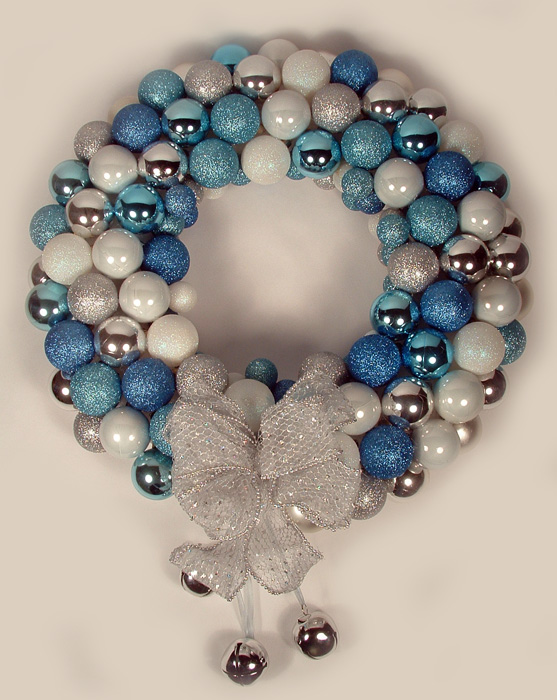
Photo of ornament wreath.
Ornament door wreath made by Kristin.
Photo of painted bird ornaments.
Painted bird ornaments made by Cheri.
Photo of silver ornament and twig decoration.
Silver ornament and twig door decor made by Cheri.

If you have any questions about any of the above decorations or would like to know how they were made, ask us! You can email us in the Contact Us section of the blog.

These were all decorations I had in my Christmas storage and I realize that almost all of them were made by Cheri. You can definitely see who we will be comparing ourselves to. Wish us luck and you get crafting!