Tag Archives: paper wreath

Red wreath, completed and hung on my door.

Christmas Advent 2015 – Day 2 Paper Wreath

Day 2, Hurrah!!

I have been making wreaths off and on over the years, but lately, for every season. I love all of the pretty scrapbook papers available and I have such a hard time not investing in every type of paper punch ever made. I have managed very admirably to keep this part of my craft collection to a small box that holds my paper and various cutters.

Materials:

  • Scrapbook paper (heavy and thin)
  • Paper punch
  • Glue
  • Wire
  • Wire cutters

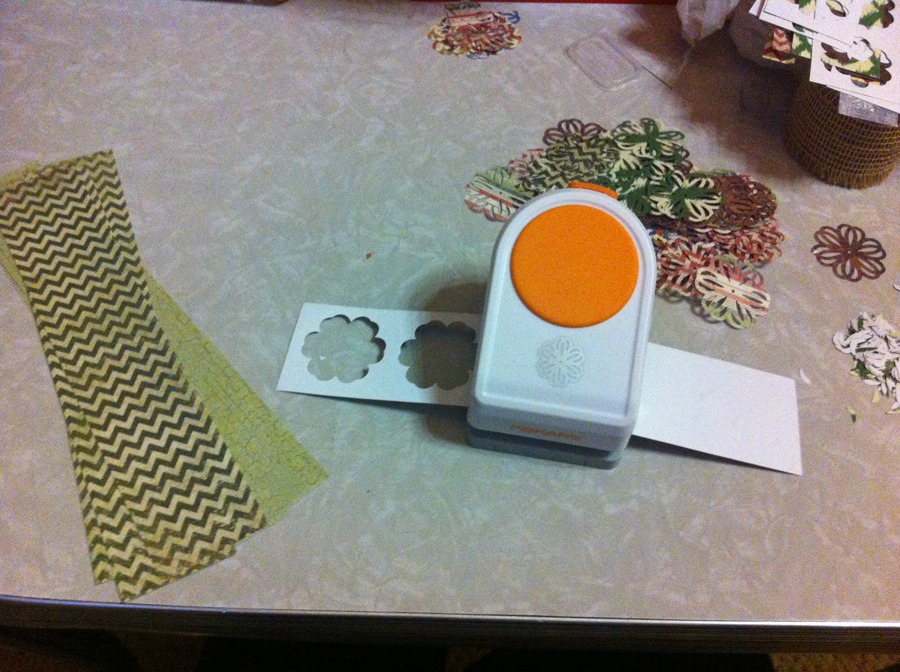
I have this awesome petal paper punch that I have barely used and picked up on clearance some time ago. I needed an excuse to use it. After this project, it has certainly seen some usage. I started by making two green wreaths (I had a LOT of green scrapbook paper). I cut out 1 large circle (about 10″ for the outside diameter) from two pieces of heavy paper, glued them together, made a quick wire hanger that I attached to the circle, and then I started punching out petals. And more petals. And more petals.

First wreath in progress.
First wreath in progress. I made the other two wreaths much wider.

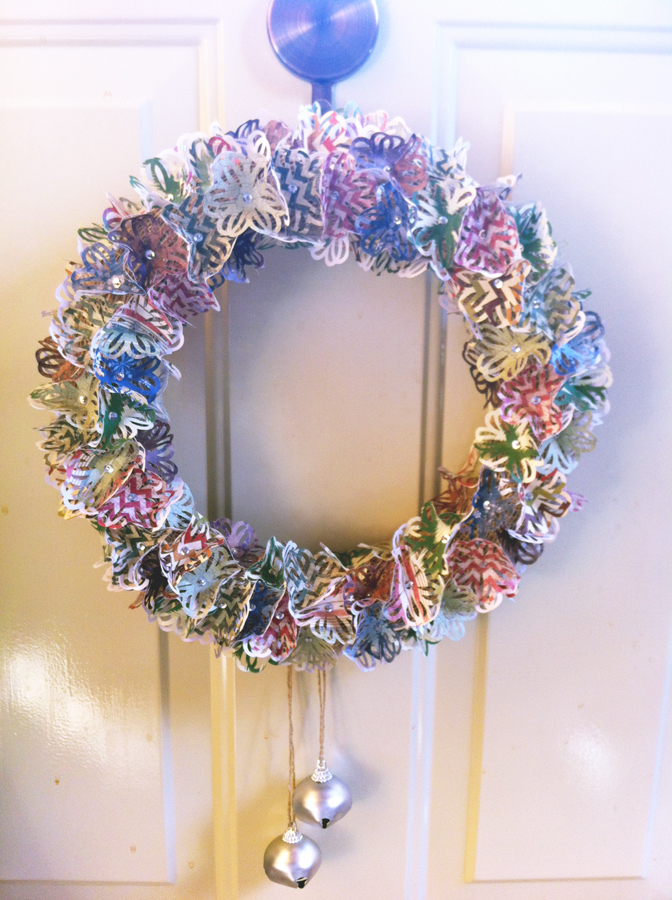
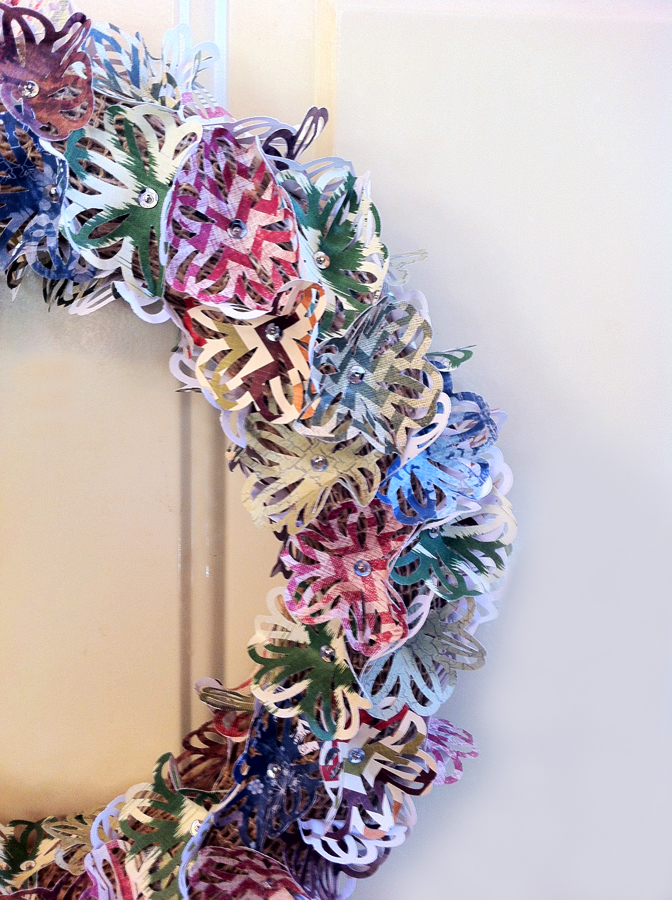
The first wreath I made is pretty thin, and while it looks great, I like wider wreaths better. When I started, I just randomly placed the petals to get a feel for the design. I found that I really liked the way the wreath looked with the petals pointing out on both the inner and outer side of the ring. Above you can see a few, but I had not quite gotten into the swing of placing the petals.

Close up of wreath hanger.
Here you can see my hanger and how I covered it up with petals.

I then found that I needed to cover the wire hanger and built up petals around the wire until I could hide it under yet more petals. You can also see the petals pointing inside and outside the wreath. I just kept layering until you could no longer see the paper ring underneath and until I liked the layout of the petals.

Green wreath, half completed.
Mostly complete wreath, still have to add the outside petals.

Above is the first wider wreath I did, again all in green paper. You can also see the start of hiding the wire hanger. I found it much easier to do all the inner pointing petals, then some of the middle petals, glue on the outer pointing petals, and then finish filling in the middle part of the wreath with the paper petals.

I was using the cut out center piece of the paper ring for my glue. I would pour some out, dip the wider end of the petal into the glue and then place it on the paper ring. In the picture above, you can see my bowl of petals. I punched lots and lots of these.

Green wreath, completed and hung on my door.

The finished green wreath looks great and I was very happy with the outcome. So happy that I immediately set out to make another one in more Christmassy colors, red and green.

Red wreath, completed and hung on my door.

So happy with it!

Happy Crafting,

Kristin

Side view of wreath

2013 Christmas Advent: Paper Wreath

Happy Holidays!

Hello, and yes we are still alive. We are doing our annual Christmas Advent. This year we are covering Christmas Decorations. I decided to to do a Christmas wreath and have been playing with paper lately and thus my Christmas Paper Wreath was made.

Finished paper wreath

For supplies:

Foam wreath shape, burlap ribbon, scrapbook paper (paper cutter optional), pins, sequins, paper punch (twine and bells optional)

Supplies needed for paper wreath

The paper punch I chose cuts out a 2 1/2″ shape, so I cut my scrapbook paper into 3″ swathes. This I then ran through my paper punch and cut out my florets.

Paper punch

Once I had all my florets, I wrapped the foam wreath with the burlap ribbon. I used pins to hold the burlap in place (I was trying to keep my supplies to a minimum, but you could use hot glue here if you preferred).

Burlap wrapped foam wreath

I attached the hanger and bells at the very end, but realistically, this would have been the best time. It worked just fine adding these at the end of the project, but I could have hidden them better had I tied them around the wreath before adding the florets.

Next, I started attaching the florets. I have to tell you about my error now. I bought large head beading pins for this project and thought they would be large enough that they would hold the florets by themselves. However, once I tried to hold the florets in place with the pins I discovered that I was wrong. I needed something to go between the pinheads and the florets. You could use just about anything, I chose to use silver sequins. I imagine that small beads would also have been lovely.

Once you put the pin through the floret, use your fingers to bend the floret up into a flower cup shape. This is what gives the florets three dimensions.

Attaching florets to wreath

Just keep pinning the florets to the wreath all the way around, being sure to cover the inside and outside of the wreath.  I made sure that none of the florets were flat on the wreath. I would pull up the edges of the nearby florets so that the edges were all up and none were flat.

Here you can see the burlap ribbon under the florets, but once the wreath is complete, you cannot see the burlap from a regular distance away.

Paper Wreath Close Up with Burlap2

I love the way it turned out. It looks great hanging on my front door.

Side view of wreath

Finished paper wreath

Happy crafting!

Kristin

Paper Wreath Close Up CG