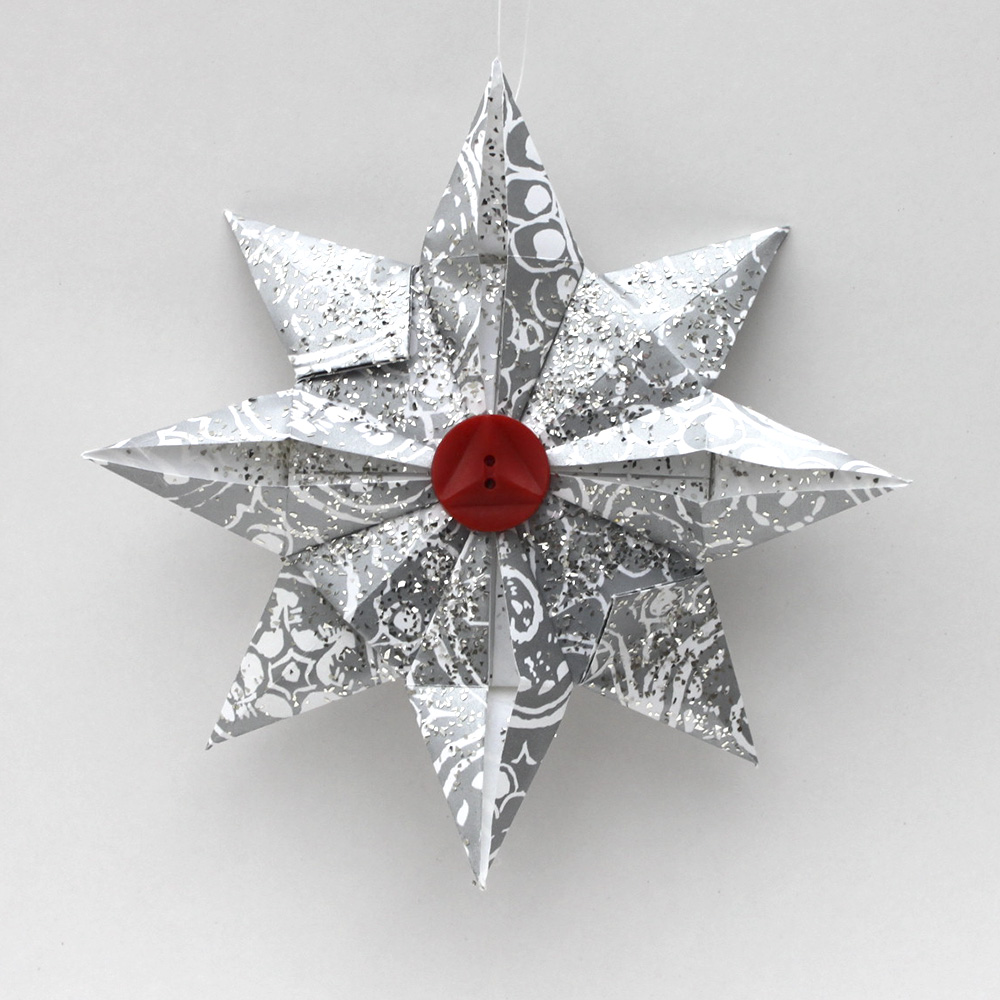
Origami star ornament made from scraps of wrapping paper.
Lynne: I was hoping that since we had Teri Partridge as a guest author today with the Champagne Cork Angel, I would not be required to have an ornament. After some discussion about fair shares and obligations, here is my ornament.
While I was cruising the net this morning for an idea for our Ornament Advent, I found an origami Christmas Star that used wrapping paper scraps. Since most of my wrapping for Christmas is done, I have lots of small pieces of paper lying around and was eager to try it.
You will need 2, 6 x 6 inch squares of wrapping paper and this tutorial by Nikki, in Stitches. And that’s it. These are the clearest directions I’ve seen for origami folding and I was able to make 2 of these ornaments in about 30 minutes.
Once I was done with the origami figure, I added glitter and then hot-glued some vintage buttons to the front and back. I had these buttons stashed in a jar, but you could use whatever you have on hand. I added some fishing line to hang the star and marked off another day on the calendar.
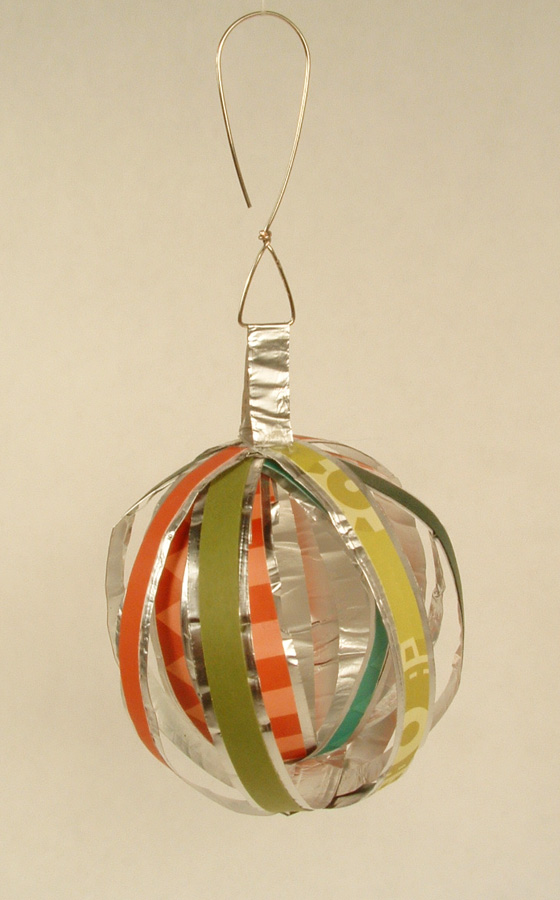
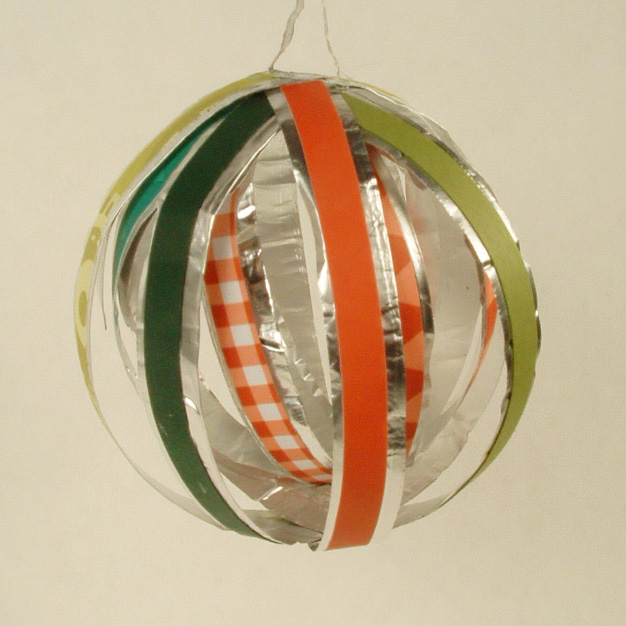
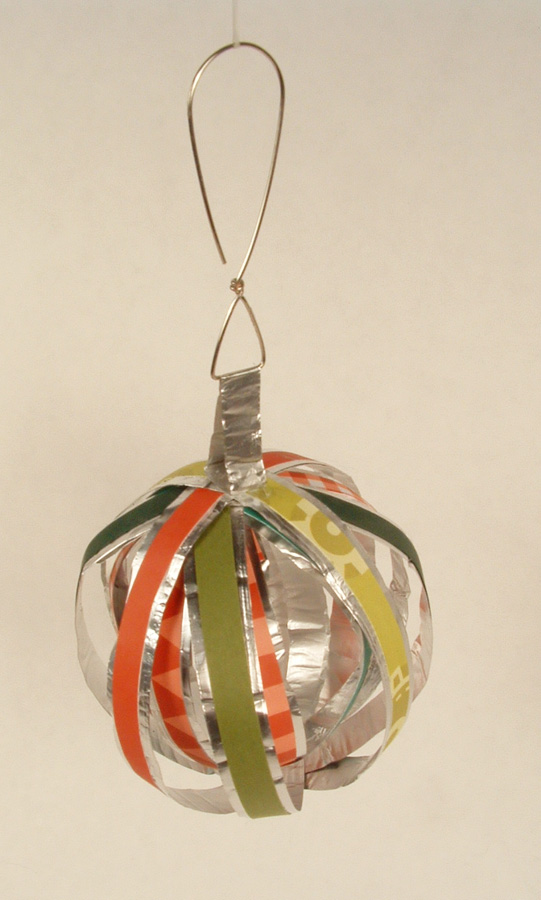
I really wanted to make a simple ornament with aluminum foil. I have been wracking my brain trying to think of something and it hit me while I was driving home from work. I could make an awesome ball with strips of foil and paper.
The ornament is a ball inside a ball. The style is reminiscent of a ribbon temari ball that I made years ago. I cut strips of aluminum foil 1″ wide and strips of scrapbook paper 1/4″ wide (all the strips were roughly 12″ long). I folded the foil lengthwise to not quite in half. I then folded the other edge to give myself two nice, smooth edges. This made the foil strips about 3/8″ wide. I ran a bone folder over the foil strips to make them smooth and shiny. I glued the scrapbook strips to the foil strips and let them dry.
After they were dry, I cut the strips to 10″ long, just to make them easier to handle. Then I wrapped the strips around a solid object (I used a small glass for the outer ball and the glue bottle for the inner ball), glued the ends down, and cut off the excess. I made four smaller rounds and 4 larger rounds. I made the inner ball first then added the larger strips to make the outer ball. I glued the top and bottom where the strips met.
I made a small circle of foil about 1/4″ wide and glued that to the top of the ball and attached a homemade hook and I was finished. I think the whole ornament took me about an hour to make.
I am really happy with it, although it is rather delicate. At least if it gets bent out of shape it is really easy to fix.
Cheri: I cannot believe I have done 3 ornaments so far. Christmas is coming way too quick this year.
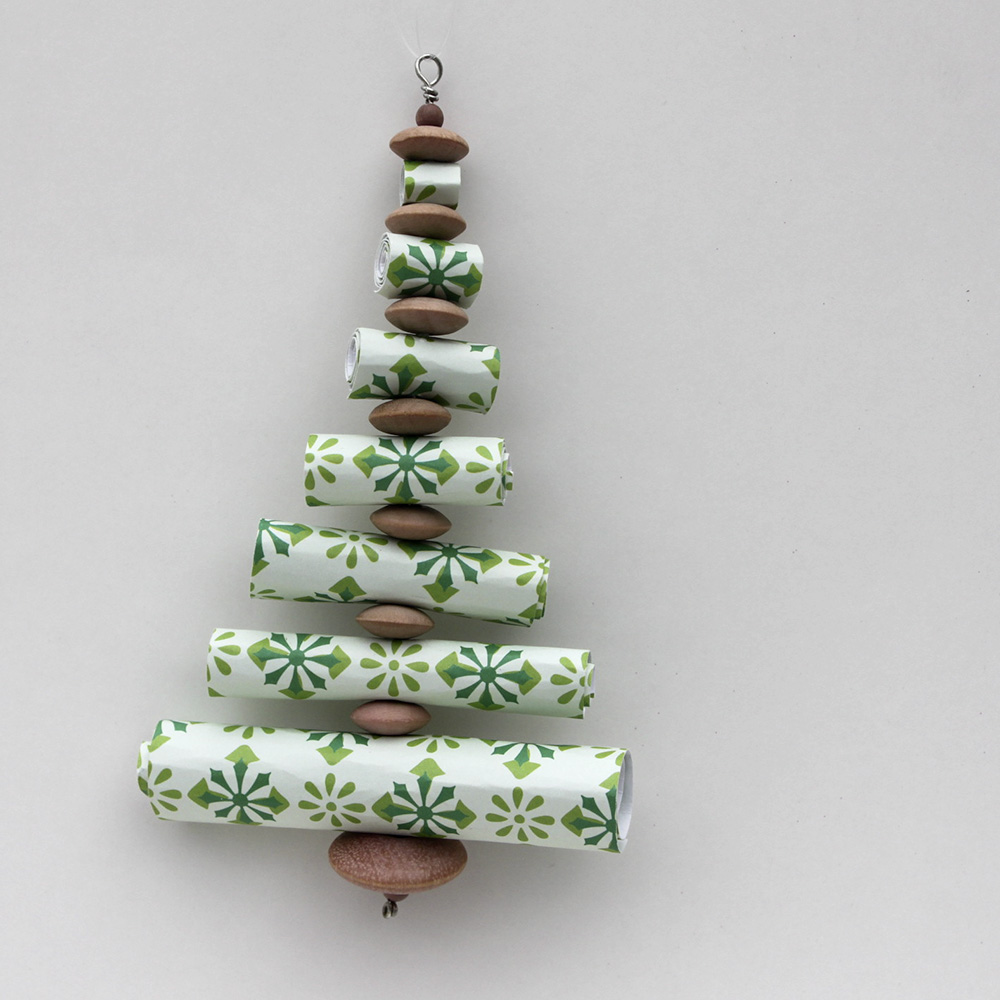
Scrap Paper Christmas Trees
Supplies:
Scrap paper or scrap book paper (I used a gift bag for the green tree)
Hole punch or a needle (the hole punch needs to be a small one)
Wire
Beads
Glue (If you would like to glue your tubes closed)
The easy part:
Cut strips of paper, in different widths. I think mine were 4 inches, 3 ½ inches, 3 inches, and down to maybe a ¼ of an inch. I made all the strips about 4 inches in length. Roll the strips like you are making little straws. After you have them all rolled, just find the center in each one and put a hole in it. Make sure you go all the way through it. This can be a little tricky if the paper is thick. This is when a needle is helpful. Run the wire through the tube. You can make a loop in each end of the wire and string them separately, or you can string all of them in a row on a wire, moving from largest to smallest. I put a bead in between each one.
I really like how these ornaments turned out and I think they will be a great addition to our Ornament Advent Tree.
Lynne: I make flowers from tissue paper and I wanted to try to use the same technique for an ornament. I needed just a few materials:
about 8 inches of silver-colored wire
3 jingle bells
tissue paper, cut into 3 and 4 inch diameter circles
I used a small plate and a glass to trace around and cut approximately 20 four inch circles and 20 three inch circles. I used this tutorial for paper carnations from FoldingTrees.com with just a few modifications for my ornament.
Silver-colored wire replaces the floral wire and I used 2 different sizes of tissue paper circles to make the ornament spherical. The larger ones are in the middle with the smaller ones towards the ends. I painted the edges red with a permanent marker.
To hold the circles on the wire, I attached one bell under the circles and another bell on top of them. I also added a bell in the middle to give more support to shape the paper circles around. I had Cheri give me some tips on how to shape the wire for the hanger. She forms the spirals around a pencil and the hook around a permanent marker.
Start crimping the papers around the 3 bells until you’re happy with the shape and you’re done.
I’m really pleased with the way this came out and the small number of materials needed.
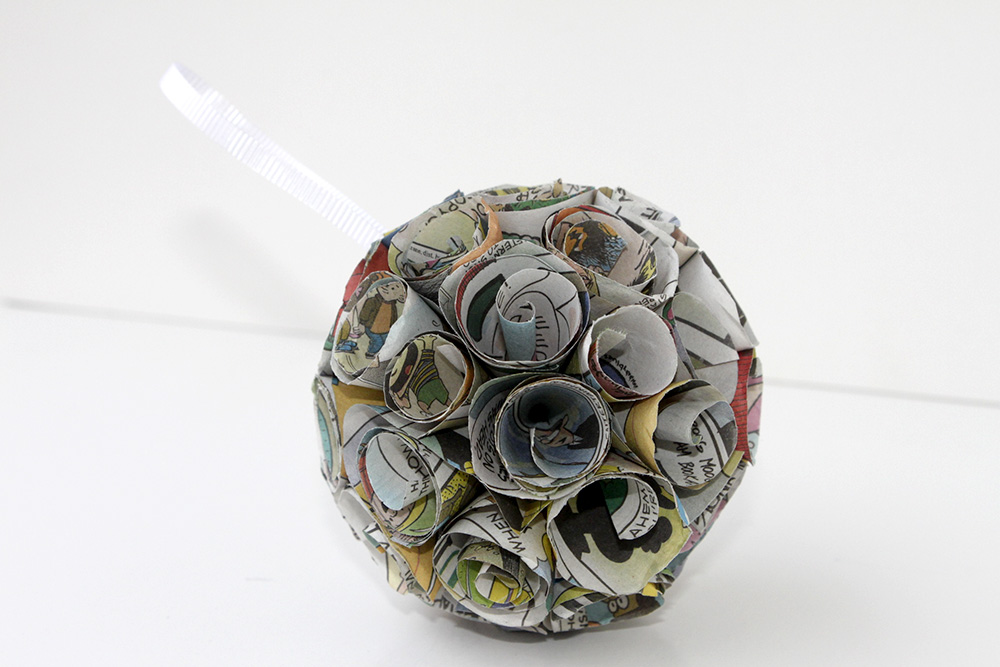
Cheri: I love comics, funnies, and cartoons. And I really love using comics for craft projects. This one is a favorite of mine. I hope you like it.
Supplies:
Sunday Funnies
Circle template (cup, glass, anything circular and in whatever size you would like, my circles were about 2 ½ inches in diameter).
Glue (any kind is fine).
Cardstock, (just a small circle is needed).
6 inches of ribbon
Instructions:
Fold the Sunday paper up so you can cut as many circles at once as possible. Then cut all of the circles in half. When you roll the paper, you want the circular edge to be the outer rim of the cone. Make about 45 cones and lay them aside.
Cut a smaller circle from the cardstock, this is just for a base to glue to.
Lay your cones around the cardstock circle, with the points touching, when you like how it looks, put a small amount of glue on each one and glue down. Place the next row of cones, try to put these in the little valleys created by the first row. You will be using a few less. Finally, glue one straight into the center, there should be a small spot for it. Do the same on the other side of the circle of cardstock.
Look at your ornament, and if you notice any thin spots just glue another cone into the spot. If you would like, you can glue more cones inside of the first cones. This gives the ornament a rose bud look.
What a fun project to make with the funnies, just make sure you read them first.
Lynne: I was surfing the web hoping to find an idea for our Advent Countdown when I came upon this great video from EepyBird. I fell in love with the sticky note pinwheels and started to think how I could modify one into an ornament. I needed a pad of pop up sticky notes, a glue stick, a darning needle, monofilament fishing line, micro glitter, spray adhesive and two buttons.
EepyBird.com counts out twelve pairs of pop up sticky notes and then glues the endnotes of the stack to each other. The structure is rotated three times to make the pinwheel. I must admit that I had to watch the video several times before I understood how the turns were done. If I watched where the doubled edges were each time the figure was turned, I could manage the proper sequence. Their excellent tutorial video is here.
The resulting structure holds its shape enough to roll down an incline, but not well enough to hang on a tree. I decided to gather the fins (the doubled edges) to prevent the pinwheel from coming apart. I used a large-eyed darning needle (sharp enough to go through the paper) with about 20 inches of fishing line. I used fishing line since it is invisible and I had a spool in my craft drawer. Using the needle to punch a hole about 1/8 inch from the edge (see photo below), draw the thread of fishing line through each fin until all the fins are gathered in a circle. Pull the line tight and knot the ends. Don’t cut the thread.
I used the two buttons to cover the hole in the middle of the pinwheel. Thread one of the buttons onto your fishing line and then push the needle through to the other side of the pinwheel. Gather these fins the same way, add the other button and tie a knot to keep everything together.
I used spray adhesive and micro glitter to add some holiday sparkle. For the hanger, I made a loop with the fishing line and attached it to two fins (see photo below) for the best balance.
I really like how the pinwheel looks and was especially pleased to make something with such an unusual material.
So we have arrived at Christmas! I hope everyone is having at wonderful holiday. For those of you who have been following along with our ornament countdown adventure, you know that Cheri and I have been showcasing our ornament creations this year. We have been alternating days which is about all we had time for with our preparations for Christmas as well. We have gathered them all together here in one post for easy viewing.
It has been a wonderful craft experience to work in so many mediums. Cheri and I had a great time creating all of these amazing ornaments and look forward to another showcase for next year (which will include all the Crafty Sisters, not just us two).
Lynne: We crafty sisters have been making ornaments all month, but we are not the only ones. Last week, I went to the Pear Tree Gallery to attend Teri Partridge‘s class on making a tissue paper star.
The ornament is not difficult to make, but it is repetitive and good company with good conversation speeds the whole process. Of course that meant Teri had to talk a little louder while giving instructions, but she is a retired middle-school teacher and up to any task.
Materials you will need:
tissue paper
white glue
white colored pencil
scissors
CD for a circle template (or something similar in size)
binder clips
12 to 20 inches of 18 or 20 gauge wire
pliers
buttons or bells
wet cloth or sponge
You need about 14 circles of cut tissue paper for the completed star. Stack your tissue paper so that you can cut all of the circles at once. We used an old CD to draw around as a template for the circles. Hold the cut-out circles together with small binder clips to keep from having to constantly adjust them. Cut into the circles at the 12, 6, 3 and 9 positions of the clock and then cut halfway between each of those quarters. Make sure the cut does not go all the way to the middle. You need the center section to hold the paper on the wire. The photo below should help with my directions.
Paper Ornament Tree Topper
Have a little glue poured out on a throwaway lid, a dampened sponge or cloth to wipe your fingers free of glue, a white colored pencil (a darker color could mark the paper and show through the point), and the cut circles and you are ready to begin.
Position your pencil with the tip in the middle of each cut and roll the tissue paper around it to make a point. Slide the pencil out and put a little glue on the edge to keep the point from unrolling. Use the 3rd or 4th finger of your hand for the glue and you will not have to keep wiping the glue off the index finger you are using to roll the paper.
When you have all fourteen of the circles finished, you are ready to put the ornament together. Cut your wire anywhere from 12 to 20 inches long depending on how many spirals you want to make and how long a hanger you want. Make a loop in the wire to hold the circles in place. The loop should be several inches from one end of the wire depending on how long you want the hanger to be. You can also use a button or a bell to make a stronger stop to keep the paper from sliding upwards when you tighten the star.
Make a hole with a needle or ice pick in the middle of the circles. String the first 7 circles onto the non-looped end of the wire with their points down and string the other 7 circles with the points up. You want the star to have the top points pointing down and the bottom points pointing up to give the ornament its circular shape. Use a bell or a button pushed up tight to the bottom circle and make another loop to hold the bell on. Arrange the circles so the points show to best advantage and make sure the circles are bunched tightly together to make it pouf out properly. Secure the bottom bell and cut the wire or make some spirals or twists if you like. Bend the wire on the top to form a hanger and you have your star ornament.
The ornament that I made in class with Teri Partridge.
When I got home, I liked the star so much I wanted to make a larger one as a topper for my tree. I made the circles slightly larger by using a 7″ plate as a template for the circles. Don’t go too big or the circles get too floppy and do not pouf right.
I needed heavier wire to make the ornament stand on its own at the top of the tree. I found some 12 gauge white electrical wire at the hardware store and took it to Cheri to have her bend the wire into the right shape. She used the neck of a champagne bottle to bend the wire into a coil to fit on the top of the tree.
Wire coiled around the neck of the champagne bottle.
The 12 gauge wire was harder to bend close enough to the paper circles, so we used pieces of cork above the stop loops in the wire to help hold them close together.
The cork holds the tissue paper circles tightly together.The champagne bottle we used to coil the wire made a great stand for our photo.
The star looks great on the top of our tree and if you like the topper on the champagne bottle, it would make a great centerpiece for your holiday table.
Have yourself a merry holiday!
Our new paper star tree topper.Paper Star Tree Topper
Cheri: I find that a lot of the things I create is because I can’t create something in the usual way. In my perfect world I would be able to make jewelry from silver and have a jewelry bench with a torch, a jewelers saw, and the like. Since I don’t, I have decided to do the next best thing. I create out of what I have.
These rings are similar to how they would be made if I was using a precious metal, only a whole lot easier. The bezels are created by gluing a strip of cardboard into a ring. Then glue the edges of that ring to another piece of cardboard. After it is dry I cut closely around the strip.
I then make a ring band with another strip of cardboard and glue the bezel on to it. I painted the whole piece to give it a patina like finish. After that is dry, I filled the bezel with sparkle glue and covered it with Mod Podge Dimensional Magic.
This was a really fun project and is quite easy. I have to thank Loryn for coming up with the great name of “Tiphony.” I just love the name and it really sums up the whole project.
Close-up of jeweled cardboard rings.Jeweled paper rings.Jeweled paper rings.
Simply elegant ornament made form scrapbook paper strips and floral wire.
Cheri:Kristin’s ornament was so awesome that I have to admit I was a tad bit intimidated by this challenge. Actually, this type of challenge really brings out the best in both of us.
My ornament was made with scrapbook paper too.
I cut about 35 strips of paper and pushed a hole in all of them on both ends. I then took some floral wire that I had and made a loop in one end, and fed all the strips onto the wire. I then took the very last strip and threaded it on to the other end of the wire and continued to do this until all of them had been put on.
I fanned them out into a ball, and made a loop in the other end. I really like to use scrapbook paper that has stripes on it because the pattern seems to flow better. So one down 7 more to go.
The ornament hangs vertically with two balls strung together.Christmas Ornament Paper Strip Balls