Tag Archives: cute

Ornament Advent: Day 14 Dinosaur Dandies

dinosaurbuddiescheri2

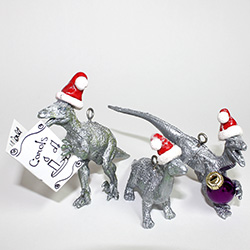
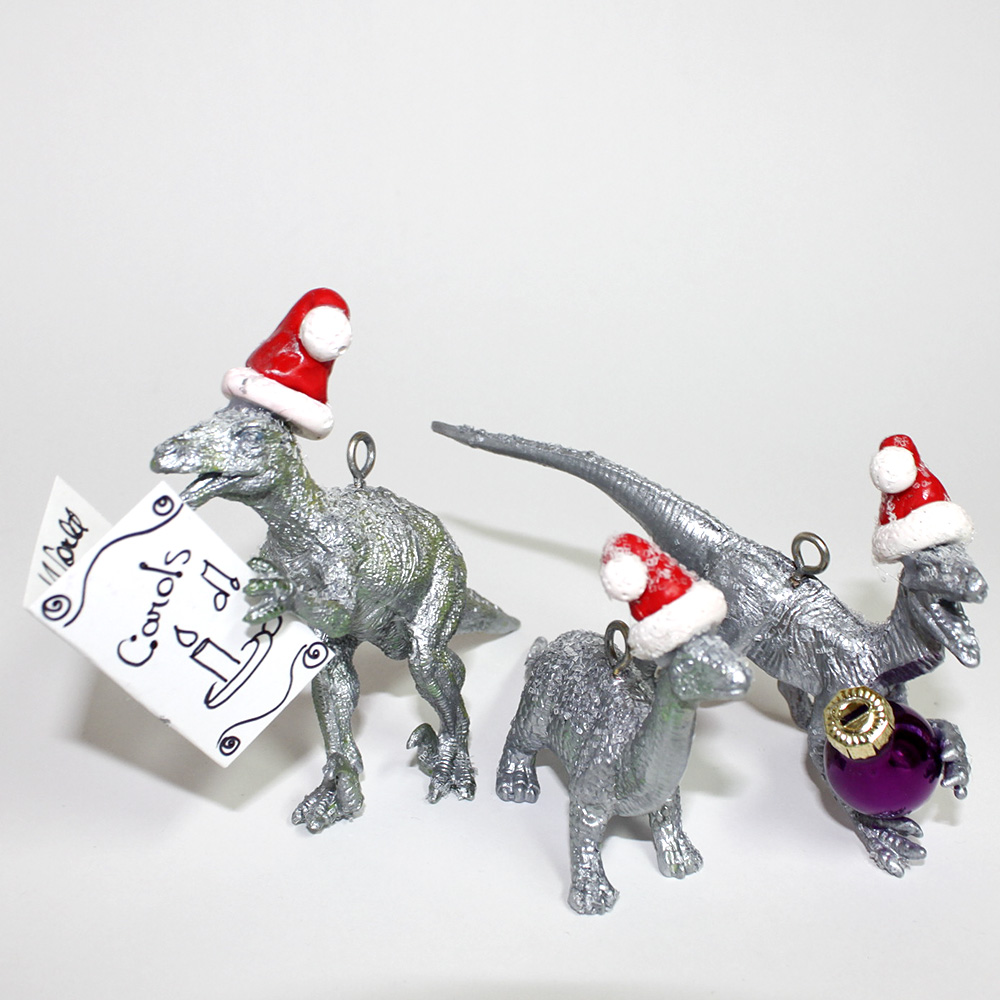
Cheri: This little group of dinosaurs are all dressed in their finest silver and glitter and are ready to decorate your tree.

Supplies:

Toy dinosaurs

Silver paint

Glitter

Oven-bake clay, red and white

Eye hooks

Paint your dinosaurs. I think you could probably spray paint them, but it is pretty cold here and I don’t think it is a good idea to spray paint in the house. (LOL)

After they are painted, (maybe 2 coats), put another coat of paint or sealer on them, and while they are still wet, sprinkle them with glitter. You could probably put a pretty heavy coat on, but I wanted them to look like they had been “kissed” with snow.

Knead a small ball of white clay and red clay, make a small coil with the white clay and roll it into a circle. Then make a small white ball for the tip of the hat. Make a small Hershey’s kiss with the red clay and stick it to the white circle. Attach the pom-pom and bake the clay according to the instructions. After they are baked and cooled, apply a little clear sealer and sprinkle with glitter.

Attach the red hat to the dinosaur with hot glue and then decide if you would like them to be doing something. I made a music book for one of the dinosaurs to make him look like he was singing and the other one with the outstretched hands was given an ornament to hold. These were both hot glued on.

I hope you like the ornaments I have made for our Christmas Advent Countdown. Wow, Christmas will be here before we know it.

dinosaurbuddiescherigawker1

Ornament Advent: Day 12 Wire and Fabric Scrap Puppy

christmaspuppylynne1

Lynne: I made this ornament “Puppy Under the Christmas Tree” from a wire armature stuffed with fabric scraps and then covered the figure with more fabric strips to get the finished shape.

I had so much fun doing this ornament. I love wire armature figures but I was sure that I could never make one. However I happened to see a book by Carla Sonheim called Drawing and Painting Imaginary Animals and found a photo of a figure done with wire and fabric. I draw my own imaginary animals called Squiggles and I told myself to make a figure just like I drew a squiggle. And it worked.

I used ordinary, hardware store galvanized wire (a gauge soft enough to work with your hands) to make the armature. One long piece made up the legs, body and tail. I used a shorter piece to shape the head and ears. I had to add more volume to the body and head to hold the fabric stuffing so I wired on some spiral shapes. Just keep adding and shaping, until you’re satisfied.

Then I stuffed and covered the armature with torn fabric scraps. Their frayed edges look like fur and give the ornament a vintage look. I used strips 1/4 inch to 1/2 inch wide and about 8 inches long. The strips need to be narrow to follow the contours of the body without sagging open in a curve. If I needed longer strips I just tied two or three of the shorter strips together. The knots disappear into the wrapped fabric. I did not use any glue or stitching to hold the strips on. I used scissors to poke the ends under the previous strips and tried to make sure loose ends were started and finished in  places that would be covered over. Small scissors are perfect for stuffing the ends under earlier layers.

I had old hat pins in my stash and I used them for the eyes and ears, but you could use buttons or embroidery. I used a small scrap of Christmas ribbon to make the collar and bow and fishing line to make an ornament loop, but I have to warn you that one look in those puppy eyes and it will be very difficult to stick the needle and fishing line through.

I’m keeping this puppy out of the ornament box after Christmas. He’s going to sit on the table right beside my favorite chair.

christmaspuppylynneback

t

christmaspuppylynnegawker

Cootie Insect Collection Specimen Box

Craft Crafty Sisters Cootie framed picture specimen collection
Framed cootie scientific specimen box to hang on your walls.

Cheri:

I picked up a box of Cooties last year at a garage sale. I had a plan and it didn’t involve playing the game. I like the look of insect displays, but I don’t  want to have a real insect display. I could have a Cootie display though.

After inspecting the cootie, I felt that I should split the thorax and head. There is a seam that runs along the two pieces and if you carefully insert a flat screwdriver into it, it will pop apart with a little effort. I took the front pieces of the thorax and head and worked with them in the specimen box and chose the placement.

I did have a bit of difficulty when it came time to attach the legs to the thorax, so I decided to hot glue the legs on to the thorax and glued it in place. I then hot glued the head, antenna and the tongue in place. I then cut a scrap of paper and hand wrote “Cootie” to make it look like it was a real insect specimen and pinned it in place.

This was such a fun project. I think I really like it because it is unexpected yet it is expected.

Insect Collection Craft Handmade DIY
Cootie insect collection.

Christmas Ornament Countdown: Steam Punk Felt Bird

Christmas Ornament Countdown
Steam punk felt bird Christmas ornament.

Cheri: This little bird is all decked out in his Christmas Regalia. He is just not satisfied with being just a bird, he felt the need to dress for the occasion. And when I say dress for the occasion, he really did. He has a lovely crown, quite nice decoration on his tail feathers and he is wearing some very nice wing bracelets.

The body of this little bird is felt that has been sewn together and stuffed. I then took several pieces of different colored wire and used it in place of feathers. He is a little bit of a steam punk bird with all his attire. I hope you like him as much as I do.

Christmas Ornament Countdown
Felt bird.

Merry Christmas from Crafty Sister Cheri.

Christmas Ornament Countdown
All dressed up in steam punk.

Christmas Ornament Countdown: Teeny Tiny Places

Christmas Ornament Countdown
Teeny tiny plastic terrariums.

Cheri: Teeny tiny terrariums are pretty fascinating places. Those little spaces made with very few items can evoke a whole world by what you see when you look into it.

These little spaces are really quite easy to make and once you have your materials, you can make several at once.

I love to buy things from gumball machines, not only do I like the prizes, but I think I like the containers the prize comes in even more. They certainly lend themselves to this kind of craft.

Gumball vending machine containers

Air dry white clay

Small piece of mirror or tiny glass

Glitter

Small animals

Chenille stems

To start with make a hole in the container. To do this you need to remove the cap and hold the clear dome so you have the convex part toward you. I heated an ice pick to make the hole.

After I had the hole completed, I took a piece of wire and made a loop on one end. I threaded the end of the wire without the loop through the hole and made another loop on the outside of the dome and cut off the wire.

To make the base of the tiny space, I used the cap of the container. I glued a small bit of air dry clay into the base and squished the piece of glass, or mirror in the center. Then I took a piece of chenille (I used tinsel chenille) and cut it very small to look like a tree. I glued this into the clay.

I glued very small animals beside the chenille tree to make it look like a snow scene and let the bottom portion dry overnight. I do this to make sure that there is no shrinkage. After it dries I take a small paintbrush and brush glue over all the surfaces that I want to put snow/glitter on. Shake off the excess and glue the bottom onto the top. This makes it permanent. Make sure you use just plain old glue for this part. I used an epoxy once and melted the face off of a deer (kind of creepy).

And there you go, all done. The little ones would look great on a small tree and the one that is a little larger I made just to set on my desk. I really enjoy looking into it and feeling the mood of the season any time of year.

HAPPY HOLIDAYS

Christmas Ornament Countdown
Two deer at the water's edge.
Christmas Ornament Countdown
Swan on the lake.
Christmas Ornament Countdown
Close-up of snow scenes.
Christmas Ornament Countdown
The gumball containers are teeny tiny places.
Christmas Ornament Countdown
Teeny tiny places in teeny tiny spaces.

Sparkly Jewel Cardboard Rings

Tiphony Rings
Tiphony cardboard rings.

Cheri: I find that a lot of the things I create is because I can’t create something in the usual way. In my perfect world I would be able to make jewelry from silver and have a jewelry bench with a torch, a jewelers saw, and the like. Since I don’t, I have decided to do the next best thing. I create out of what I have.

These rings are similar to how they would be made if I was using a precious metal, only a whole lot easier. The bezels are created by gluing a strip of cardboard into a ring. Then glue the edges of that ring to another piece of cardboard. After it is dry I cut closely around the strip.

I then make a ring band with another strip of cardboard and glue the bezel on to it. I  painted the whole piece to give it a patina like finish. After that is dry, I filled the bezel with sparkle glue and covered it with Mod Podge Dimensional Magic.

This was a really fun project and is quite easy. I have to thank Loryn for coming up with the great name of “Tiphony.” I just love the name and it really sums up the whole project.

Tiphony Rings
Close-up of jeweled cardboard rings.
Paper Rolls Ring
Jeweled paper rings.
Tiphony Rings
Jeweled paper rings.

Crafty Challenge 4: Freestyle Machine Embroidery in the Spirit of Coach Willis

Crafty Challenge 4
My interpretation of the spirit of the Coach Willis bag.

Cheri: Whew, what a challenge this was. It was tough one, but, it was also an awesome one. I think I spent the first week trying to decide how and what I wanted to make my purse out of.

I have always enjoyed doing machine embroidery, so I decided that I would embroider the outside of my purse. I was pretty sure in my head of how I wanted it to look, so I looked around at my fabric supplies, (which is not nearly as grand as Loryn’s), and chose what fabric I wanted to use.

After one failed attempt with the fabric I had on hand, I decided to buy some new fabric. I headed to our local Wal-Mart, which has just put in a small fabric selection, after our Jo-Ann’s closed, and chose a half yard of brown canvas, I also picked up some lining fabric that went with the brown nicely. With fabric in tow, I headed home.

This was Thursday, I had 3 more days to go. I have to admit that my style of crafting is a tad bit unique. I don’t really measure anything. I will try to use a straight edge to get the proportions right but more often than not I will use the selvage edge to base my edges on. And so the great purse challenge began for me.

I worked until midnight on Thursday, midnight on Friday and started working again at 2:00 pm on Saturday. Most of the time was spent with the embroidery and the base of the bag, and then the unspeakable happened, I accidentally melted some of the lining of my bag with the iron.

I knew that this was not going to be an easy fix. So after entertaining several options I picked up some other fabric I had on hand from Loryn’s stash and started working with this. Essentially, I started again from square one.

I spent several hours on Saturday redoing my purse and in the end I was really happy with how it turned out. It looks like me and I am really quite proud to carry it.

Crafty Challenge 4
The back of the bag and the details of the handle.
Crafty Challenge 4
The side of my bag and a close up of the hardware I used.
Crafty Challenge 4
Freestyle machine embroidery leaves.
Crafty Challenge 4
The lining of the bag and the reverse side of the front leaf embroidery. The reverse looks as good as the front.
Crafty Challenge 4
This pocket holds my phone.

Crafty Challenge 3: Drinking Straw Necklace

Drinking Straw Necklace
Drinking straw necklace with triangle and chain links.

Cheri: Wow, what a tough challenge number 3 was. I spent a week trying to figure out what I was going to make. I had all kinds of ideas floating around in my head and it really gave me a new perspective on how I looked at items that I was throwing out. With projects like this, I guess the hard part is just picking up something and working with it. It doesn’t always mean that you will like what you are making but each step will give you some insight into your final product.

I decided that I would make my project out of straws. So I grabbed a bunch of straws and started to cut them, bend them and punch holes in them. When I came to the flexible part, which I had discarded, I started to work with the curves. I finally decided that I was going to make them into triangles and I would link one into the other. I fiddled with them until I had the size I wanted and then I glued each one of the ends in to the other end.

I worked with the possibility of making them into a bracelet, which would be awesome, but I really wanted to make a necklace as I had been working with using the leftover portion of the straws as a link in a chain and I liked how it looked.

I love the way the necklace hangs. After I completed it, I started thinking about using straws in different colors or using clear straws. I even worked with a hole punch and put holes in the straws and was able to put other straws through the holes and build structures, like you would with Tinker Toys.

For all my misgivings about this project it ended up being a project with unlimited possibilities, and a go-to whenever I want to make a unique piece of jewelry that is really “out of the box”.

Drinking Straw Necklace
Close up of triangle links.
Drinking Straw Necklace
Close up of chain links.