All posts by Kristin McCormick

Crocheted earmuffs in cream and black wool yarn.

Crafty Challenge 12: Headwarmer – Earmuffs


Crocheted earmuffs in cream and black wool yarn.

Our most recent crafty challenge was to make a headwarmer. This could be in any color, material, style or shape. Cheri was ahead of us all and posted her adorable recycled sweater hat here. We gave ourselves 3 weeks to make this particular challenge as we were all still recovering from the holidays. I had mine done in less than a week and then had to try very had not to talk about it or brag about it. Of course, this early birdness of me is now completely offset by my late posting.

I love earmuffs, but have never been able to find a satisfactory pair. The never stay on my head or they don’t cover my ears very well. I also hate hats as I have very static prone hair. I knew as soon as we started talking about a headwarmer challenge that earmuffs were my challenge.

I bought a cheap set of fleece wrap-around earmuffs for less than $2. I then cut the fleece off the wire and used the wire for the base of my earmuffs. I have some lovely wool yarn, one skein in cream and another in black. I also received this gigantic spool of very fine black alpaca yarn on year for Christmas. I took all three yarns and crocheted my earmuffs with this lovely and warm combination.

Crocheted earmuffs made on wire frame.

I crocheted 4 circles in double crochet, all the same size and just big enough to cover my ears. I then held two of these circles on either side of the ear part of the wire frame and using half-double crochet, I stitched the circles together. I really wanted the double thickness which provides amazing protection from cold and wind. You could also put some stuffing or quilting in between the two circles if you wanted poofy earmuffs (this would be very cute for a child).

After stitching both circles on the frame, I then single crocheted around the length of wire between the ear pieces. To keep from having to weave-in ends, I folded the ends from the ear pieces under the single crochet. This made the back wire a little thicker and made it so I only had the ends from this last stretch to weave-in.

Crocheted earmuffs in black and cream wool yarn.

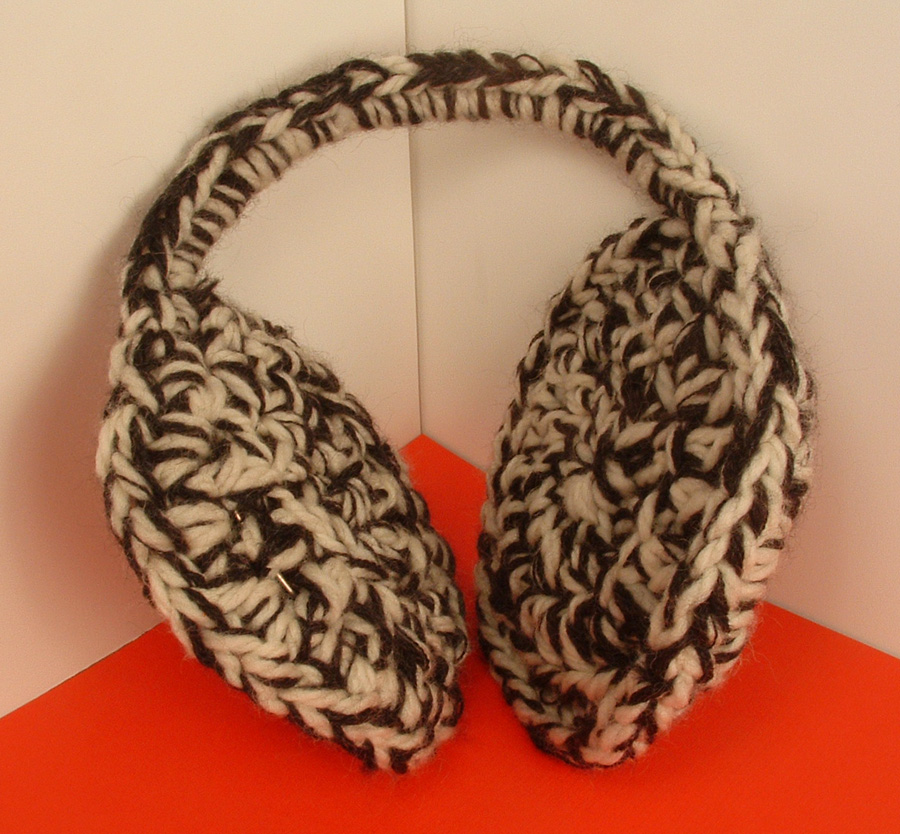
This completed my earmuffs. This project took me all of about 2 hours and most of that was just figuring out what stitch I wanted to use to make the circles. I have been wearing these for weeks now and just love them. They are comfortable, very warm, and I haven’t had cold ears at all this year!

Happy Crafting!

Kristin

Christmas garland made of wrapping paper.

Ornament Advent: Day 23 Christmas Wrap Garland

One of the greatest benefits of having a crafting family are how ideas are bounced, re-imaged, and re-shaped among us. I really love the Star Ornaments that Loryn made and I also just love the Chinese Fortune Garland that Cheri made. I decided to do something similar to Loryn’s stars and follow Cheri and make a garland. I am very happy with how it turned out!

Christmas garland made of wrapping paper.

Supplies:

Christmas wrap

Paper punch (I used 2″ seal punch)

Glue stick or pen

Yarn, string, or ribbon

Christmas garland made of Christmas wrap and shaped into a wreath.

I had some really shiny Christmas wrap and also had this 2″ seal paper punch. I used the paper punch to cut around 120 pieces out of the Christmas wrap. I then pulled out some thick crochet thread that is a sort-of soft gold color and is ribbonish (flat and about 1/8″ thick). I spread glue on two cut-outs and glued the crochet thread between the two pieces. You do have to be sparing with the glue as the Christmas wrap is very thin. I left around 1/4″ of the yarn visible between the cut-outs.

Christmas Wrapping Paper Garland

My garland is around 12′ long and looks great on a tree! I think this whole garland took me around 45 minutes to make. The other nice thing about this garland is that once you fold up the shapes, it takes up so little space and stores very well.

Christmas Garland made of wrapping paper.

Happy Holidays and Happy Crafting!

Kristin

Christmas tree ornament made of chenille pipe cleaners.

Ornament Advent: Day 19 Chenille Tree

I knew from the beginning that I would just have to make a tree ornament for this Christmas advent. I have had one in mind, but I had no idea to execute it. I watched Loryn’s and Cheri’s tree ornaments get posted and loved each of them. My goal was to keep the ornament very simple and easy to make. This whole ornament probably took me about 30 minutes and I was Google Talking (can I use that that way?) with Mom which slows me down as we each share what we are project we are working on.

Christmas tree ornament made of chenille pipe cleaners.

I used chenille pipe cleaners, cut in half, then wrapped candy cane style for the form of my tree. I know I keep mentioning temari lately, but I have a ton of supplies leftover and so I used some really cool fuzzy green thread from my temari stash to wrap around the chenille pipe cleaners. I really liked how the fuzzy thread looks like the needles on a pine tree. I tied the ends of the thread and glued my knots to ensure that they wouldn’t come loose.

Christmas tree ornament made of pipe cleaners.

I grabbed all the thread wrapped pipe cleaners in one group. ran some silver wire down the middle, and approximately 1″ in on the pipe cleaners, wrapped the silver wire around the group to hold it together. Then I bent all the wires down over the silver wrapping so that just the wire stuck out the top. I used this bit of wire to string the wooden star bead and make the loop for the hanger. At this point, it you didn’t put the hanger on the ornament, it actually looks really cool just as a decoration for your table, although I would recommend putting something under it as the pipe cleaners are a bit scratchy.

Ornament hook made to look like a Christmas tree.

I love the hanger I made for this ornament. Whoever said that you needed to have plain hooks for your ornaments? I made the hanger out of more silver wire, just bending it into shape and curling the end so you didn’t poke yourself with it.

Ornament hook made of wire to look like a Christmas tree.

Happy crafting!

Kristin

Thread ball draped with glass seed beads sewn into ribbon.

Ornament Advent: Day 15 Beaded Ball

Gonna Go Back in Time!

Thread ball draped with seed beads

So, I was not feeling at all well this weekend and missed my Saturday post for the Ornament Advent. To make up for it, I decided to splurge and make a slightly more difficult ornament. For this ornament, I once again raided my temari ball stash and used one of the green balls for the base. It is around 3″ in diameter. I then wrapped the ribbon around the ball tacking it down first with pins and then with basting stitches.

Thread ball draped with glass seed beads sewn into ribbon.

The beads are from the giant spinner of seed beads that Mom and I bought to take with us when we went camping (yes, we like to craft while camping). I strung the beads and crossed under the ribbon, trying to make a slight draping effect while doing so. It was interesting how much heavier the ball got by the time I was finished. All those glass beads weigh more than you would think.

Green thread ball draped with stands of seed beads.

I then decided that I needed a bead topper and found a lovely smoky gray glass bead in my oddments and leftovers drawer that looks great. I made the hook and I was ready to go.

Green thread ball draped with seed beads.

I am really pleased with how this one turned out.

Happy Crafting,

Kristin

Ornament Advent: Day 11 Foil and Scrapbook Paper Ball

I really wanted to make a simple ornament with aluminum foil. I have been wracking my brain trying to think of something and it hit me while I was driving home from work. I could make an awesome ball with strips of foil and paper.

Ball Christmas ornament made of strips of paper and aluminum foil

The ornament is a ball inside a ball. The style is reminiscent of a ribbon temari ball  that I made years ago. I cut strips of aluminum foil 1″ wide and strips of scrapbook paper 1/4″ wide (all the strips were roughly 12″ long). I folded the foil lengthwise to not quite in half. I then folded the other edge to give myself two nice, smooth edges. This made the foil strips about 3/8″ wide. I ran a bone folder over the foil strips to make them smooth and shiny. I glued the scrapbook strips to the foil strips and let them dry.

Paper and aluminum foil Christmas ornament.

After they were dry, I cut the strips to 10″ long, just to make them easier to handle. Then I wrapped the strips around a solid object (I used a small glass for the outer ball and the glue bottle for the inner ball), glued the ends down, and cut off the excess. I made four smaller rounds and 4 larger rounds. I made the inner ball first then added the larger strips to make the outer ball. I glued the top and bottom where the strips met.

Ball ornament made of strips of paper and aluminum foil.

I made a small circle of foil about 1/4″ wide and glued that to the top of the ball and attached a homemade hook and I was finished. I think the whole ornament took me about an hour to make.

I am really happy with it, although it is rather delicate. At least if it gets bent out of shape it is really easy to fix.

Happy crafting!

Kristin

Felt Christmas Tree ornament

Ornament Advent: Day 7 Felt Tree and Wreath

Today’s ornament was a massive lesson in frustration. Or rather, the ornament that you don’t see was. My original idea for an ornament failed spectacularly. My craft table is covered with parts, bits, and pieces. Around 10:00pm I realized that it was never going to work. Then began the frantic search. I dug through all of my supplies in the hope for a lightning strike. I didn’t get one until I was texting my sister that I was ready to give up. Right after I hit send, it hit me.

Felt Christmas Tree ornament

I love felt and I had a lot of fun last year with the pins and sequins ornament I made, so why not combine the two. The base of this ornament is a ball I made for temari. Temari is a Japanese art form that I played with a few years ago and kept all my supplies (go figure). You make the ball by taking a very large handful of stuffing and wrapping it with thread (one way to make the ball anyway). A lot of thread. You keep winding the thread around and around and around the stuffing until you get a round ball. This particular ball was my attempt to create a flattened ball to showcase a design on the front and back. I never did get around to completing the temari, but it gave me an excellent form to create my Christmas ornament.

Felt wreath side of the ornament

Next, I cut strips of felt around 1/2″ to 3/4″ wide and started cutting these strips into triangle pieces. Then I took my piles of pins and sequins and pinned the triangles to the ball to make the images of the wreath and tree. I used some fuzzy white thread to make a sort of frame to separate the two images by sewing it around and around the ball. I made a quick hook and voila! I was finished.

Side view of Christmas ornament
Here you can see the fuzzy white thread.

I really like the effect of the multiple colors of green for the Christmas tree and the stars in the wreath really make it pop. You could use anything for the form of the ornament, Styrofoam would be very easy. I imagine a Santa Claus/reindeer ornament would be very cute. Anyone want to try it? Send us your picture and we will post it! I would love to see someone else’s version.

Christmas tree side of ornament

Just goes to show that necessity really is the mother of invention.

Happy Crafting!

Kristin

Gold ring Christmas ornament

Christmas Ornament Advent: Day 3 Gold Rings

Gold rings2

So, I make jewelry. In my collection of jewelry supplies are all sorts of materials and findings for really old projects that I just cannot get rid of. I guess you could call me a supply hoarder (I don’t feel too bad about this as I think Cheri has a bigger collection). Ask anyone in my family and they will tell you that I am a museum for clothes and supplies (I still have some beads from my very first Fire Mountain order around 20 years ago, and crap did I just make myself feel old). Anyway, the gold rings I used in this Christmas ornament have been in a drawer for years. I made a pair of earrings for my M-I-L out of them and of course, I did my usual M.O. and bought way too many supplies and was stuck with a bag full of various sizes of gold jump-rings.

For this project, I laid down some wax paper and pulled out my bottle of bead glue (super glue). I used some tweezers to place the rings where I wanted them and glued the whole piece together. I like the project so much that I think I am going to make a set of earrings with a similar shape for the holiday season. The ornament is around 3 inches top to bottom and side to side, not including the hook.

Gold ring Christmas ornament

This is a very simple project and looks great on a Christmas tree. The jump-rings are available at most craft stores in the jewelry supply section.

Happy crafting!

Kristin

Wreath of copper leaves

Crafty Challenge 11: Copper Fall Wreath

Hello Again! I feel like I have been incommunicado for a very long time. All the Crafty Sisters got together last weekend for our latest Crafty Challenge. This challenge was to make a fall wreath.

Wreath of copper leaves
The wreath is 15″ tall and 13″ wide.

Due to everything in our house breaking down all at the same time, I was under a bit of a money crunch so I knew whatever I made, I had to have all the supplies already on hand. It helped that as soon as we started talking about a fall wreath, I was picturing a leaf wreath made of copper. And as some of you might remember, we did that wonderful Copper Crafty Challenge a while back and I still had a lot of the copper discs leftover from the copper necklace I made. The discs are remarkably easy to cut with heavy-duty scissors and I knew that they would make beautiful leaves.

Here you can really see the oily effect that burnishing the leaves created.

So, I started cutting and cutting and cutting. I had some very interesting dimples in my fingers from the force of cutting the copper discs, but I had some amazing maple leaf shapes. I also knew that I wanted to burnish the leaves to create different colors. I pulled out my trusty propane torch and proceeded to burn the crap out of one of the leaves. I learned very quickly that you only wanted to brush the copper leaves with heat very quickly. If you wanted a deeper color, you just kept running the torch over the copper quickly and letting it cool a second and repeat to the color desired. Thankfully, the blackened portions just wipe off and you can burnish again to your hearts content. I then bent the leaves very gently with a pair of pliers to give them some depth.

I did not coat the copper leaves with anything as I really will like the aging effect on the copper.

I made the ring the leaves are attached to as well, the wreath frame that is. I had a length of copper pipe (again left over from the Copper Challenge that I never used) and I ran a wire through the pipe and bent it all in a circle. I used the wire to make a hanger at the top of the frame. It turned out that the length of pipe was not long enough, but as I originally planned to let the pipe show through in some places, I would just make sure the leaves covered the wire parts of the wreath frame. I then used one of my hammers and my anvil to flatten the pipe to make the leaves attach better.

Here you can see the depth of the copper leaves.

I knew that my personal soldering abilities were not good enough to be able to place the leaves exactly where I wanted them so I switched my connecting component to hot glue. This worked out very well and I was able to place the leaves precisely where I wanted each one to go. I then flipped the wreath over and poured hot glue all over the frame where it connected to the leaves. This gave the wreath lots of stability and now absolutely nothing moves.

Photo showing wreath hanging from my loft
This is where I hang my wreathes in the house.

I am so happy with my wreath and it is now hanging in my house and just looks gorgeous. I did have a good laugh at the unveiling though. You will find out when more wreaths are posted! Amazingly, working with all that cut copper, I never did cut myself. This may be the first project in a while that didn’t end with a few bandaged fingers.

Happy Crafting,

Kristin!

Photo of 6 different pieces of white diner china.

White Diner China

So, the craftysisters seem to follow in each others footsteps when it comes to certain household items. Dishes seems to be a big one. I have been passed on several sets of dishes over the years when other craftysisters decide to move on to something different. (I am also called the family museum for some of the things I have been passed that I still own.

Photo of 6 different pieces of white diner china.
I bought the 2 bowls in the back, Loryn bought me the 2 round plates on the left and I got the 2 oval plates on the right from Mom.

This time though, we all seem to be following Mom (craftysister Lynne), but she isn’t moving to something different. Thankfully, over the years she has collected so much that she was actually able to cut her collection into three parts and with only $26 and some help from Loryn, I was able to complete my set (or rather, complete it as much as I wanted).

Photo of 2 different sizes of oval diner china.
These are the 2 sizes of plates I got from Mom. There are 11 of the big oval plates and 8 of the smaller oval plates.

White diner china is something that I never really figured I would get into, but it is so versatile and classic that it will never go out of style. In fact, when I wanted to complete the set, I went to Old Time Pottery and found three gigantic aisles of white and off-white diner china and was able to match the color of the plates Mom and Loryn gave me.

Photo of 2 different sizes of round diner china.
These plates were found at Goodwill by Loryn. There are 8 of each size plate. (She found more, but kept the rest.)

I am very happy with my new set and thought I would share it with you. Not all of our lives (quite clearly) are dominated by crafts, so I thought you might be interested to see what has come into my life lately. Now I will need to post some photos of the food I will be putting on these dishes in the future!

Photo of two different sizes and styles of round diner bowls.
I love both of these styles and sizes of bowls. I bought these myself from Old Time Pottery (8 of each style) for $26.
Photo of 2 different round diner bowls seen from a side view.
The bowls on the left are cereal bowls and the bowls on the right are pasta bowls.

Full Listing:

11 Large oval plates – 11 3/4″ x 7″

8 Small oval plates – 9 3/4″ x 8 1/2″

8 Large round plates – 10 1/4″

8 Small round plates – 6 3/4″

8 Cereal bowls – 6″ x 3″

8 Pasta bowls – 8 3/4″ x 2″

Happy crafting,

Kristin

Side view of felt flower magnets.

Crafty Challenge 10: Felt Flower Magnets

So, we didn’t announce our latest challenge publicly, but we decided to make magnets! I have still been having too much fun with felt lately and figured that what better material to use for my magnets.

Overhead view of all 18 felt flower magnets.
Here are all 18 magnets that I made.

I decided to make felt flower magnets and as usual, I giggled my way through the project. Something about felt is so much fun and is so enjoyable that I just laugh and chuckle the whole time. I think it is also one of the few materials that I can almost always get exactly what I imagined in my head created with my hands.

Side view of felt flower magnets.
Here you can see the depth of each flower magnet.

I bought myself a bunch of magnets from our local hardware store, Kleindorfer’s. They have everything! The magnets are wonderful and are just right for holding miscellaneous objects to my fridge. I used that wonderful crafter staple, Aleene’s Tacky Glue to hold everything together and the felt is just standard crafter’s felt that I have bought from Joann’s and Michael’s.

Side view of felt flower magnets.

I used Google Images with the search on “flowers” and made most of my magnets based on photos of flowers I saw there. I didn’t use any patterns for these flowers, just cut out shapes that fit the petals I was trying to create. Some of the flowers are just images from my head and an imaginative use of various petal shapes.

Top view of felt flower magnets.

I did go through the flowers afterwards and do some tugging and pulling to be sure that all the petals and stamens would hold well. I had to touch up a few places with some more glue, but I think they will stand up to regular use very well.

Top view of felt flower magnets.

I had a lot of fun with this project and cannot wait for the next one!

Top view of felt flower magnets.
I just love the chrysanthemum shape!

Happy crafting,

Kristin