Squiggle parrots know exactly where to perch to get their point across.
This drawing is a combination of markers and colored pencils. I am trying to get a good layer of pencil, then a smoother layer of marker and then shading by the pencils.
It is never worth it to argue with a parrot. They can do it standing on their heads.
-Lynne: Our hardware challenge sounded straight forward when we first proposed it. The idea of being turned loose in a hardware store seemed more like a dream than a challenge and the $5.00 limit on materials cost did not daunt me at all. We are “make-do” sisters.
Earlier this spring, I found the book “Simply Sublime Bags” by Judi Kahn. In it she shows how to make “no sew” purses using fabric and duct tape. I was so taken by the idea that I made myself a keyhole clutch from a feedsack with matching duct tape. The pattern can be found here online, but the book is well worth getting for all the wonderful ideas.
Beyond being extremely cute and novel, my clutch has been surprisingly durable. I have been wanting a slightly larger purse and this challenge seemed like the perfect time to make another one. After all, duct tape is to a hardware store like water is to a duck. Besides with a project like this, all I would need was the fabric and something to hold the fabric together in its purse shape.
I’m afraid that I became rather testy when I realized that glue, thread, staples, paint, ink and tape would count towards the $5.00 total. I can tell you right now that no hardware store can sell you 50 cents worth of glue. We had to buy what materials we needed in the quantities available and we could not buy a quantity and divide the price by the number we used. I only wanted 4 yards of fishing line, but I would have had to buy 700 yards for $2.99. That was more than half my budget. I needed to rethink how to “sew” the purse together.
I wandered the aisles of all the hardware stores in town. I had knowledgeable, helpful men following me trying to help me find the “right part.” They would always take a step backwards when I told them that not only did I not know the part I needed, I did not know what the part would be for. Hardware by its very nature is made to be used in the manner it was made. Wood screws are for wood and metal screws are for metal and never the twain shall meet. People who work at hardware stores are bewildered and confused by browsers.
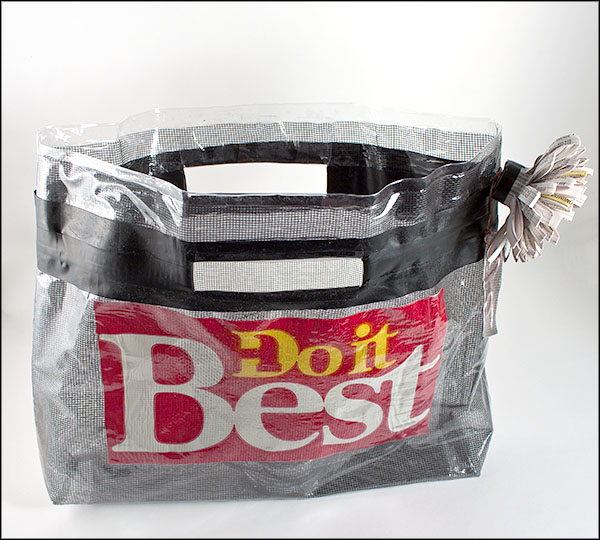
When I saw the fiberglass window screen, I knew I wanted to use it as the fabric for my purse. I could buy one foot of the 36″ wide screen and stay well within my budget. I noticed a roll of clear plastic vinyl next to the screen and remembered that plastic can be fused into a fabric by heating it with an iron. Heat unlike glue and staples would not cost me anything. I could sandwich the screen in between two pieces of the plastic and have both my fabric and my “glue.” I added some electrician’s tape which is cheap because it doesn’t stick to anything, a carriage bolt, a foot of copper wire and a brass hex nut to my list and I was 14 cents under my $5.00 limit.
I found that fusing the “fabric” could be tricky. You have to keep in mind what will melt fastest and that plastic can shrink in odd ways and iron accordingly. The holes in the fiberglass screen allowed the plastic to adhere to itself, but I found that where I needed a strong bond I had to use just the clear plastic. By cutting the screen smaller than the plastic, the seams were only plastic and strong enough to hold all the stuff I put in a purse.
I desperately needed some decoration for my purse and I only had 14 cents left in my budget, but I had become a crafty challenge participant. I gathered up the paper bag I had used for the free popcorn, the plastic bag for my purchases and the free telephone directory at the end of the counter and felt crafty as well as rich in materials.
The electrician’s tape strengthened the open handles and made a nice decorative statement around the top of the purse. I fused the logo from the plastic bag to the front of the purse to add the graphic text and some much-needed color. Once you start fusing it is hard to stop. I fashioned the copper wire into my initial and fused it in a sandwich of clear plastic, fiberglass screen, the label from the paper bag and another layer of plastic for a hang tag.
– Paper flower and hang tag initial.
Hardware is hard and I wanted to soften it with a flower decoration. I had just noticed these paper flowers on craftgawker and I had that free telephone directory. I used a paper punch to put a hole in the edge of the purse and threaded the carriage bolt through it and the center of the folded flower. The hex nut secured the flower to the purse and made a “cuter than a button” flower center.
I may fuse some more plastic around the handles now that the challenge is over and I don’t have to worry about a budget. But I am very happy with the results. I love the idea of making your own fabric and fusing is forgiving. If you make a mistake, keep ironing things on till you like it. That is the way to Do it Best.
-Lynne: Our hardware challenge sounded straight forward when we first proposed it. The idea of being turned loose in a hardware store seemed more like a dream than a challenge and the $5.00 limit on materials cost did not daunt me at all. We are “make-do” sisters.
Earlier this spring, I found the book “Simply Sublime Bags” by Judi Kahn. In it she shows how to make “no sew” purses using fabric and duct tape. I was so taken by the idea that I made myself a keyhole clutch from a feedsack with matching duct tape. The pattern can be found here online, but the book is well worth getting for all the wonderful ideas.
Beyond being extremely cute and novel, my clutch has been surprisingly durable. I have been wanting a slightly larger purse and this challenge seemed like the perfect time to make another one. After all, duct tape is to a hardware store like water is to a duck. Besides with a project like this, all I would need was the fabric and something to hold the fabric together in its purse shape.
I’m afraid that I became rather testy when I realized that glue, thread, staples, paint, ink and tape would count towards the $5.00 total. I can tell you right now that no hardware store can sell you 50 cents worth of glue. We had to buy what materials we needed in the quantities available and we could not buy a quantity and divide the price by the number we used. I only wanted 4 yards of fishing line, but I would have had to buy 700 yards for $2.99. That was more than half my budget. I needed to rethink how to “sew” the purse together.
I wandered the aisles of all the hardware stores in town. I had knowledgeable, helpful men following me trying to help me find the “right part.” They would always take a step backwards when I told them that not only did I not know the part I needed, I did not know what the part would be for. Hardware by its very nature is made to be used in the manner it was made. Wood screws are for wood and metal screws are for metal and never the twain shall meet. People who work at hardware stores are bewildered and confused by browsers.
When I saw the fiberglass window screen, I knew I wanted to use it as the fabric for my purse. I could buy one foot of the 36″ wide screen and stay well within my budget. I noticed a roll of clear plastic vinyl next to the screen and remembered that plastic can be fused into a fabric by heating it with an iron. Heat unlike glue and staples would not cost me anything. I could sandwich the screen in between two pieces of the plastic and have both my fabric and my “glue.” I added some electrician’s tape which is cheap because it doesn’t stick to anything, a carriage bolt, a foot of copper wire and a brass hex nut to my list and I was 14 cents under my $5.00 limit.
I found that fusing the “fabric” could be tricky. You have to keep in mind what will melt fastest and that plastic can shrink in odd ways and iron accordingly. The holes in the fiberglass screen allowed the plastic to adhere to itself, but I found that where I needed a strong bond I had to use just the clear plastic. By cutting the screen smaller than the plastic, the seams were only plastic and strong enough to hold all the stuff I put in a purse.
I desperately needed some decoration for my purse and I only had 14 cents left in my budget, but I had become a crafty challenge participant. I gathered up the paper bag I had used for the free popcorn, the plastic bag for my purchases and the free telephone directory at the end of the counter and felt crafty as well as rich in materials.
The electrician’s tape strengthened the open handles and made a nice decorative statement around the top of the purse. I fused the logo from the plastic bag to the front of the purse to add the graphic text and some much-needed color. Once you start fusing it is hard to stop. I fashioned the copper wire into my initial and fused it in a sandwich of clear plastic, fiberglass screen, the label from the paper bag and another layer of plastic for a hang tag.
– Paper flower and hang tag initial.
Hardware is hard and I wanted to soften it with a flower decoration. I had just noticed these paper flowers on craftgawker and I had that free telephone directory. I used a paper punch to put a hole in the edge of the purse and threaded the carriage bolt through it and the center of the folded flower. The hex nut secured the flower to the purse and made a “cuter than a button” flower center.
I may fuse some more plastic around the handles now that the challenge is over and I don’t have to worry about a budget. But I am very happy with the results. I love the idea of making your own fabric and fusing is forgiving. If you make a mistake, keep ironing things on till you like it. That is the way to Do it Best.
-Cheri:Craft challenge 2 was a blast. The $5.00 limit adds an interesting twist to the challenge. But I wasn’t too worried about it. Here in Logansport we have a really cool old hardware store. I think they have some of the same merchandise that they had when they opened maybe 60 odd years ago. I spent a good hour pouring over the store, opening drawers and looking in all the little nooks and crannies.
I had so many ideas I knew I was going to have a hard time congealing them into one piece. I have a tendency to overdo things so I decided I was going to get a few items and work with them for a little bit to see what I could come up with. I picked up a variety pack of O rings, a retaining ring, a spring, a small flange washer and wire. I have spent probably the last 20 years making things with wire so I was pretty sure if all else failed, I would be able to make something with the wire.
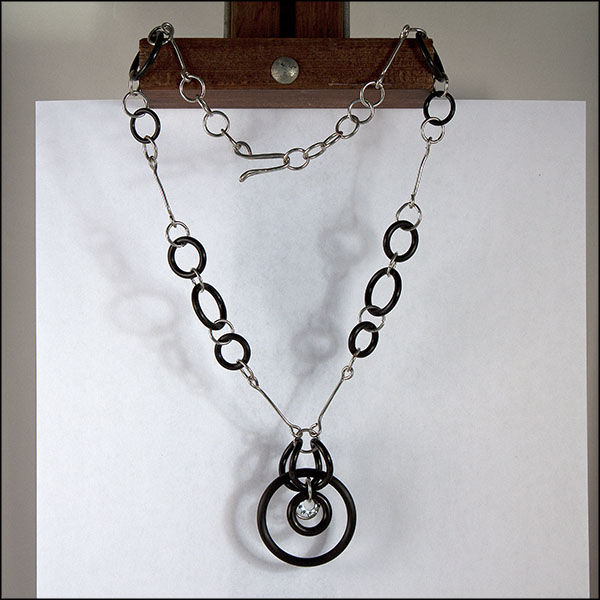
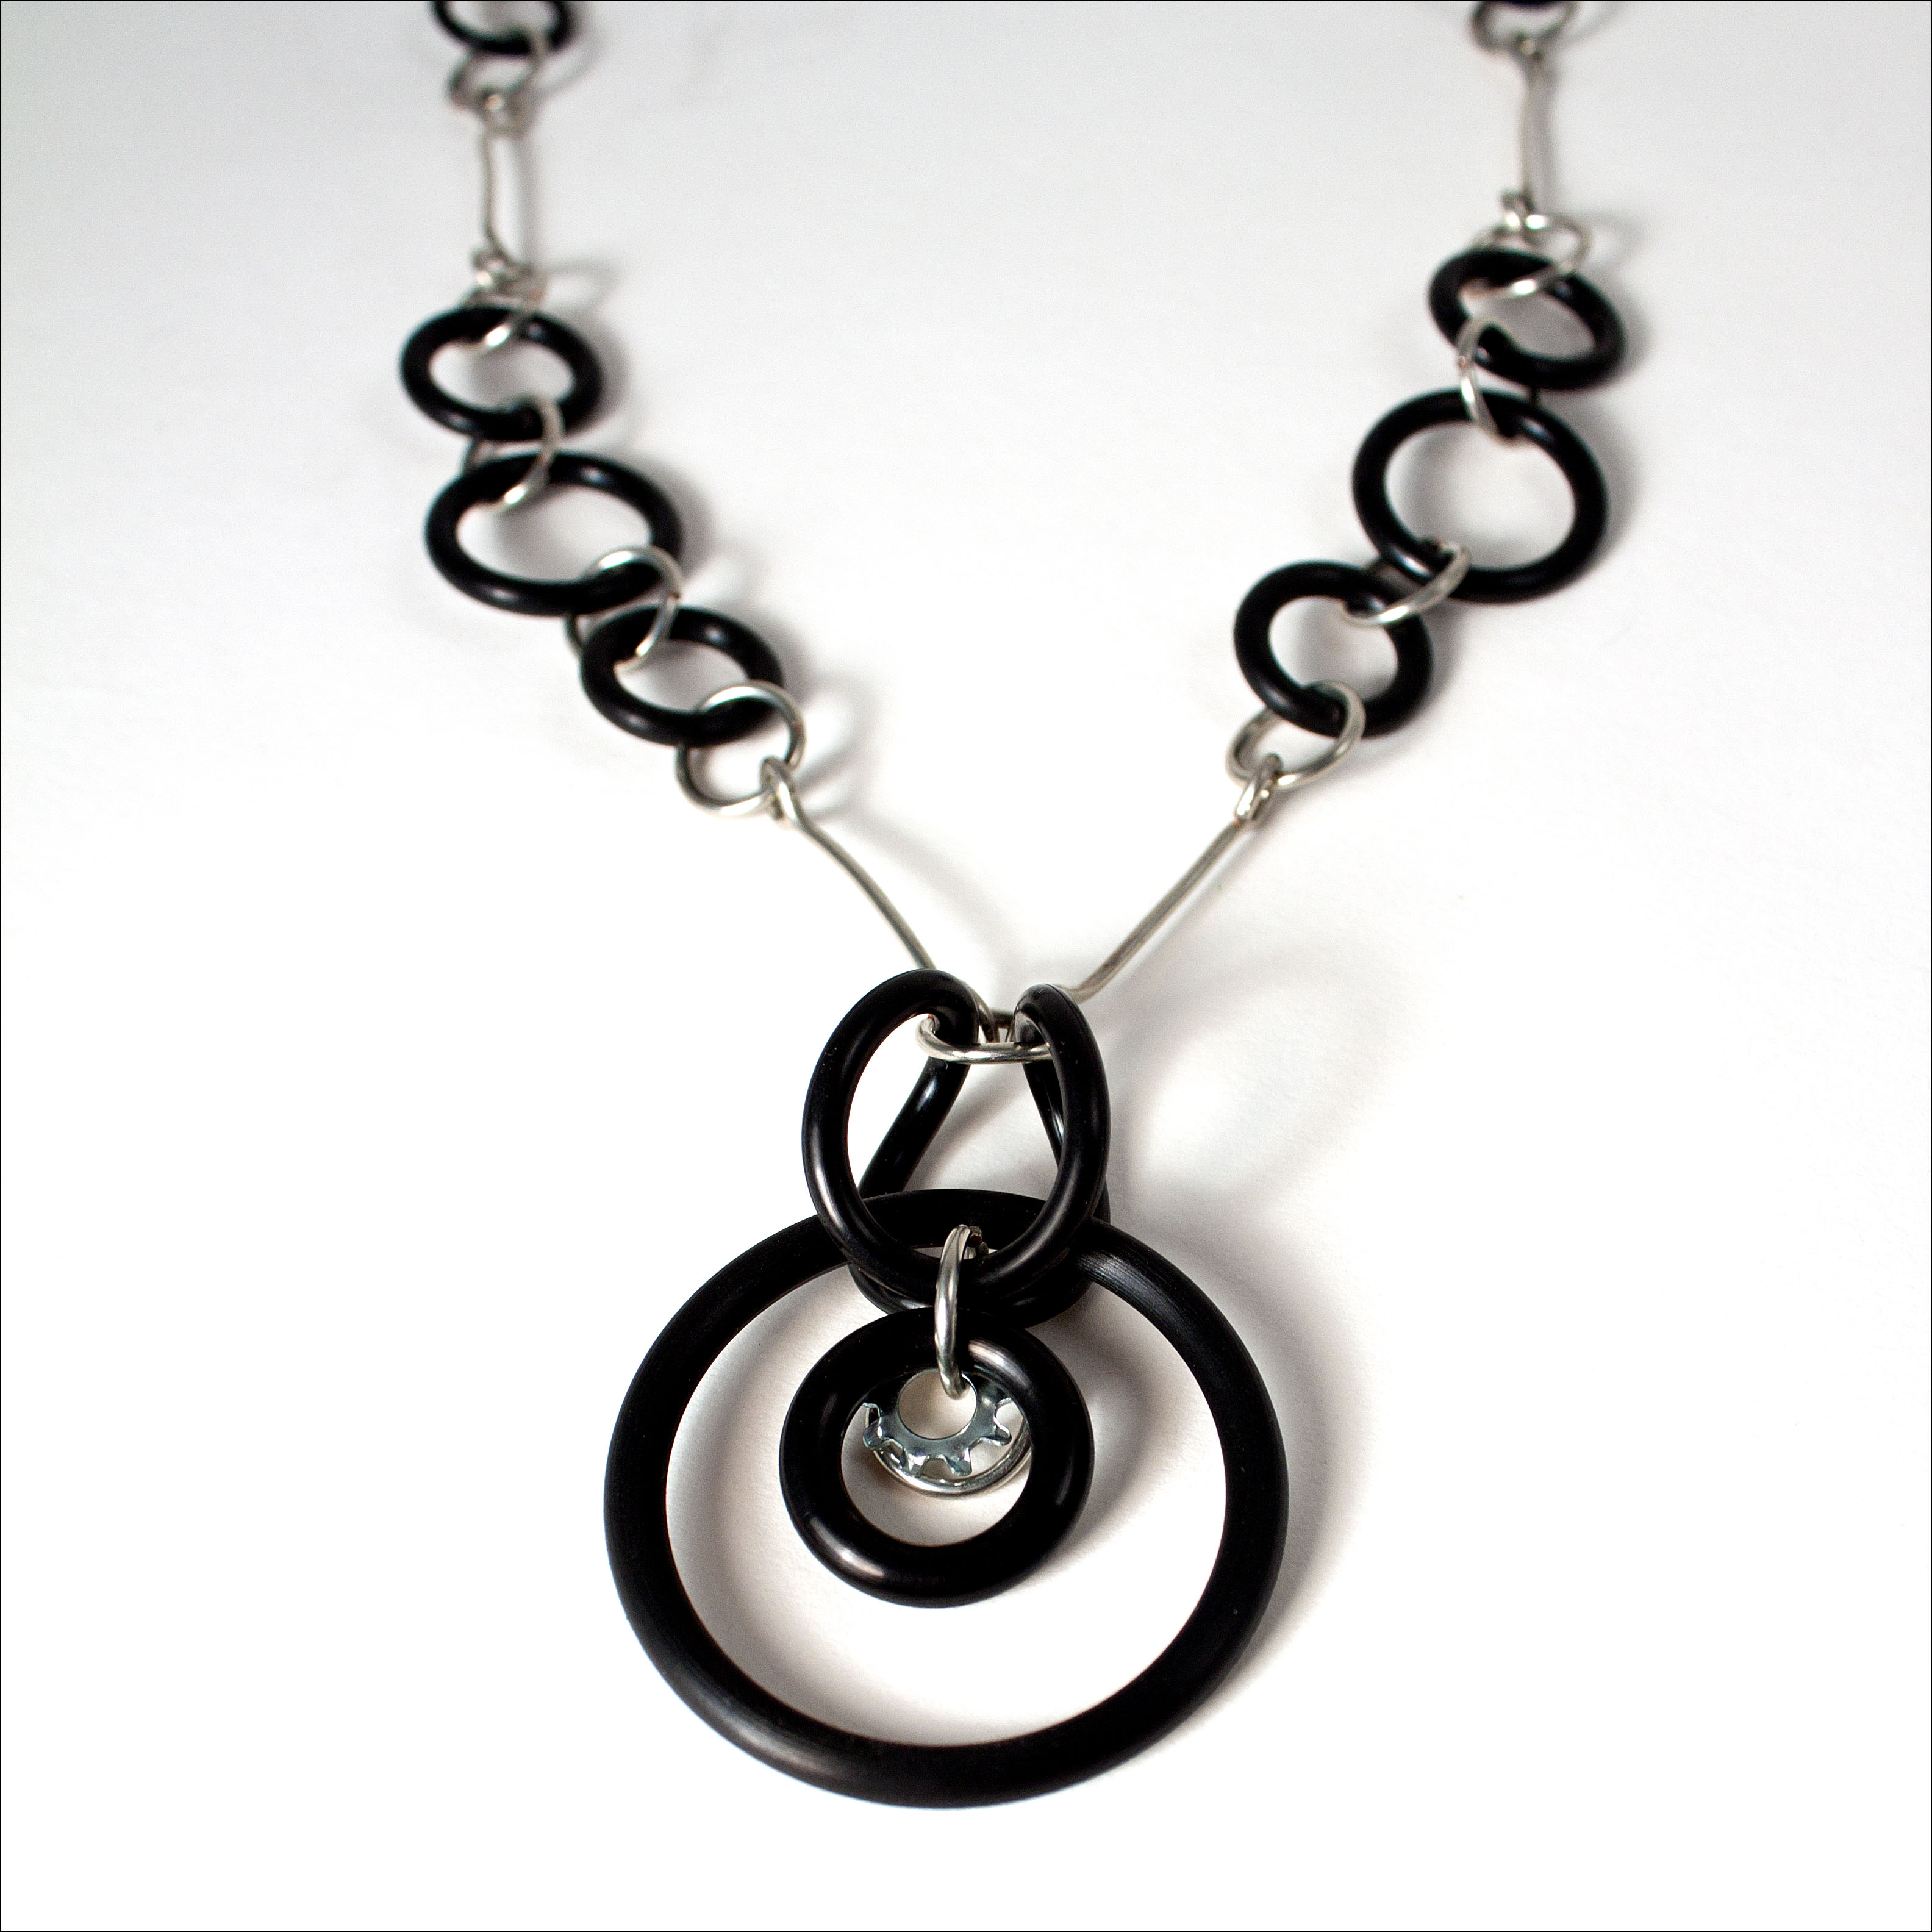
I divided the O rings up into sizes and worked with the large ones to see what I could make. I eventually hit upon the idea of twisting the circles to create a centerpiece for a necklace. I made wire links from wrapping the wire around a pencil and cutting them apart, and formed the longer pieces of wire by making a loop on each end. I was thrilled with the outcome and I think that the hardware store may become one of my favorite places to go for jewelry supplies.
The twisted O ring loop supports the two pendant loops.
We have reached the deadline of our second crafty challenge and for those who did see the post or who have forgotten here are our rules. This one was a lot more difficult than I expected it to be and I didn’t think that it would be easy to begin with.
$5 really does not go far in any store. I was a little lucky in that I have a wonderful hometown hardware store called Kleindorfer’s Hardware and Variety Store. Kleindorfer’s has been here for a long time and I don’t know that they update their prices often. All that said, they have the best customer service of any store in the Bloomington area. They are polite, know their stock and how to help even the most confused customer.
My search for a project consisted of me wandering in the store for anything under $2. I wrote in a notebook anything that might be interesting, trying to come up with an idea of what to create. After some trial and error I realized that the hardest part would be how to connect my project together (do you have any idea what glue costs?). Mine is actually held together with friction. and pressure, fancy words for “I stuffed it in there.”
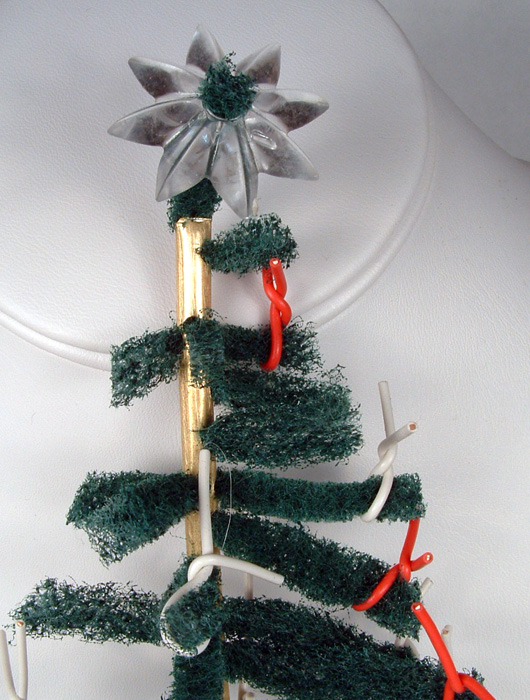
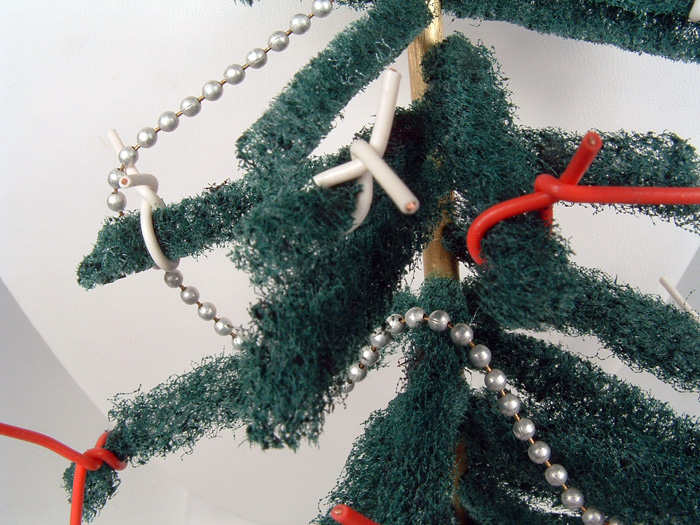
My Christmas tree!
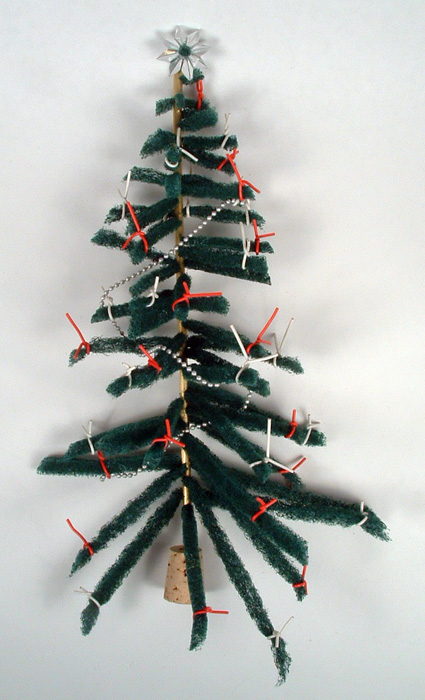
I managed to keep my total purchase to $4.87. I found a small brass tube at the hardware store, held it in a vise and drilled numerous small holes to fit the Scotch Brite branches. The first holes I drilled were way too small, so I went back through and drilled them much bigger which sped up the process incredibly.
A plastic star for securing paneling to a wall made a perfect tree-topper.A small cork is the tree stand.Matte silver ball-chain made an excellent garland and red and white wire made cute ornaments.
I am happy with how the tree turned out. It is amazing how you can come to depend on those regular crafting staples of wire and glue. Having to step away from these made this a very entertaining and imaginative Crafty Challenge.
I just went with colored pencils on this squiggle. I wanted to see the different shades of orange that I have. I did lay a base of yellow and red first and then used the oranges for shading.
I really like birds. And I love this creamsicle dragonbird.
I used colored pencil, markers and photoshop on this one. I worked so hard on the green wing that the paper refused to take any more color. It is great that photoshop can fix these things. This started as a scribble by my mother.