Category Archives: craft

Ornament Advent: Day 4 Pop Up Sticky Notes

popupornament

Lynne: I was surfing the web hoping to find an idea for our Advent Countdown when I came upon this great video from EepyBird. I fell in love with the sticky note pinwheels and started to think how I could modify one into an ornament. I needed a pad of pop up sticky notes, a glue stick, a darning needle, monofilament fishing line, micro glitter, spray adhesive and two buttons.

EepyBird.com counts out twelve pairs of pop up sticky notes and then glues the endnotes of the stack to each other. The structure is rotated three times to make the pinwheel. I must admit that I had to watch the video several times before I understood how the turns were done. If I watched where the doubled edges were each time the figure was turned, I could manage the proper sequence. Their excellent tutorial video is here.

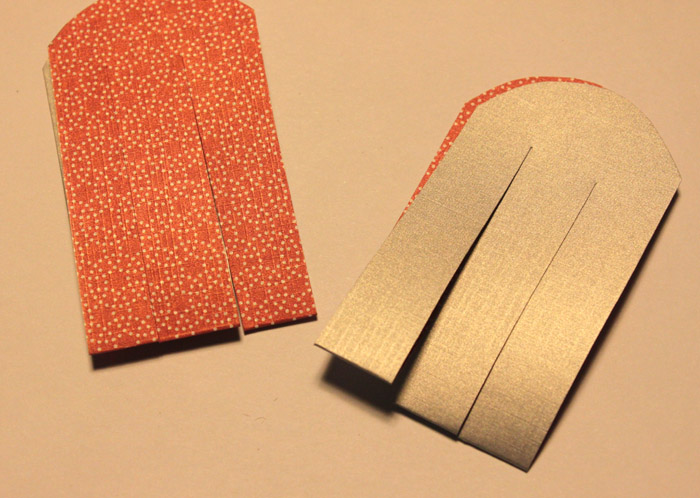
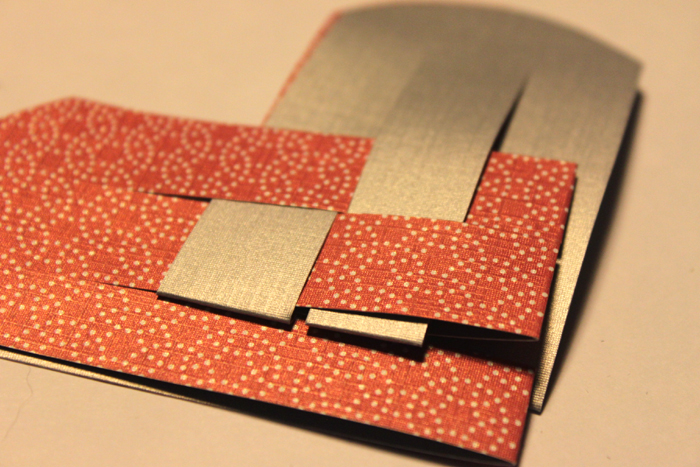
The resulting structure holds its shape enough to roll down an incline, but not well enough to hang on a tree. I decided to gather the fins (the doubled edges) to prevent the pinwheel from coming apart. I used a large-eyed darning needle (sharp enough to go through the paper) with about 20 inches of fishing line. I used fishing line since it is invisible and I had a spool in my craft drawer. Using the needle to punch a hole about 1/8 inch from the edge (see photo below), draw the thread of fishing line through each fin until all the fins are gathered in a circle. Pull the line tight and knot the ends. Don’t cut the thread.

I used the two buttons to cover the hole in the middle of the pinwheel. Thread one of the buttons onto your fishing line and then push the needle through to the other side of the pinwheel. Gather these fins the same way, add the other button and tie a knot to keep everything together.

I used spray adhesive and micro glitter to add some holiday sparkle. For the hanger, I made a loop with the fishing line and attached it to two fins (see photo below) for the best balance.

I really like how the pinwheel looks and was especially pleased to make something with such an unusual material.

popupornament2

Gold ring Christmas ornament

Christmas Ornament Advent: Day 3 Gold Rings

Gold rings2

So, I make jewelry. In my collection of jewelry supplies are all sorts of materials and findings for really old projects that I just cannot get rid of. I guess you could call me a supply hoarder (I don’t feel too bad about this as I think Cheri has a bigger collection). Ask anyone in my family and they will tell you that I am a museum for clothes and supplies (I still have some beads from my very first Fire Mountain order around 20 years ago, and crap did I just make myself feel old). Anyway, the gold rings I used in this Christmas ornament have been in a drawer for years. I made a pair of earrings for my M-I-L out of them and of course, I did my usual M.O. and bought way too many supplies and was stuck with a bag full of various sizes of gold jump-rings.

For this project, I laid down some wax paper and pulled out my bottle of bead glue (super glue). I used some tweezers to place the rings where I wanted them and glued the whole piece together. I like the project so much that I think I am going to make a set of earrings with a similar shape for the holiday season. The ornament is around 3 inches top to bottom and side to side, not including the hook.

Gold ring Christmas ornament

This is a very simple project and looks great on a Christmas tree. The jump-rings are available at most craft stores in the jewelry supply section.

Happy crafting!

Kristin

Day two “Ornament Advent Countdown”.

Cheri-December 12, 2012. Day two of “The Crafty Sisters Advent Ornaments“.
Snowflake ornament made with Tinker Toys

This is a super simple ornament to make and it really is pretty neat. It may not make the best ornament as it is a little large but it would be a great tree topper or a wall hanging.

All you need to do is get some Tinker Toys and pegs. I found some orphaned ones at a garage sale last summer and decided to give them a new life.

The design fell in to place pretty easily and then, I just hot glued the pieces together.

The hard part for me was the painting. Spray paint seemed to be the best way to go, but the paint soaked right in to the Tinker Toys. After several coats (and a patchy finish), eventually I finished painting it with acrylic paint and glittered it.

This was a fun project and the possibilities are endless.

Merry Christmas-Cheri

snowflake12212 009


tinkertoyornamentgawker

Ornament Advent: Woven Paper Heart Ornament

heart

Loryn – The Crafty Sisters are kicking off our Advent Ornament Challenge! For each day of December up til Christmas, we’ll be posting a fun and easy ornament that you can make.

First up is this woven heart ornament. I remember making these in Girl Scouts in the early ’80s. I was fascinated by the technique. Weave the paper together, and it makes a basket. Magic!

To make the ornament, first pick out your paper. Back in the Girl Scouts, we used construction paper, but I had some double sided scrapbooking paper on hand that worked great. Use a medium weight paper, not too thin or they won’t hold up, and not too thick or you won’t be able to do the weaving. Fold the paper over the 3 1/2″ mark, then trim off the rest.

heartfold

Then you’ll want to cut two pieces that are 3 1/2″ long (one side of the fold only) by 2″ wide. Then fold one of them the other way so the reverse print is showing.

heartready

Then shape the top of each piece into a semi-circle, for one part of the heart. Cut two slits into each piece, starting at the fold. The slits need to be more than 2″ long. You’ll end up with this:

heartslits

Now you’re ready to start weaving. The technique isn’t your standard over-under-over-under. Instead, you need to put the “under” pieces through the middle of the alternating piece. Here, I’m starting by inserting the gray piece into the middle of the pink:

heartstart

Then the pink ones need to go through the middle of the gray on the next row. It’s best to do the first two on each side, then finish up the last three.

heartweave2

When you get to the last ones, you’ll see why the paper still needs to be flexible! Keep at it, and you’ll end up with this:

heartweave3

Now all you have to do is push the pieces into shape and add the finishing touches.

heartopen

To give them a bit more finish, I put a small grommet onto each side of the heart, to thread the ribbon through. I used about 10″ of white ribbon and tied them off with square knots. Fill them with candy for a simple Christmas gift!

— Loryn

heartgkr


Wreath of copper leaves

Crafty Challenge 11: Copper Fall Wreath

Hello Again! I feel like I have been incommunicado for a very long time. All the Crafty Sisters got together last weekend for our latest Crafty Challenge. This challenge was to make a fall wreath.

Wreath of copper leaves
The wreath is 15″ tall and 13″ wide.

Due to everything in our house breaking down all at the same time, I was under a bit of a money crunch so I knew whatever I made, I had to have all the supplies already on hand. It helped that as soon as we started talking about a fall wreath, I was picturing a leaf wreath made of copper. And as some of you might remember, we did that wonderful Copper Crafty Challenge a while back and I still had a lot of the copper discs leftover from the copper necklace I made. The discs are remarkably easy to cut with heavy-duty scissors and I knew that they would make beautiful leaves.

Here you can really see the oily effect that burnishing the leaves created.

So, I started cutting and cutting and cutting. I had some very interesting dimples in my fingers from the force of cutting the copper discs, but I had some amazing maple leaf shapes. I also knew that I wanted to burnish the leaves to create different colors. I pulled out my trusty propane torch and proceeded to burn the crap out of one of the leaves. I learned very quickly that you only wanted to brush the copper leaves with heat very quickly. If you wanted a deeper color, you just kept running the torch over the copper quickly and letting it cool a second and repeat to the color desired. Thankfully, the blackened portions just wipe off and you can burnish again to your hearts content. I then bent the leaves very gently with a pair of pliers to give them some depth.

I did not coat the copper leaves with anything as I really will like the aging effect on the copper.

I made the ring the leaves are attached to as well, the wreath frame that is. I had a length of copper pipe (again left over from the Copper Challenge that I never used) and I ran a wire through the pipe and bent it all in a circle. I used the wire to make a hanger at the top of the frame. It turned out that the length of pipe was not long enough, but as I originally planned to let the pipe show through in some places, I would just make sure the leaves covered the wire parts of the wreath frame. I then used one of my hammers and my anvil to flatten the pipe to make the leaves attach better.

Here you can see the depth of the copper leaves.

I knew that my personal soldering abilities were not good enough to be able to place the leaves exactly where I wanted them so I switched my connecting component to hot glue. This worked out very well and I was able to place the leaves precisely where I wanted each one to go. I then flipped the wreath over and poured hot glue all over the frame where it connected to the leaves. This gave the wreath lots of stability and now absolutely nothing moves.

Photo showing wreath hanging from my loft
This is where I hang my wreathes in the house.

I am so happy with my wreath and it is now hanging in my house and just looks gorgeous. I did have a good laugh at the unveiling though. You will find out when more wreaths are posted! Amazingly, working with all that cut copper, I never did cut myself. This may be the first project in a while that didn’t end with a few bandaged fingers.

Happy Crafting,

Kristin!

Rocks rock!

Cheri-There is something mysterious about rocks. Even lowly little plain rocks can be very special. Often these are the ones that need a second look. A few months ago, I realized these rocks were telling stories that could be just as amazing and interesting as the pretty sparkly ones. All it takes is a little bit of looking and eventually they will lend their shape to something beautiful.

To begin their transformation, I draw an outline on the rock in the shape I think it resembles. Then the rock is given details and personality with a permanent black marker, and I sign the back with my “nom de plume”.

I like to leave the rocks outside at places I visit. It makes me happy to think that someone will find it, pick it up and start their own story with it.

Chair Challenge

Cheri- It doesn’t seem to matter how much time we have for a challenge, I seem to always wait until the last minute to complete it.

Over the years, I’ve collected several chairs that need to be painted/redone.  I started with 3 chairs that I’ve had for a while and decided to try a different technique on each one. If I didn’t like how my chair was coming along, I’d move on to a different one.

The camp chair was my third try. It was a garage sale find and was a lot more unique than my other attempts. The bad part of the project, was that the canvas needed to be replaced. For a folding chair, this is a pretty major fix as the chairs stability depends on the canvas seat and the back.

After pulling off the canvas, I was amazed by the wonderful wooden skeleton the chair had. of course now I was faced with the daunting task of showing off the chair without covering it up too much.

After mulling it over in my head for a bit, I decided that something transparent would be best for the back. It just happened that I  picked up some unused medical tubing at another garage sale that would be perfect for the back of the chair. I dremelled about 12 holes on each side of the back. Then I took the tubing and wrapped it around the chair, tacking it in each place that had previously been drilled.

The back of the chair looked great, next came the seat. I first tried to use the tubing again, but the tubing needs to be held tight and this chair folds. I had some leather in my material stash and dug it out. It was a perfect fit to replace the canvas seat of the chair.

It needs a few more tweaks, but the finished product came out pretty cool.


Rocking the resistors

I liked this challenge, but it seemed to me that I couldn’t get the idea of jewelry out of my head. It just seemed to speak to me and say, “I should be a piece of jewelry”. So, naturally, that is what I made.

I felt that the colors were a factor in what I made. To me they felt like Fall, and what else is more like fall than a leaf. I made a base and then I wired the resistors as veins of the leaf. I like how the colors filled in the base. I make a lot of pendants normally, so this time I decided it would be a bracelet. Kind of like a bangle bracelet. I curved the leaf around a glass to give it the right feel on a wrist. I took a piece of 16 gauge German Silver and made a loop in each end. I curved the wire to conform around my wrist.

For the ring, I formed a loop in the wire about 12″ from the end and then wrapped the wire around a mandrel 3 times. I curled the wire around the loop and cut off the excess. I cut off one end of the wire next to the base of the resistor and formed a loop. These small loops were attached to the larger loop to give a star- burst effect.

I am pretty thrilled with how they came out. I hope you like them too.

Tourmaline necklace.

Necklaces and Earrings: My Camping Finds

Mom (Craftysister Lynne) and I went camping in Georgia a few weeks ago. While there, we got lost driving and found this amazing little store. It was called Rocks, Relics and Beads. This place was packed with so much stuff that it was completely overwhelming. The owner was such a character. He seemed to delight in making up stuff on the fly (you know, in a true Grandfatherly way). Mom even posted some photos on Facebook of our visit to this wonderland. It only seemed fair as I posted pics of her version of wonderland (an art store) during our camping trip to the Indiana Dunes last year.

So, below are two of the finds I made at this amazing wonderland:

Tourmaline, crystal, glass and sterling silver necklace.

I just love tourmaline. It comes in such an amazing array of colors and I love all of them. This is a slice of a chrome tourmaline crystal and I just fell for it the minute I saw it. It took me awhile to decide how I wanted to display and mount this piece, but I am very satisfied with the finished pendant.

The front piece of the necklace where the pendant hangs, is strung on 18 gauge sterling silver wire. The rest of the necklace is strung on beading wire. I like to do necklaces like this as I think it brings more focus to the pendant.

Close up view of tourmaline pendant.

I cannot say it enough that I just love this pendant and the necklace. I wrapped the tourmaline very gently with 21 gauge sterling silver wire that just comes around the sides of the stone and rises in back of the stone to form the wrapped bail.

And of course, I made earrings to go along with this piece. I had some fun this time around doing some sterling silver findings and various wigjig type forms for these earrings and for the next necklace below.

Earrings that match the tourmaline necklace.
No tourmaline in the earrings, but I use some really pretty green crystal and glass beads.

I cannot wait to wear this set. Below you can see the almond shaped clasp that I made for this necklace. It is made from 18 gauge sterling silver wire.

Almond shaped sterling silver clasp.

Tourmaline necklace.
Here you can see the entire necklace!

The next piece has an Italian art bead for the pendant. I just love the contrast of the orange and teal swirls.

Necklace made with an Italian art bead for the pendant.

It doesn’t show up as well in the photo, but the teal beads and the teal swirls in the pendant are actually the same color. I love the way the one teal bead above the pendant looks like it is smiling at you and showing his fangs. It made me laugh when I noticed it.

The orange beads are agate and the white beads are quartz crystal composite beads. I used seed beads for the back portion of the necklace as I wanted the entire focus to be on the front double strands. I again used 18 gauge sterling silver wire to make the bail for the pendant as well as the findings that connect the double strands of the front part to the single strand of the back portion of the necklace.

Agate earrings that match the Italian art bead necklace.

The earrings are made of more agate and the findings are made of 21 gauge sterling silver wire.

This is a very colorful piece and I am very happy with how it turned out. This is a great summer necklace and earrings set.

Close up view of the double strands of the front portion of the necklace.

I hope everyone had a wonderful Memorial Day and I look forward to posting some more of my recent projects!

Happy Crafting,

Kristin

Bird Paper Mache Tree Crafty Sisters Challenge

Crafty Challenge 7: Paper Mache Tree with Nesting Bird

Bird Paper Mache Tree Crafty Sisters Challenge
Bird nesting in a tree.

Cheri: I find it really interesting that every project we do, I always think that it is the best one yet, but this project was one of the best. I like working with paper. It has endless possibilities and can be made into practically anything. I knew I wanted to make a tree with a nest and a bird, as this is a theme that I have been exploring lately.

To begin, I made a base for the tree with paper covered wire. To make the base, I cut about nine lengths of wire around 9 inches long. I took a longer piece of wire and wrapped it around the base and slowly coiled my way up the tree. I left some of the wire sticking out of the bottom to make the roots and some sticking out of the top to make the limbs.

I then took some pages from an old book, (Gone with the Wind), and ripped them into strips. I  paper-mached the strips onto the tree, the bird and the branches.

For the nest, I cut very thin slices of paper and formed them with glue using the bottom of a small bowl as a form. I let it dry and when I took  it out it looked amazingly like a real nest. At this point I was not really sure if I wanted to paint it or not, but after talking it over with my son, Justin, we felt that it would look nice if I did a light watercolor wash on it. This really made the text pop and was just the right touch.

I was very pleased with how it looked when it was completed and it really came out how I wanted it to look. And somehow it seems fitting to turn paper back into a tree.

Paper Mache Tree Crafty Sisters Challenge
Tree with nest removed.
Paper Mache Bird Nest Crafty Sisters Challenge
Close up of nest and bird.
Paper Mache Bird Tree Crafty Sisters Challenge
Another view.
Paper Mache Bird Nest Tree Wire Crafty Sisters Challenge
Nesting bird and tree.