Spring is here and around Indiana, it is running full steam already. In celebration, we are gearing up for our sixth Crafty Challenge. This round is all about copper.
In another bid to help clean out the garage, Loryn found some really nifty copper discs hiding in a box. (This was how our Wooden Spool Challenge started.) These are cut-outs from sheet metal and their origin is unknown. (Really, where does half the stuff in garages come from? It is like the inverse of the dryer phenomenon.)
Four roughly even stacks for the four Crafty Sisters!
We each got our own stack (we didn’t actually count them out this time, there were too many) and you could just see all our brains buzzing already.
I thought it was really funny after we divided them up, we all took a stack and then remembered that we would need a photo for the blog. We all placed our stack just so and made sure to pick up the same one we set down. We certainly get proprietary over our craft materials don’t we?
This is actually Lynne's pile of copper discs. The rest of us snapped ours up pretty quickly.
So, we now have two weeks (well, at this point 12 days) to come up with a craft that makes use of these bendy little circles.
Stay tuned for the final results on April 8th! I can’t wait to see what we all come up with!
Frilly and festive tissue paper flowers for a Christmas tree garland.My white Christmas tree with its new garlands.
Lynne:Crafty Challenge 5 was a challenge for me. I don’t believe I have made any Christmas ornaments for several years and it was tough to get my mind back into that red and green groove.
I like long garlands and I like them to be lit. Strings of Christmas tree lights seemed to me to be the best way to start, so I bought a strand of 100 clear Christmas tree lights. I needed the light strand to be decorated and the longer I looked at them the more the bulbs looked like the centers of flowers. Why not put a flower around each light bulb? The flower I made for my Do It Best Purse in the hardware store challenge would be the perfect fit to go around the collars of the light bulbs.
I plugged in my strand of lights for two hours to check on how hot they would get. I could still hold them in my hand at the end of the two hours so I used red tissue paper. However, be safe and turn off your tree lights whenever you leave the house.
Tissue paper comes folded in its package. When you unfold the paper the creases are good guidelines for cutting the long strips. I cut through all of the layers at the same time, because there was less chance of the sheets slipping while they were still in the original folds. I used a rotary cutter and the resulting strips were about 3″ wide.
Crease from tissue paper being folded for packaging.
I folded the strip in half and then separated the layers into stacks of two strips each. (The number of layers can vary depending on how thick the paper is and how frilly you want the flowers.) I taped the unfolded edge with scotch tape. I put half the tape on one side then flipped the strip over and folded the tape up onto the other side. Then I used scissors to cut the folded edge of the strip into fringe.
Taping the long strips closed.Taping 2 layers of long strip.I used scissors to fringe the folded edge of the strips.
Once you’ve fringed the length of the strip, cut it into 5″ sections. 5 inches worked best for me but you can make the sections longer if you want fuller flowers. Take each 5″ section and roll it around one of the light bulb plastic holders. The holders are plastic and I found that a dab of hot glue when you first start to roll the flower is strong enough to hold the flower in place. Once you have the flower rolled use a piece of tape to keep it closed. I put a flower on every other light bulb and I was just able to finish the garland in two hours.
I liked the results so much that after the challenge was over I made another garland and bought a white Christmas tree to put them on.
Fold the 5" strip around the holder of the light bulb and tape it closed.Close-up of the flower.Another close-up because they look so pretty and festive.Frilly Flower Garland
Loryn: I’ve collected wooden ornaments from the 70s and 80s for several years now, and I’ve wanted a fun way to display them. Our Two-Hour Christmas Decoration Challenge seemed like a good time to think something up.
Here, you can see how big the tree is (my ceilings are nearly 10′!). When we were kids, our grandpa would take us to pick out a live tree at his uncle’s Christmas tree farm. We would pick out a tree that seemed little out in the field, only to find out that it was 8′ tall once we got it into the house. Evidently, I still have that same problem, as I didn’t realize how big this would be until I got it on the wall!
I used green clothesline wire that I found at the hardware store during our $5 Challenge. My initial idea was to make the tree as one piece. At 10:30, with one quarter of my time already gone, I realized it just wasn’t going to work. The wire was much harder to bend than I expected, and it was a weird, wobbly mess. Time for plan B! I decided that individual rows would be easier to work, and it meant that I could add rows as my collection grew.
Here you can see the loops I made at the end of each row to hold the screws that hold the tree onto the wall. I first planned to make the ornament “hooks” go the other way, and to use hooks to hold each ornament in its spot. In the middle of the project, I realized that by turning them over I could eliminate hooks.
The ornaments are really lightweight, so I didn’t worry about getting the screws into studs. There will be a lot of screw holes in the walls to patch. This room will be painted after Christmas, so I’ll be patching anyway. If you’re not up for patching, this would make a fun, single strand garland, or even an advent calendar, with a new ornament added each day!
Close-up of tree topper.Close-up of ornaments on their hanger.Vintage ornaments on wall tree.
Cheri: Well, another project come and gone. This one did not freak me out too much. I am always making little projects.
Sometimes I will see an object that I really like because it stirs up memories of being a kid. That is what happened when I bought these Christmas tree light bulbs at a garage sale a few months ago. I was drawn to the color, (pink) and I really liked the vintage feel of them too.
I knew that I would never use bulbs like these on a lighted string (who could trust them), but I still liked the look of them. They were the kind of lights we had on our tree when I was a kid. I don’t even know if these are sold anymore. They do have a tendency to get hot and really the newer, small lights are brighter.
When I saw them for 50 cents, I couldn’t think of anything to do with them at the time so I tucked them away for when an idea came. When this project was discussed, I felt that I could possibly use the light bulbs for something. I was pretty sure what I wanted to do and I was also sure that the idea would work pretty well. All I really needed was hot glue, ( I am the Queen of hot glue).
For the 14 point star ornament, I started out with glue on the metal tips and then I put one light bulb in the center on each side. I tried to do this mathematically but as I am math challenged, I decided to go by sight. It came out pretty well the first time and I knew that I really didn’t want to press my luck so I decided it looked pretty symmetrical.
For the eight point stars, I just glued 4 together and glued 4 more together and attached them. I hot-glued buttons onto them to cover the glue in the center.
I then decided I needed a hanger that was not very noticeable. In the box were 2 bulb clips, so I took one bulb off the star, attached the clip and then glued the bulb back on. This way I can attach a hook to it.
All in all I was quite pleased with the outcome and I think it will look terrific on a tree. The best thing is it was really simple and cheap. I just love it when a plan comes together.
14 point Christmas tree lightbulb star ornament.
The back of the 14 point star ornament with hanger.Four lightbulbs glued together end to end into a four point star and then two of those flat stars glued together to form an eight point star.The back of the eight point star with a close-up of the wire hanger,
We have just finished our Crafty Challenge 4 and are ready for number 5! This one is all about the time of year. From around now until Christmas, the Crafty Sisters begin to get secretive. We tend to stop discussing our projects with each other and mutter a lot, or at least I mutter a lot.
For us, this is crunch time for Christmas gifts and we do make a lot of them. In this vein, Crafty Challenge 5 is all about Christmas Decorations. We did need to limit this somehow and due to the whole Christmas crunch time I mentioned, the best idea was an actual time limit. So, the challenge is to create a Christmas decoration in less than two hours. We even set a specific time. December 4th – 10am until 12pm is the making time and the unveiling will be at 12:30pm. We can think all we want and purchase the supplies in the meantime, we just cannot start making the decorations until 10am.
To get us in a holiday mood, I thought some examples of a few of our past Christmas decorations was in order. So, get your mind in gear and get thinking (but don’t get making yet!).
Chenille pipe cleaner door wreath made by Cheri.Garland by Kristin, Choir Bird and Winter A-Frame by Cheri.Choir bird made by Cheri.Miniature A-Frame winter scene made by Cheri.Snowman ornament made by Cheri.Ornament door wreath made by Kristin.Painted bird ornaments made by Cheri.Silver ornament and twig door decor made by Cheri.
If you have any questions about any of the above decorations or would like to know how they were made, ask us! You can email us in the Contact Us section of the blog.
These were all decorations I had in my Christmas storage and I realize that almost all of them were made by Cheri. You can definitely see who we will be comparing ourselves to. Wish us luck and you get crafting!
Lynne: I suppose that Crafty Challenge 4 really was my idea. I have been carrying the handbag I made for Crafty Challenge 2 and it was not really designed for everyday use. So I needed a bag to carry through the winter. The crafty challenge seemed like a good way to make myself make one.
I believe Cheri deserves the blame for the Coach Willis idea. The Willis bag is a deceiving design. The rod and handle assembly is complicated and that type of handle puts a particular stress on the closing clasp. This means that the bag needs to be made of strong reinforced material and that the position of the clasp has to be precise for the handbag to hang right. But what you don’t know beforehand can keep you from ending before you start.
Since I was still fascinated by the possibilities of fused fabrics, I wanted to make the handbag from plastics. At a garage sale the other day, I found two white carrier bags for 10 cents. These were department store bags that were made of the same material you find in the rectangular totes that are sold in supermarkets to reduce the number of plastic bags they give you. This material is some type of polyester and it does fuse with an iron. Not easily, but when used with other more amenable plastics it works.
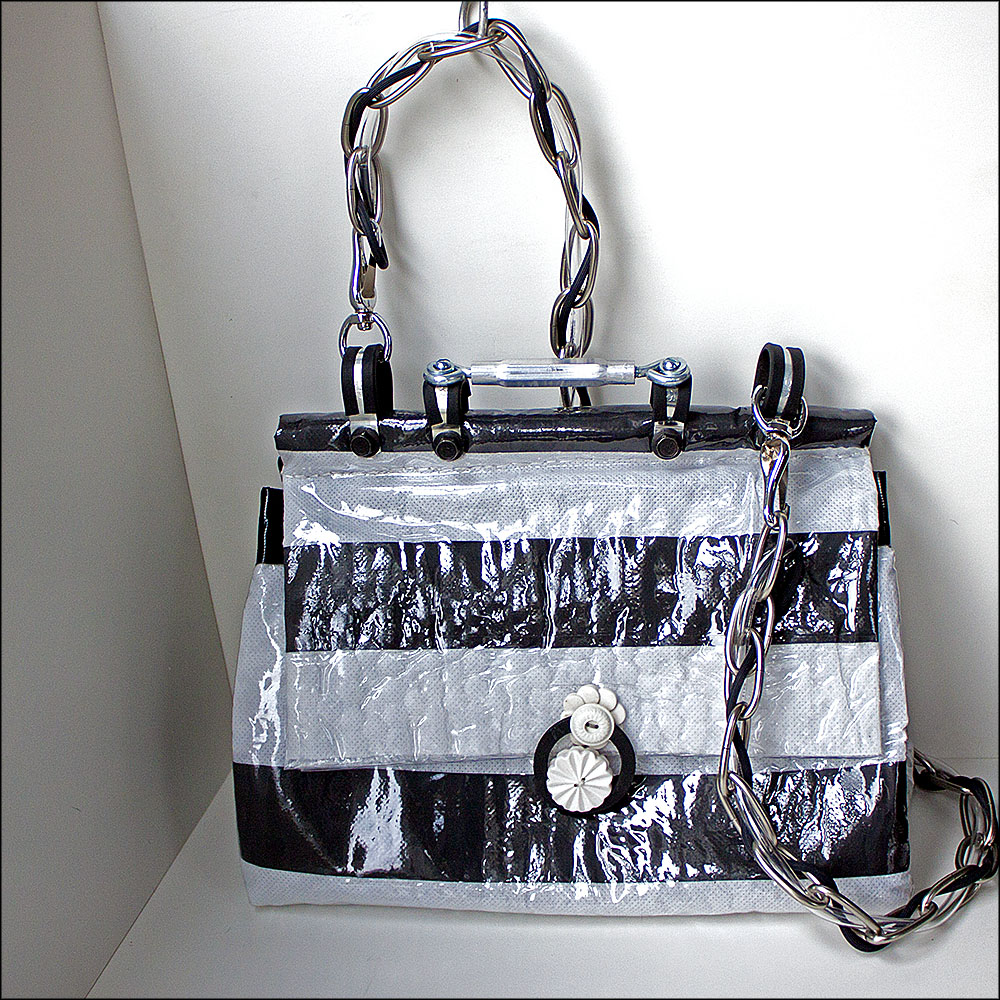
I made a fused fabric sandwich of bubble wrap, carrier bag and plastic vinyl sheeting. Each layer of the fabric has its own purpose. The bubble wrap provides sturdiness and a unique texture that I am particularly fond of. The carrier bag provides color and the plastic vinyl fuses everything together while making a durable surface for the exterior of my handbag. I used black duct tape to add stripes to the white of the carrier bag and to reinforce the top of the base of the bag.
I fused the layers into a rectangle of the size I wanted following the general directions of the duct tape bag described here. I added extra inches for the flap because I did not want to put a flap on after the main body of the bag was done. I wanted the strength of one continuous layer of fabric.
The hardware for the handle and rod assembly was the hardest and the most interesting part. I have always liked the leather-laced chains of the Chanel 2.55 bags and I had several feet of wonderful chain left from when Loryn and I put up new chandeliers in my living room and studio. The shape of the chain made it difficult to use standard rings to attach it to the handle. This meant I needed to go to the hardware store. I love our local Arone Hardware store because there are lots of parts and pieces that are not packaged and can be bought one at a time. I needed the plastic sheeting for the fused fabric, stiff plastic hose for the handle rod and smaller, clear tubing to lace through the chain. I thought the chain needed a little more cushioning and I found that the spline used to make screens made a great black accent in the chain. Rubber-coated hose clamps, fasteners, nuts and bolts and a turnbuckle for the handle made up the rest of the hardware I needed.
I don’t want you to think that I had much of a plan when I went to Arone’s. I spent a lot of time wandering from one aisle to the next just picking up things and checking to see if they would fit together. The staff there are great and let me look without interruption, although I see the guys shaking their heads every now and then. That is one of the fun things about these challenges, we are going into areas we have never been before and anything can happen. A terrible mistake can turn out to be the most brilliant idea ever and vice versa of course.
The clasp closure was the next most difficult thing. I did not want the weight of a hasp type of hardware attached to the front fabric of the bag. I wanted to use some of our vintage buttons and I thought that buttons sewn together with a button on the interior would help carry the weight of the bag through the whole structure of the fabric. The bottom of the clasp is 4 buttons sewn together. Two buttons with a small button in between to make a channel for the gasket loop were sewn to the outside of the bag and another button was sewn to the inside of the bag. The top of the clasp is 3 buttons sewn together with a rubber gasket. Small button, gasket, large button were sewn to the outside and another large button was sewn to the inside. I put holes in the gasket with an awl and just sewed through it the same time I sewed the buttons.
The clasp was also a process of trial and error and I had buttons strewn everywhere on my table. I was getting desperate for a loop when Cheri showed me a zip-lock bag full of washers she had just picked up at a garage sale. I casually snagged the largest one and went home to finish my bag.
The handbag is much roomier than I thought it would be and I really enjoy carrying it. It has a solid feel without being too heavy and I know there is not another one out there like it.
Click the thumbnails below for a gallery view of the photos.
Finished Coach Willis and Chanel inspired bag.
Chain, screen spline, duct tape and the ever necessary Diet Coke clutter my work table. Surprisingly, I find I use a mechanic’s vise quite often. It was good for drilling the holes through the rod assembly.
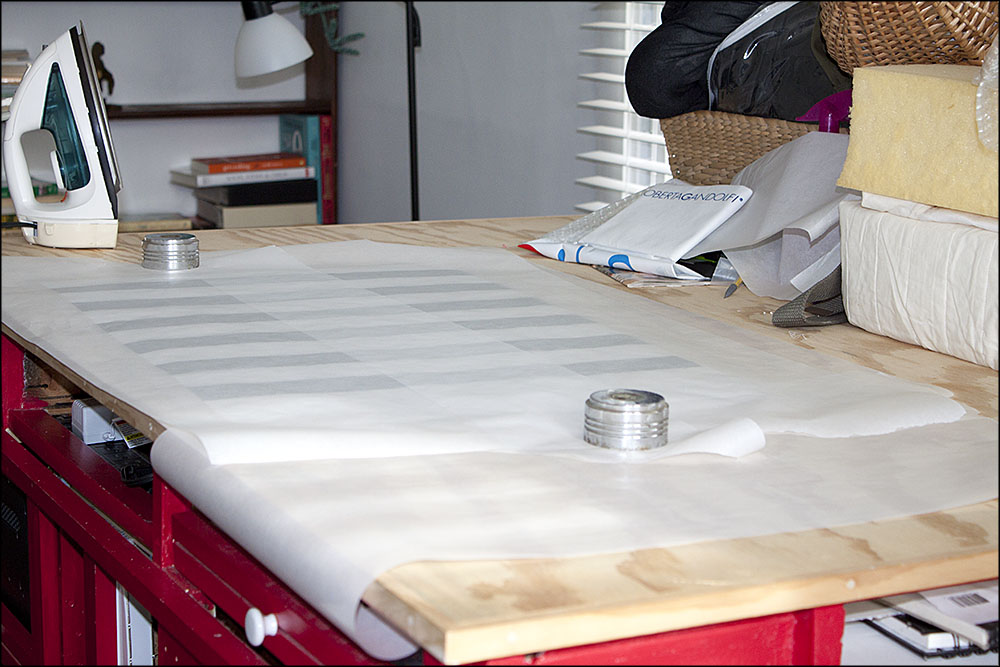
The fabric is laid out between sheets of parchment paper on my table and ready for fusing. The black stripes of duct tape were put on the carrier bag fabric before I fused the fabric.
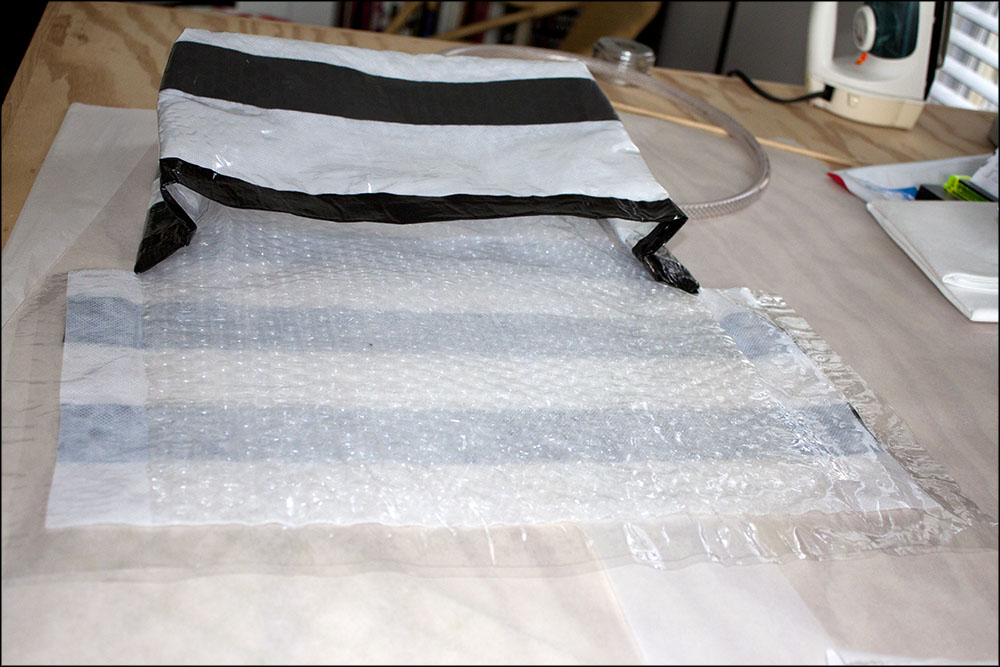
The base of the bag is fused together and I am reinforcing the flap.
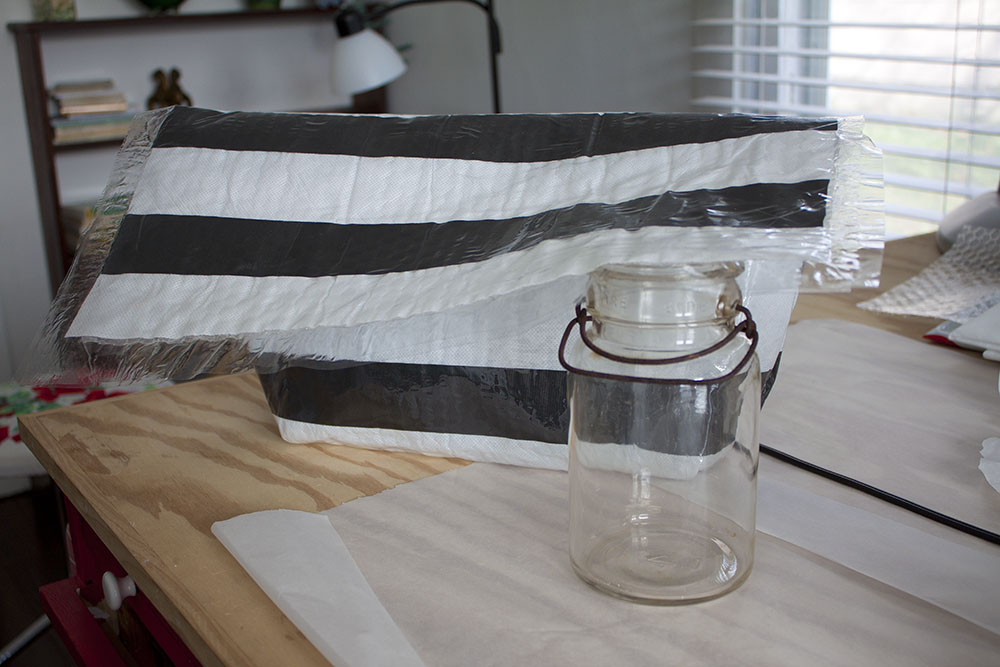
I used the mason jar as a sewing ham to iron the side seams flat.
The turnbuckle makes an interesting handle. It is screwed to the hose clamps. All 4 hose clamps are secured with nuts and bolts through the rubber hose rod.
Loryn: I’ll admit that I wasn’t sure about this challenge. It’s not that I don’t like making bags; quite the opposite, and that was the problem. I’ve been making bags for many years, and I always put a lot of time and effort into nice details and finishes. So how would I do that with the limited time allowed for a crafty challenge?
Typically, my bags are lined and interlined, with lots of pockets inside. To cut down on the time needed, I wanted to use fabrics that didn’t need linings or seam finishes. Luckily, I had two thrifted items that would be perfect. The wool felt came from a Soviet military coat, and the piping is from a fuchsia 1980s ultrasuede men’s sport coat. All of the “raw edges” are on the exterior of the bag, and the construction seams are exposed.
Ultrasuede piping means no raw edges inside
To mimic the look of the Willis bag and to brighten up the dark felt, I put piping at all the seams. I’ll admit, I love piping, and put it on lots of projects. I used cotton sash cord from the hardware store inside the piping.
The button, tab and original buttonhole.
For a closure, I used a buttonhole from the coat as my tab. My initial idea was to use a magnet closure, but it wasn’t strong enough. The clasp holds the entire bag together, so I changed to the button tab.
The coat had green topstitching, and I decided to match it, both so I could use the premade buttonhole and because it is a nice contrast to the fuchsia piping.
Hardware for the handle.
I used a dowel in the top to match that detail on the inspiration bag. The metal rings are looped around the dowel, with slits in the felt so I could put them in place. I love working with a fabric that doesn’t ravel!
Side view with ultrasuede piping.
It’s hard to tell from the pictures, but this is a pretty big bag. It’s 15″ wide, just under 14″ tall, and over 5″ wide. It’s perfect for work!
Detail where the front piping joins the top front
Because of the single layer construction, I didn’t put any pockets in the bag. I didn’t want any pocket seams to show on the outside of the bag or any extra layers of fabric to mess up the lines of the bag.
Once the challenge was over, I decided to make up an organizer to put inside the bag:
Divider insert for bag
The divider is two-sided, with heavy cardboard in between to give it shape. I made special pockets to hold my phone, glasses, pens, and iPad. I lined some of the pockets with ultrasuede to protect screens and lenses. Not only is it really handy, but it gives the messenger shape. I love using it! Loryn
My interpretation of the spirit of the Coach Willis bag.
Cheri: Whew, what a challenge this was. It was tough one, but, it was also an awesome one. I think I spent the first week trying to decide how and what I wanted to make my purse out of.
I have always enjoyed doing machine embroidery, so I decided that I would embroider the outside of my purse. I was pretty sure in my head of how I wanted it to look, so I looked around at my fabric supplies, (which is not nearly as grand as Loryn’s), and chose what fabric I wanted to use.
After one failed attempt with the fabric I had on hand, I decided to buy some new fabric. I headed to our local Wal-Mart, which has just put in a small fabric selection, after our Jo-Ann’s closed, and chose a half yard of brown canvas, I also picked up some lining fabric that went with the brown nicely. With fabric in tow, I headed home.
This was Thursday, I had 3 more days to go. I have to admit that my style of crafting is a tad bit unique. I don’t really measure anything. I will try to use a straight edge to get the proportions right but more often than not I will use the selvage edge to base my edges on. And so the great purse challenge began for me.
I worked until midnight on Thursday, midnight on Friday and started working again at 2:00 pm on Saturday. Most of the time was spent with the embroidery and the base of the bag, and then the unspeakable happened, I accidentally melted some of the lining of my bag with the iron.
I knew that this was not going to be an easy fix. So after entertaining several options I picked up some other fabric I had on hand from Loryn’s stash and started working with this. Essentially, I started again from square one.
I spent several hours on Saturday redoing my purse and in the end I was really happy with how it turned out. It looks like me and I am really quite proud to carry it.
The back of the bag and the details of the handle.The side of my bag and a close up of the hardware I used.Freestyle machine embroidery leaves.The lining of the bag and the reverse side of the front leaf embroidery. The reverse looks as good as the front.This pocket holds my phone.
WooHoo! I actually managed to get this Crafty Challenge finished a little early. For me, that is monumental (at least compared to my past Crafty Challenges).
The challenge this time was to use the Coach Willis Handbag for inspiration and create something in that spirit. It could be any medium and any size. I tried several mediums, but seemed to have the best luck when I finally went to fabric. Then I had to decide what size I wanted, so I needed to find a purpose for my bag. I have a large laptop (it has a 17″ screen and the keyboard includes a separate number keypad) that I have never been able to find a bag that I liked and that would protect it, that I liked. So, with that in mind, I was going to make the Willis inspired laptop bag.
I had some really cute flannel kitties fabric and some matching pre-quilted red fabric that would be perfect for padding. After looking at my dogs, I realized that I would be better off if I put the flannel on the inside to help keep some of the hair on my new bag to a minimum. I did draw a sketch, but for the most part, I made it up on the fly. You should know though that I have seen many bags made by Loryn and Cheri, so I had some idea of how to go about this, I wasn’t completely in the dark.
I just love that hardware!
I made the handle first as I wanted to use Loryn’s quilting idea to help reinforce the handle. The body was next and man, do not use denim Singer needles on medium-weight fabric, no matter how many layers you are sewing through. I trashed three needles very quickly. Once I switched to heavy-duty, medium weight needles, I had no problems whatsoever.
I made all the parts of the bag like pillows (right sides together, sew the edges and pull right-side out) and was very good about ironing everything. I am always surprised by how much of a difference ironing makes. Suddenly your project goes to the next level of wow and looks clean and (mostly) well made. Please keep in mind I am not the best seamstress. I tend to keep to pillows and curtains which are really just squares and rectangles with no real finesse (or at least the way I make them).
I did manage to find some excellent hardware for my bag at Kleindorfers. This is the hardware store I spent so much time in for our second Crafty Challenge. It really helped that since that challenge, I really know their stock. They are so helpful and they don’t look at you funny when you giggle and cackle with glee when you find such a wonderful hardware selection, they laugh and see if there is anything else you need.
I also have to mention in here my gratefulness for cellphones, good cellphone plans and AT&T. I spent almost the entire day on the phone with Loryn yesterday. I looked it up on my phone and it came out to 6 hours and 44 minutes. It is so nice just to have someone to mutter to while working on a project. I also spent the morning cleaning and having someone to talk to while doing that always makes the job easier.
Back to the challenge, I then proceeded to put all the parts together and it went much better than expected. I added the hardware and giggled the whole while (Really, I did. Ask Loryn.) The one problem I had was with the dowel rod I had picked up for the top of the bag. It wouldn’t fit the hardware I had decided to use. When I bought the hardware, I bought more than I needed as I was not quite sure how or which pieces I would end up using for the bag. That meant another trip to Lowe’s this morning for the next size down in dowel rods. I cut it to size and painted it red to help it blend in to to the bag.I did that this morning and voila! my bag was finished. Hooray! The finished size is 22 1/2″ wide by 19″ tall. It came out a lot bigger than I intended, but I do like it. I may adjust the size eventually, but for now it is great just the way it is.
And now on to family and food. Happy Thanksgiving everyone!
It must be said; better late than never. I am really (and I mean really) late getting my photos for this challenge posted. I have been really busy doing some painting (don’t worry, you’ll get to hear about and see it at a later date) and have just not had a whole lot of time to really do much else but sleep and work.
I had a hard time with this project for several reasons. First, I try to keep my hoarding down to a minimum and don’t have a whole lot of storage space right now, so my collection of incidentals was rather small. Second, for these challenges, I have been really trying to step out of my comfort zones craft wise and this has made for some uncertain outcomes. The project was to use the packaging or incidentals that come with a purchase. It must be the stuff that you would usually throw away or re-use for another packing job, not the purchase itself, in other words, free.
I love the slightly aged look the shellac gave the newspaper.
After all the plaster and paper-mache (or papier-mâché) work we did for our Halloween costumes, I thought this might be a good medium for this challenge. It wasn’t a bad idea, just an unknown path for me. I definitely learned a lot from this project.
I wanted to make a bowl for the little stuff that seems to get thrown on the counter. As it would be in the kitchen, I figured what better paper to use than the Kroger coupons I get every week (I do most of my grocery shopping there). This proved to be a good idea as the paper Kroger uses for its ads tears beautifully into strips. I then draped the paper-mache strips over some wooden bowls I had. I like their shape but not the material. I had covered the bowls with Vaseline to keep the strips from sticking to the bowls. Notice I am using the plural here for bowls. I managed to turn out one good bowl from the two starts. I then let this dry.
I intentionally made sure that one of Kroger's logos would be visible.
I am glad I used small bowls, as larger ones would not have worked at all. The Vaseline seemed to prevent the paper-mache from drying completely (this process works just fine with plaster, but not so much with paper-mache). I managed to pry the shapes off the wooden bowls, but pretty much destroyed one of the shapes in the process. I used some of the paper strips from the destroyed shape (which were not sticking together) to fix the salvageable one and this time I used some wood glue to keep the strips down. I let this dry overnight and started shellacking the bowl the next day. I did multiple coats all over the bowl. I really liked the effect of the shellac as it gave the newspaper a lovely aged look.
At this point, it was time to present our projects and mine was really not dry. I kept it on some wax paper to present to my Crafty Sisters and it worked out fairly well. It is now a week and a half later and I have just finished taking the photos you see here and the bowl is completely set and hard. It has turned out just like I wanted it to, I just needed to be a LOT more patient. I whined a lot about this project and I apologize profusely to my Crafty Sisters who had to listen to me. I am really happy with my final project although it took over a week to get there.
I did trim the top edge of the bowl with scissors to give it a clean edge.
Lessons learned: 1. be patient; 2. do not use Vaseline with paper-mache or at least put plaster on top of the Vaseline and then do the paper-mache; and 3. shellac takes a long time to dry.