Christmas Ornament Countdown: Wire Wrapped Joy

Christmas Ornament Countdown
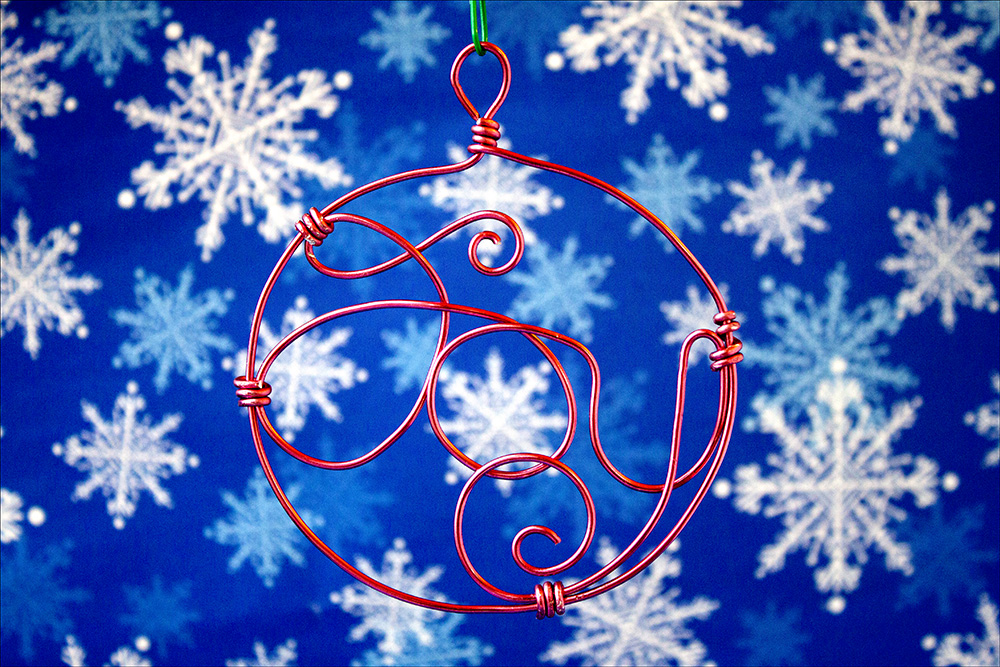
Wire "Joy" Christmas tree ornament.

Cheri: While my sis and I were shopping at Hobby Lobby the other day, we were checking out the wire in the jewelry section. Back many years ago when I first started working with wire, I was using baling wire. This is the wire that holds bales of hay together. It was a good thing I was young and my hands were in good shape.

Since then wire comes in all shapes and sizes and colors. The wire I picked up for this ornament was really soft, and my hands really appreciated it. I was able to form the letters very smoothly and if I made an adjustment to the wire, it was easy to get the kinks out.

This ornament is really quite simple. I shaped the word “Joy” and then I made a big circle with a hanger at the top and placed the word in it. I then took small pieces of wire and held the word in place by wrapping it at various points. I think it turned out very nice and should really add a lot to the ornament tree that we are all working on.

Merry Christmas from Crafty Sister Cheri.

Upcycled Felt Star Ornaments with Blanket Stitch Tutorial

Loryn:  I love working with wool felt, and one of the best ways to get it inexpensively is to felt wool sweaters from the thrift store. After I made the Felted Wool Stockings, I had lots of small pieces of felt left. Cheri and Kristin’s Ornament Countdown inspired some wool felt ornaments.

I cut three simple star shapes from card stock and used them as a template. Click here for a PDF Star Ornament Template  that you can download.

For your first step, layout your template. If you have a patterned fabric, play around with the direction of the pattern to find one that you like best before pinning.

Cut two of each piece, and you’re ready to start stitching. I used No. 6 pearl cotton thread in a yellow gold color. Sew with a single strand, and use a much longer piece of thread than you think you will need.

For your first stitch, start on the wrong side of your top star and bring the needle and thread through to the right side. Wrap the thread around the edge, bring the needle through in the same spot, and draw the loop snug.

All of the stitches will be started from the front side of the stars. Try to space them evenly, but don’t worry about being perfect.

To make the blanket stitch, insert your needle, bring the thread around the needle, then pull it taut.

Essentially, you’re making a knot on the edge of the fabric. Pull it snug, and repeat the stitches until you get to the point of the star.

To sew the points, make three stitches by bringing the needle up at the same spot each time, one stitch on the right side, one at the point, and one on the left side. Keep stitching until you’ve finished four of the five points.

It’s easier to stuff the finished points and main body while one point is unsewn. I used plain old polyfill, leaving the fill really loose. Small leftover felt scraps also make good stuffing material.

Stitch the remaining point, leaving a small opening to stuff the final point. Once it’s stuffed, finish sewing the seam and make a knot with your needle. Don’t cut the thread yet, though. Run the needle through the inside of one of the arms, and bring it out at the point where you want to put the hanging loop. Make a knot, measure out a hanging loop, then make two more knots to finish the hanging loop. Hide your thread, and you’re done!

This process would work great for all kinds of shapes, like trees, bells, or circles, and they look great hanging on matching stockings!

Christmas Ornament Countdown: Steam Punk Felt Bird

Christmas Ornament Countdown
Steam punk felt bird Christmas ornament.

Cheri: This little bird is all decked out in his Christmas Regalia. He is just not satisfied with being just a bird, he felt the need to dress for the occasion. And when I say dress for the occasion, he really did. He has a lovely crown, quite nice decoration on his tail feathers and he is wearing some very nice wing bracelets.

The body of this little bird is felt that has been sewn together and stuffed. I then took several pieces of different colored wire and used it in place of feathers. He is a little bit of a steam punk bird with all his attire. I hope you like him as much as I do.

Christmas Ornament Countdown
Felt bird.

Merry Christmas from Crafty Sister Cheri.

Christmas Ornament Countdown
All dressed up in steam punk.

Daily Squiggle

Daily Squiggle
Shell from a warm sandy beach.

Lynne: I did this squiggle at a class given by Teri Partridge. We were to draw the altered edges of a shell. I’ve included the pencil drawing and the squiggle I did later.

I use a mechanical pencil with 2B lead and a a blending tool when I do a graphite drawing. The squiggle is done with Caran d’Ache colored pencils. The color of these pencils seems to go on thicker than the Prismacolors and need entirely different techniques when blending–which I am trying to learn.

Display Ornaments on a Wire Garland

Loryn:  I have some beautiful vintage Polish glass heart ornaments (one of Cheri’s fabulous garage sale finds!) that I’ve wanted to display, but I’ve worried about breaking the delicate ornaments. My cats especially love to bat ornaments around. While I was working on my Two-Hour Christmas Decoration Crafty Challenge, I realized that the same technique would be great for displaying delicate ornaments.

For this garland, I turned the points down so that each ornament has its own “groove” to sit in. This keeps them from sliding around and bumping into each other. I used an inexpensive 18 gauge galvanized wire.

I hung it across the archway between my front room and living room, where it looks beautiful, but is out of the way.

I used a screw to hold up each end. For more detailed directions on how to bend the points, see the photos below. The entire garland took less than an hour to make and hang. Once the wire was formed, I hung one end and carefully slid the ornaments into place before attaching the other end. A second pair of hands is helpful for this part!

If you have delicate ornaments that you’re afraid to display, this is a fun way to get to use them!


Glass Heart Garland
Hang your precious ornaments safely.

Daily Squiggle

Daily Squiggle
Stop! No one but squiggles are allowed in here.

Lynne: I used colored pencils for this squiggle. I was mainly interested in drawing her right hand with the palm outward. I tried to use my own hand as a reference for this pose, but the angle is just a little wrong. I had to find a model.

Blue and orange are the main complementary colors. I like to go simple on color when I am working on perspective.