Today’s ornament was a massive lesson in frustration. Or rather, the ornament that you don’t see was. My original idea for an ornament failed spectacularly. My craft table is covered with parts, bits, and pieces. Around 10:00pm I realized that it was never going to work. Then began the frantic search. I dug through all of my supplies in the hope for a lightning strike. I didn’t get one until I was texting my sister that I was ready to give up. Right after I hit send, it hit me.
I love felt and I had a lot of fun last year with the pins and sequins ornament I made, so why not combine the two. The base of this ornament is a ball I made for temari. Temari is a Japanese art form that I played with a few years ago and kept all my supplies (go figure). You make the ball by taking a very large handful of stuffing and wrapping it with thread (one way to make the ball anyway). A lot of thread. You keep winding the thread around and around and around the stuffing until you get a round ball. This particular ball was my attempt to create a flattened ball to showcase a design on the front and back. I never did get around to completing the temari, but it gave me an excellent form to create my Christmas ornament.
Next, I cut strips of felt around 1/2″ to 3/4″ wide and started cutting these strips into triangle pieces. Then I took my piles of pins and sequins and pinned the triangles to the ball to make the images of the wreath and tree. I used some fuzzy white thread to make a sort of frame to separate the two images by sewing it around and around the ball. I made a quick hook and voila! I was finished.
Here you can see the fuzzy white thread.
I really like the effect of the multiple colors of green for the Christmas tree and the stars in the wreath really make it pop. You could use anything for the form of the ornament, Styrofoam would be very easy. I imagine a Santa Claus/reindeer ornament would be very cute. Anyone want to try it? Send us your picture and we will post it! I would love to see someone else’s version.
Just goes to show that necessity really is the mother of invention.
Cheri: I love comics, funnies, and cartoons. And I really love using comics for craft projects. This one is a favorite of mine. I hope you like it.
Supplies:
Sunday Funnies
Circle template (cup, glass, anything circular and in whatever size you would like, my circles were about 2 ½ inches in diameter).
Glue (any kind is fine).
Cardstock, (just a small circle is needed).
6 inches of ribbon
Instructions:
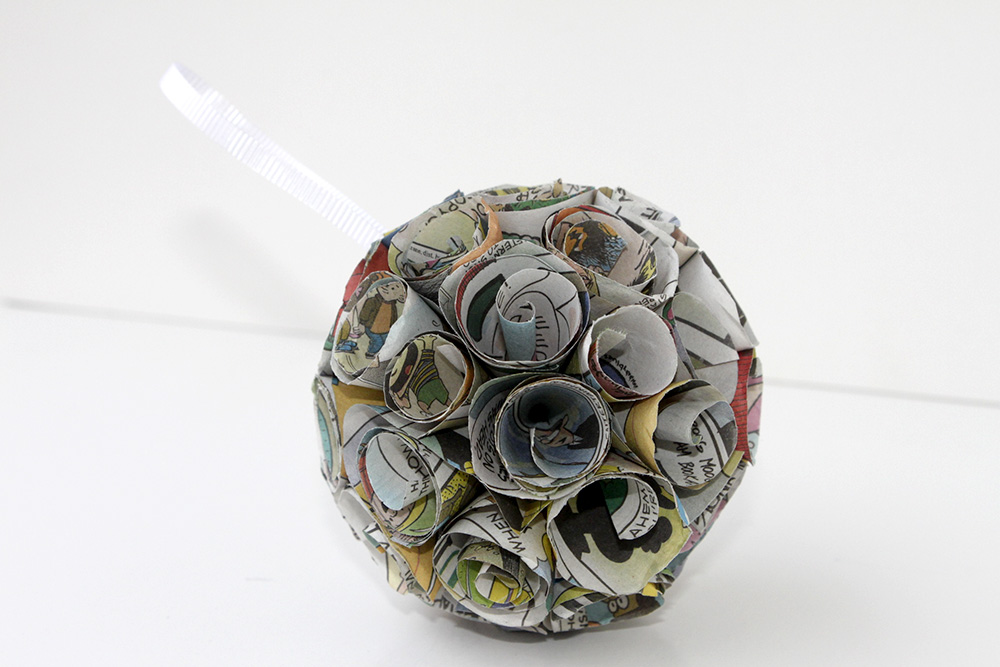
Fold the Sunday paper up so you can cut as many circles at once as possible. Then cut all of the circles in half. When you roll the paper, you want the circular edge to be the outer rim of the cone. Make about 45 cones and lay them aside.
Cut a smaller circle from the cardstock, this is just for a base to glue to.
Lay your cones around the cardstock circle, with the points touching, when you like how it looks, put a small amount of glue on each one and glue down. Place the next row of cones, try to put these in the little valleys created by the first row. You will be using a few less. Finally, glue one straight into the center, there should be a small spot for it. Do the same on the other side of the circle of cardstock.
Look at your ornament, and if you notice any thin spots just glue another cone into the spot. If you would like, you can glue more cones inside of the first cones. This gives the ornament a rose bud look.
What a fun project to make with the funnies, just make sure you read them first.
Lynne: I was surfing the web hoping to find an idea for our Advent Countdown when I came upon this great video from EepyBird. I fell in love with the sticky note pinwheels and started to think how I could modify one into an ornament. I needed a pad of pop up sticky notes, a glue stick, a darning needle, monofilament fishing line, micro glitter, spray adhesive and two buttons.
EepyBird.com counts out twelve pairs of pop up sticky notes and then glues the endnotes of the stack to each other. The structure is rotated three times to make the pinwheel. I must admit that I had to watch the video several times before I understood how the turns were done. If I watched where the doubled edges were each time the figure was turned, I could manage the proper sequence. Their excellent tutorial video is here.
The resulting structure holds its shape enough to roll down an incline, but not well enough to hang on a tree. I decided to gather the fins (the doubled edges) to prevent the pinwheel from coming apart. I used a large-eyed darning needle (sharp enough to go through the paper) with about 20 inches of fishing line. I used fishing line since it is invisible and I had a spool in my craft drawer. Using the needle to punch a hole about 1/8 inch from the edge (see photo below), draw the thread of fishing line through each fin until all the fins are gathered in a circle. Pull the line tight and knot the ends. Don’t cut the thread.
I used the two buttons to cover the hole in the middle of the pinwheel. Thread one of the buttons onto your fishing line and then push the needle through to the other side of the pinwheel. Gather these fins the same way, add the other button and tie a knot to keep everything together.
I used spray adhesive and micro glitter to add some holiday sparkle. For the hanger, I made a loop with the fishing line and attached it to two fins (see photo below) for the best balance.
I really like how the pinwheel looks and was especially pleased to make something with such an unusual material.
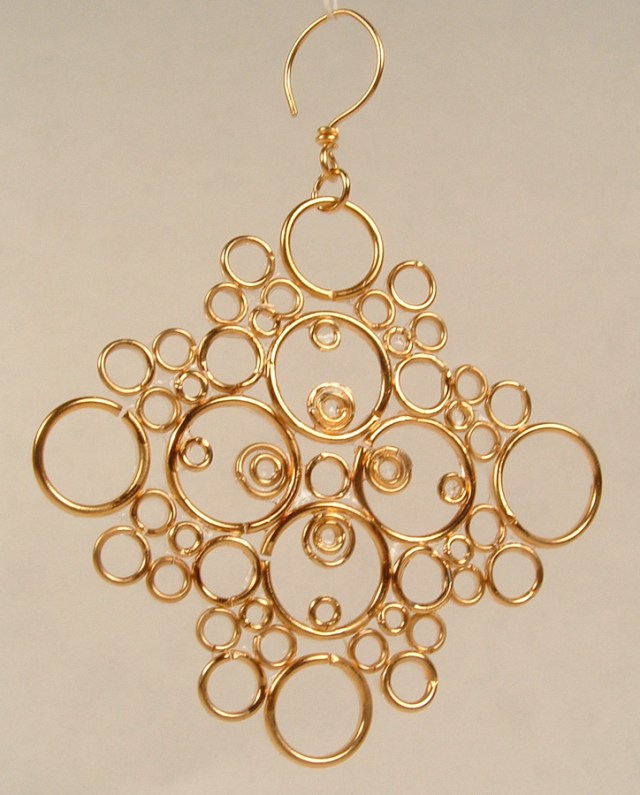
So, I make jewelry. In my collection of jewelry supplies are all sorts of materials and findings for really old projects that I just cannot get rid of. I guess you could call me a supply hoarder (I don’t feel too bad about this as I think Cheri has a bigger collection). Ask anyone in my family and they will tell you that I am a museum for clothes and supplies (I still have some beads from my very first Fire Mountain order around 20 years ago, and crap did I just make myself feel old). Anyway, the gold rings I used in this Christmas ornament have been in a drawer for years. I made a pair of earrings for my M-I-L out of them and of course, I did my usual M.O. and bought way too many supplies and was stuck with a bag full of various sizes of gold jump-rings.
For this project, I laid down some wax paper and pulled out my bottle of bead glue (super glue). I used some tweezers to place the rings where I wanted them and glued the whole piece together. I like the project so much that I think I am going to make a set of earrings with a similar shape for the holiday season. The ornament is around 3 inches top to bottom and side to side, not including the hook.
This is a very simple project and looks great on a Christmas tree. The jump-rings are available at most craft stores in the jewelry supply section.
Loryn – The Crafty Sisters are kicking off our Advent Ornament Challenge! For each day of December up til Christmas, we’ll be posting a fun and easy ornament that you can make.
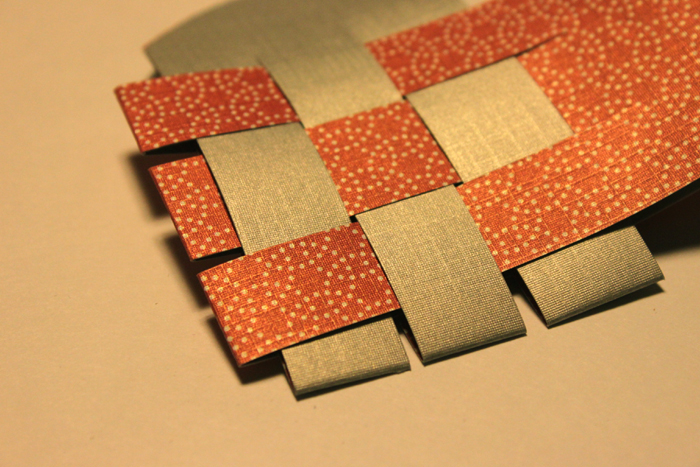
First up is this woven heart ornament. I remember making these in Girl Scouts in the early ’80s. I was fascinated by the technique. Weave the paper together, and it makes a basket. Magic!
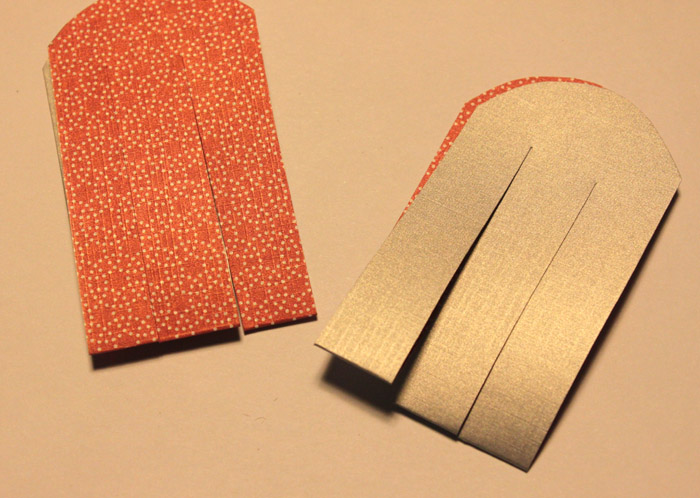
To make the ornament, first pick out your paper. Back in the Girl Scouts, we used construction paper, but I had some double sided scrapbooking paper on hand that worked great. Use a medium weight paper, not too thin or they won’t hold up, and not too thick or you won’t be able to do the weaving. Fold the paper over the 3 1/2″ mark, then trim off the rest.
Then you’ll want to cut two pieces that are 3 1/2″ long (one side of the fold only) by 2″ wide. Then fold one of them the other way so the reverse print is showing.
Then shape the top of each piece into a semi-circle, for one part of the heart. Cut two slits into each piece, starting at the fold. The slits need to be more than 2″ long. You’ll end up with this:
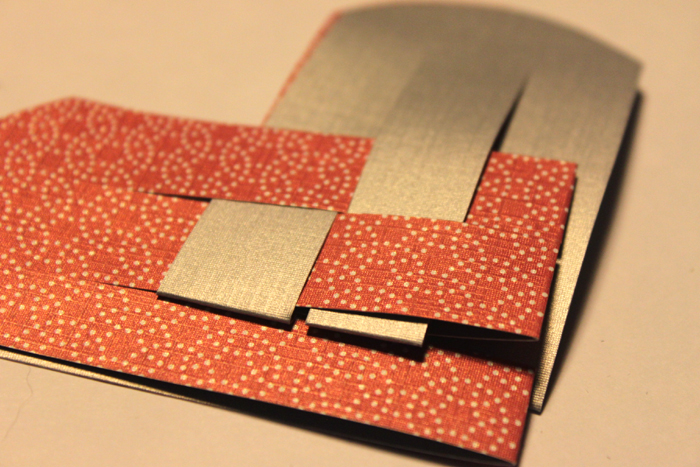
Now you’re ready to start weaving. The technique isn’t your standard over-under-over-under. Instead, you need to put the “under” pieces through the middle of the alternating piece. Here, I’m starting by inserting the gray piece into the middle of the pink:
Then the pink ones need to go through the middle of the gray on the next row. It’s best to do the first two on each side, then finish up the last three.
When you get to the last ones, you’ll see why the paper still needs to be flexible! Keep at it, and you’ll end up with this:
Now all you have to do is push the pieces into shape and add the finishing touches.
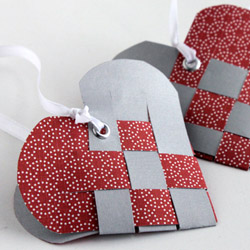
To give them a bit more finish, I put a small grommet onto each side of the heart, to thread the ribbon through. I used about 10″ of white ribbon and tied them off with square knots. Fill them with candy for a simple Christmas gift!
So, we didn’t announce our latest challenge publicly, but we decided to make magnets! I have still been having too much fun with felt lately and figured that what better material to use for my magnets.
Here are all 18 magnets that I made.
I decided to make felt flower magnets and as usual, I giggled my way through the project. Something about felt is so much fun and is so enjoyable that I just laugh and chuckle the whole time. I think it is also one of the few materials that I can almost always get exactly what I imagined in my head created with my hands.
Here you can see the depth of each flower magnet.
I bought myself a bunch of magnets from our local hardware store, Kleindorfer’s. They have everything! The magnets are wonderful and are just right for holding miscellaneous objects to my fridge. I used that wonderful crafter staple, Aleene’s Tacky Glue to hold everything together and the felt is just standard crafter’s felt that I have bought from Joann’s and Michael’s.
I used Google Images with the search on “flowers” and made most of my magnets based on photos of flowers I saw there. I didn’t use any patterns for these flowers, just cut out shapes that fit the petals I was trying to create. Some of the flowers are just images from my head and an imaginative use of various petal shapes.
I did go through the flowers afterwards and do some tugging and pulling to be sure that all the petals and stamens would hold well. I had to touch up a few places with some more glue, but I think they will stand up to regular use very well.
I had a lot of fun with this project and cannot wait for the next one!
Here we are! I managed to get my chair finished and before our display among ourselves even, although it then took me a week and a half to get the post up and ready.
The chair I chose to makeover is one of my kitchen chairs. Years ago, I received this wonderful 50’s table and chairs set from Memom (Mom to two Craftysisters and Grandmother to the other two). I loved the set, but the upholstery on the chairs was getting old and there were a few tears here and there. I decided that I would reupholster them, attempting to keep the same general style of vinyl, but more modern and more to my color scheme.
Here you can see the old and cruddy furniture tacks that I replaced.
I have actually already re-upholstered four of the six chairs and had started on a fifth when I made a common (well, common for me) error in judgement. I tried to used a piece of vinyl that was just a little too small. I was running out of material and didn’t want to buy some more (this even though I would need to buy more to finish the last chair). I have a tendency to make this sort of decision when I am too tired and should really just put the project away for a while. Well, maybe I learned my lesson this time. Anyway, I had already taken the chair back off and it was mostly finished, when the problems with the too small piece of vinyl really became apparent. There was no way to hide the staples holding the vinyl in place as the staples could not be placed in their proper positions due to the smaller size of the vinyl. At this point, my frustration in having to take all those darn staples out yet again caused me to set the whole project aside for about a year and a half. Of course, all this time the chair has sat upstairs in my loft as an impalement accident waiting to happen as the chair back was never put back on.
So, along comes this excellent opportunity to get back in the swing of chair re-upholstery and finally get at least another chair finished.
I found the color of vinyl that I wanted for the seats at Great Lakes Fabrics and bought quite a bit of it as I wanted extra for possible repairs later. The material is marine vinyl and I will eventually replace the backs with material from there as it is extremely durable. I wanted a marbleized effect that was reminiscent of the original fabric and this was similar and yet was much more my color style. I also purchased a large quantity of chrome half-dome furniture tacks from the same place. The white vinyl for the chair backs I purchased at Joann’s. I used high loft quilt batting from Joann’s for padding in my chair backs and a double layer of this for the chair seats.
Taking the chairs apart proved to be a great exercise is damaging fingers. I learned very quickly the importance of a good tack puller, pliers and wire cutters. There are over a hundred chrome half-dome furniture tacks on the back of each chair and that plus more than a hundred staples, makes taking the chairs apart a real chore. This is the step I really learned to dread more and more with each chair. I absolutely love the finished product though, so it is well worth it in the long run.
As this is my fifth chair to finish in the set, I can say that I have really learned a lot about re-upholstering kitchen chairs.
1. Always have excess material. You can cut off excess, you cannot add on more material after it has already been cut.
2. Wire cutters work very well to remove tacks and staples. The sharp edge grabs onto the tack or staple and pulls them out very handily.
3. Sub-staples, Sub-staples, Sub-staples. I got this from Craftysister Loryn who got it from Design Sponge. These are temporary staples put in at an angle and are meant to be removed. Design Sponge has a series of wonderful upholstery posts that describe everything you would really ever need to know about re-upholstery. I really wish I had seen these tutorials before I got started on my kitchen chairs. This pretty much guarantees that I will be re-doing the first four chairs again.
I am very, very happy with how my chair turned out and may actually get to the last chair in the set this week sometime. I am off all this week so, other than the heat, I have no excuse for not getting the last chair finished (other than the realization that I need to re-do the first four chair backs again anyway.).
I just love how sub-staples make the finishing on the chair backs so easy! When I look at this chair compared to the first four, I just cringe.
Every single one of the Crafty Sisters has at least one chair in their house or in storage that is in desperate need of a repair/makeover. This challenge is all about getting one chair checked off our projects to complete list.
This time, part of the challenge is to document the whole process for you, our readers. You will get to see the befores and afters, as well as the steps we took (and possible failures we had to overcome) to complete the challenge.
Because this is a bit more time consuming than some of our other challenges, we are giving ourselves three weeks to finish this Crafty Challenge. We have until June 23rd to complete our Chair Repair Challenge!
All the Crafty Sisters have a storage space that looks like the photo above. Finding only one chair that needs to be repaired and made over is the hard part, so wish us luck!
Framed cootie scientific specimen box to hang on your walls.
Cheri:
I picked up a box of Cooties last year at a garage sale. I had a plan and it didn’t involve playing the game. I like the look of insect displays, but I don’t want to have a real insect display. I could have a Cootie display though.
After inspecting the cootie, I felt that I should split the thorax and head. There is a seam that runs along the two pieces and if you carefully insert a flat screwdriver into it, it will pop apart with a little effort. I took the front pieces of the thorax and head and worked with them in the specimen box and chose the placement.
I did have a bit of difficulty when it came time to attach the legs to the thorax, so I decided to hot glue the legs on to the thorax and glued it in place. I then hot glued the head, antenna and the tongue in place. I then cut a scrap of paper and hand wrote “Cootie” to make it look like it was a real insect specimen and pinned it in place.
This was such a fun project. I think I really like it because it is unexpected yet it is expected.
Loryn: This copper challenge was intriguing for me, as the only metalworking I’ve done is twisted wire jewelry. As soon as I saw the copper pieces, I immediately thought of doing a mobile in the style of Alexander Calder.
I started out making cut pieces like the leaf-shapes in many of Calder’s mobiles. I had cut about ten, and my hands were starting to hurt, when I had an idea to try making three dimensional shapes out of the disks.
Each shape is made from two disks cut to fit together.
Two simple pieces can make a huge variety of shapes. Read on to see how they are made.
Steps to make the mobile parts:
Make a cut to the center of each disk. Scissors work surprisingly well on this lightweight copper.
Slide the two disks together on the cuts that you just made. Keep sliding them together until the edges of the circles are even.
Then, start bending the cut pieces into interesting shapes. I started bending the pieces so that the two pieces wouldn’t fall apart. Turning each cut piece in the opposite direction creates a really stable object. This copper (leftover from a manufacturing process 20 years ago) is very hard to bend, so it makes really nice curves. I just kept playing around with different bends on each shape!
To hang each piece, I just used a nail to punch a hole. The mobile wires are made from 18 gauge galvanized wire, with a 12 gauge wire for the upper piece, which holds the most weight. I have a lot of disks left, so I’ll be making lots more of these twisted disk sculptures!