Category Archives: Homemade

Ornament Advent: Day 11 Foil and Scrapbook Paper Ball

I really wanted to make a simple ornament with aluminum foil. I have been wracking my brain trying to think of something and it hit me while I was driving home from work. I could make an awesome ball with strips of foil and paper.

Ball Christmas ornament made of strips of paper and aluminum foil

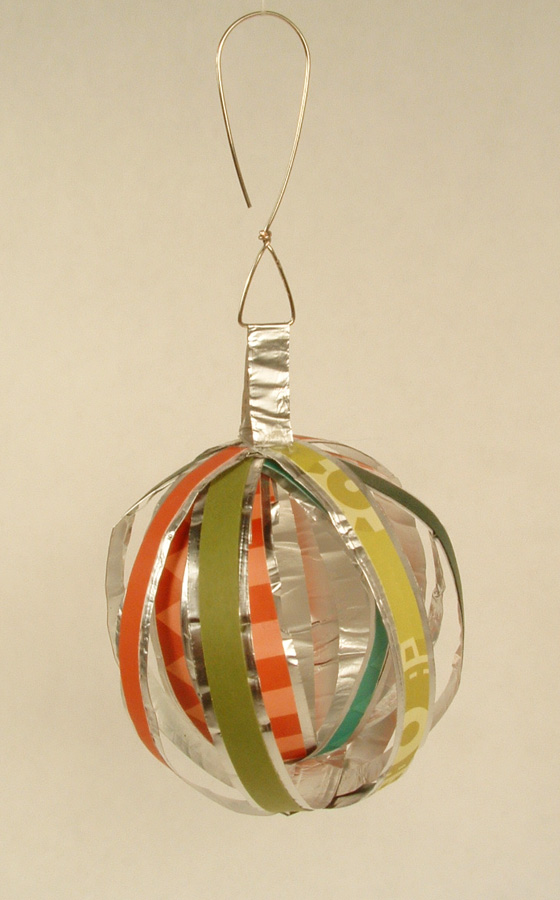
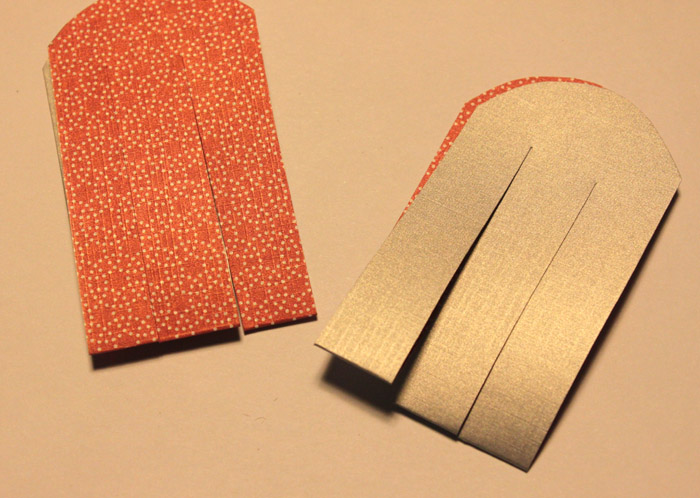
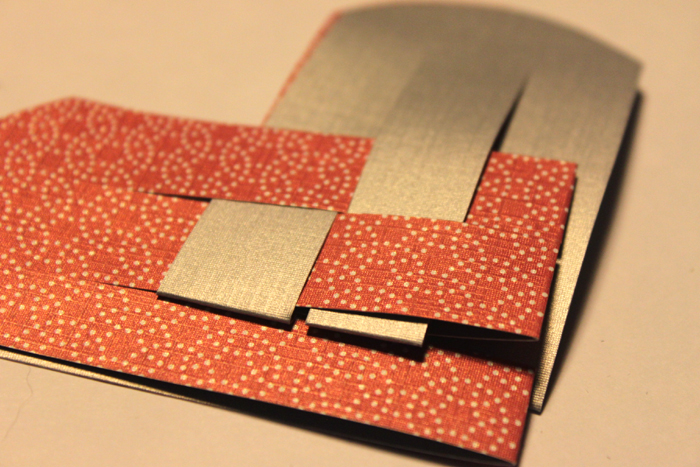
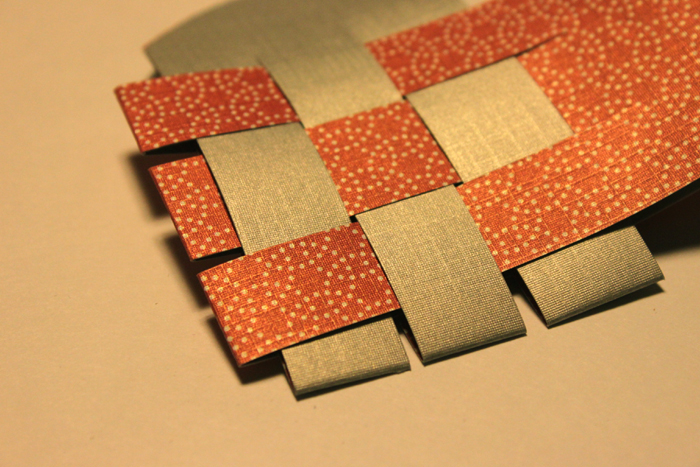
The ornament is a ball inside a ball. The style is reminiscent of a ribbon temari ball  that I made years ago. I cut strips of aluminum foil 1″ wide and strips of scrapbook paper 1/4″ wide (all the strips were roughly 12″ long). I folded the foil lengthwise to not quite in half. I then folded the other edge to give myself two nice, smooth edges. This made the foil strips about 3/8″ wide. I ran a bone folder over the foil strips to make them smooth and shiny. I glued the scrapbook strips to the foil strips and let them dry.

Paper and aluminum foil Christmas ornament.

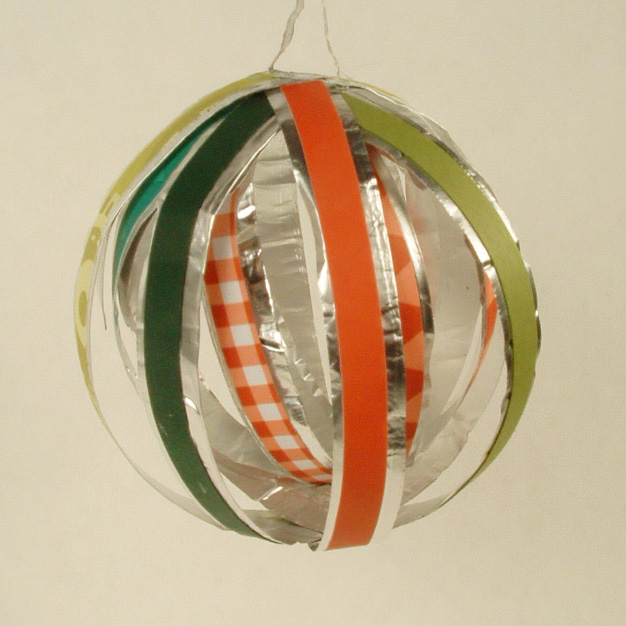
After they were dry, I cut the strips to 10″ long, just to make them easier to handle. Then I wrapped the strips around a solid object (I used a small glass for the outer ball and the glue bottle for the inner ball), glued the ends down, and cut off the excess. I made four smaller rounds and 4 larger rounds. I made the inner ball first then added the larger strips to make the outer ball. I glued the top and bottom where the strips met.

Ball ornament made of strips of paper and aluminum foil.

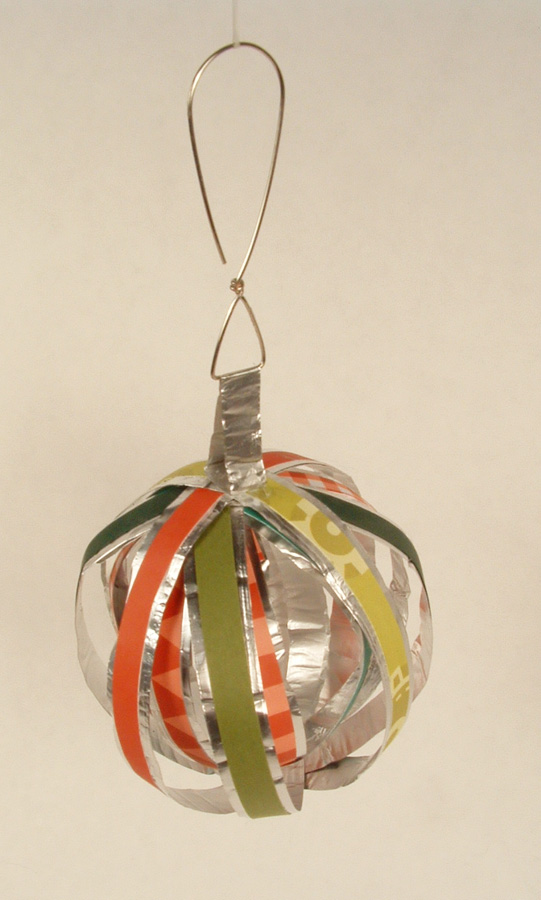
I made a small circle of foil about 1/4″ wide and glued that to the top of the ball and attached a homemade hook and I was finished. I think the whole ornament took me about an hour to make.

I am really happy with it, although it is rather delicate. At least if it gets bent out of shape it is really easy to fix.

Happy crafting!

Kristin

Ornament Advent: Day 9 Upcycled Felt Bird

feltbird

Loryn:  For Day 9 of our Ornament Advent challenge, I’ve made a bird from old sweaters that I felted. Wool felt is expensive, so upcycling old sweaters is a crafty way to have a good supply cheaply. I sewed the bird together using blanket stitch. (For a tutorial, see my felted ornament post from last Christmas). I wanted the bird to be delicate, so I used fine gauge sweaters so the felt isn’t too heavy. I loosely stuffed him with cut up felt scraps, which gives an old fashioned look.

feltbirdcl

For the details of the face, I used gold embroidery floss for the beak, and a bead with a few blue backstitches for the eye. He went together quickly and looks great on the tree!

— Loryn

feltbirdgawk

Felt Christmas Tree ornament

Ornament Advent: Day 7 Felt Tree and Wreath

Today’s ornament was a massive lesson in frustration. Or rather, the ornament that you don’t see was. My original idea for an ornament failed spectacularly. My craft table is covered with parts, bits, and pieces. Around 10:00pm I realized that it was never going to work. Then began the frantic search. I dug through all of my supplies in the hope for a lightning strike. I didn’t get one until I was texting my sister that I was ready to give up. Right after I hit send, it hit me.

Felt Christmas Tree ornament

I love felt and I had a lot of fun last year with the pins and sequins ornament I made, so why not combine the two. The base of this ornament is a ball I made for temari. Temari is a Japanese art form that I played with a few years ago and kept all my supplies (go figure). You make the ball by taking a very large handful of stuffing and wrapping it with thread (one way to make the ball anyway). A lot of thread. You keep winding the thread around and around and around the stuffing until you get a round ball. This particular ball was my attempt to create a flattened ball to showcase a design on the front and back. I never did get around to completing the temari, but it gave me an excellent form to create my Christmas ornament.

Felt wreath side of the ornament

Next, I cut strips of felt around 1/2″ to 3/4″ wide and started cutting these strips into triangle pieces. Then I took my piles of pins and sequins and pinned the triangles to the ball to make the images of the wreath and tree. I used some fuzzy white thread to make a sort of frame to separate the two images by sewing it around and around the ball. I made a quick hook and voila! I was finished.

Side view of Christmas ornament
Here you can see the fuzzy white thread.

I really like the effect of the multiple colors of green for the Christmas tree and the stars in the wreath really make it pop. You could use anything for the form of the ornament, Styrofoam would be very easy. I imagine a Santa Claus/reindeer ornament would be very cute. Anyone want to try it? Send us your picture and we will post it! I would love to see someone else’s version.

Christmas tree side of ornament

Just goes to show that necessity really is the mother of invention.

Happy Crafting!

Kristin

Ornament Advent: Day 5 Tiny Paper Stars

tinystarsfinal

Loryn — I see a lot of ornaments made the way these are – just glue three or more circles together – but I thought they would be really fun made with a star paper punch. They make tiny ornaments, just a few inches tall, and they’re perfect for a miniature tree.

tinystars

My paper punch is from Martha Stewart crafts. I cut a few stars from different colored scrapbooking papers, then folded each one down the middle. Glue three together around a piece of embroidery floss, then put beads on the bottom.

tinystarsfin

I like the single bead better than the one with two beads. Bells would be fun, too. They need some weight to make them hang right. The ornaments take just a few minutes to make, so you could decorate a mini tree in no time!

— Loryn

tinystarsgawk

Ornament Advent: Day 4 Pop Up Sticky Notes

popupornament

Lynne: I was surfing the web hoping to find an idea for our Advent Countdown when I came upon this great video from EepyBird. I fell in love with the sticky note pinwheels and started to think how I could modify one into an ornament. I needed a pad of pop up sticky notes, a glue stick, a darning needle, monofilament fishing line, micro glitter, spray adhesive and two buttons.

EepyBird.com counts out twelve pairs of pop up sticky notes and then glues the endnotes of the stack to each other. The structure is rotated three times to make the pinwheel. I must admit that I had to watch the video several times before I understood how the turns were done. If I watched where the doubled edges were each time the figure was turned, I could manage the proper sequence. Their excellent tutorial video is here.

The resulting structure holds its shape enough to roll down an incline, but not well enough to hang on a tree. I decided to gather the fins (the doubled edges) to prevent the pinwheel from coming apart. I used a large-eyed darning needle (sharp enough to go through the paper) with about 20 inches of fishing line. I used fishing line since it is invisible and I had a spool in my craft drawer. Using the needle to punch a hole about 1/8 inch from the edge (see photo below), draw the thread of fishing line through each fin until all the fins are gathered in a circle. Pull the line tight and knot the ends. Don’t cut the thread.

I used the two buttons to cover the hole in the middle of the pinwheel. Thread one of the buttons onto your fishing line and then push the needle through to the other side of the pinwheel. Gather these fins the same way, add the other button and tie a knot to keep everything together.

I used spray adhesive and micro glitter to add some holiday sparkle. For the hanger, I made a loop with the fishing line and attached it to two fins (see photo below) for the best balance.

I really like how the pinwheel looks and was especially pleased to make something with such an unusual material.

popupornament2

Gold ring Christmas ornament

Christmas Ornament Advent: Day 3 Gold Rings

Gold rings2

So, I make jewelry. In my collection of jewelry supplies are all sorts of materials and findings for really old projects that I just cannot get rid of. I guess you could call me a supply hoarder (I don’t feel too bad about this as I think Cheri has a bigger collection). Ask anyone in my family and they will tell you that I am a museum for clothes and supplies (I still have some beads from my very first Fire Mountain order around 20 years ago, and crap did I just make myself feel old). Anyway, the gold rings I used in this Christmas ornament have been in a drawer for years. I made a pair of earrings for my M-I-L out of them and of course, I did my usual M.O. and bought way too many supplies and was stuck with a bag full of various sizes of gold jump-rings.

For this project, I laid down some wax paper and pulled out my bottle of bead glue (super glue). I used some tweezers to place the rings where I wanted them and glued the whole piece together. I like the project so much that I think I am going to make a set of earrings with a similar shape for the holiday season. The ornament is around 3 inches top to bottom and side to side, not including the hook.

Gold ring Christmas ornament

This is a very simple project and looks great on a Christmas tree. The jump-rings are available at most craft stores in the jewelry supply section.

Happy crafting!

Kristin

Ornament Advent: Woven Paper Heart Ornament

heart

Loryn – The Crafty Sisters are kicking off our Advent Ornament Challenge! For each day of December up til Christmas, we’ll be posting a fun and easy ornament that you can make.

First up is this woven heart ornament. I remember making these in Girl Scouts in the early ’80s. I was fascinated by the technique. Weave the paper together, and it makes a basket. Magic!

To make the ornament, first pick out your paper. Back in the Girl Scouts, we used construction paper, but I had some double sided scrapbooking paper on hand that worked great. Use a medium weight paper, not too thin or they won’t hold up, and not too thick or you won’t be able to do the weaving. Fold the paper over the 3 1/2″ mark, then trim off the rest.

heartfold

Then you’ll want to cut two pieces that are 3 1/2″ long (one side of the fold only) by 2″ wide. Then fold one of them the other way so the reverse print is showing.

heartready

Then shape the top of each piece into a semi-circle, for one part of the heart. Cut two slits into each piece, starting at the fold. The slits need to be more than 2″ long. You’ll end up with this:

heartslits

Now you’re ready to start weaving. The technique isn’t your standard over-under-over-under. Instead, you need to put the “under” pieces through the middle of the alternating piece. Here, I’m starting by inserting the gray piece into the middle of the pink:

heartstart

Then the pink ones need to go through the middle of the gray on the next row. It’s best to do the first two on each side, then finish up the last three.

heartweave2

When you get to the last ones, you’ll see why the paper still needs to be flexible! Keep at it, and you’ll end up with this:

heartweave3

Now all you have to do is push the pieces into shape and add the finishing touches.

heartopen

To give them a bit more finish, I put a small grommet onto each side of the heart, to thread the ribbon through. I used about 10″ of white ribbon and tied them off with square knots. Fill them with candy for a simple Christmas gift!

— Loryn

heartgkr


Wreath of copper leaves

Crafty Challenge 11: Copper Fall Wreath

Hello Again! I feel like I have been incommunicado for a very long time. All the Crafty Sisters got together last weekend for our latest Crafty Challenge. This challenge was to make a fall wreath.

Wreath of copper leaves
The wreath is 15″ tall and 13″ wide.

Due to everything in our house breaking down all at the same time, I was under a bit of a money crunch so I knew whatever I made, I had to have all the supplies already on hand. It helped that as soon as we started talking about a fall wreath, I was picturing a leaf wreath made of copper. And as some of you might remember, we did that wonderful Copper Crafty Challenge a while back and I still had a lot of the copper discs leftover from the copper necklace I made. The discs are remarkably easy to cut with heavy-duty scissors and I knew that they would make beautiful leaves.

Here you can really see the oily effect that burnishing the leaves created.

So, I started cutting and cutting and cutting. I had some very interesting dimples in my fingers from the force of cutting the copper discs, but I had some amazing maple leaf shapes. I also knew that I wanted to burnish the leaves to create different colors. I pulled out my trusty propane torch and proceeded to burn the crap out of one of the leaves. I learned very quickly that you only wanted to brush the copper leaves with heat very quickly. If you wanted a deeper color, you just kept running the torch over the copper quickly and letting it cool a second and repeat to the color desired. Thankfully, the blackened portions just wipe off and you can burnish again to your hearts content. I then bent the leaves very gently with a pair of pliers to give them some depth.

I did not coat the copper leaves with anything as I really will like the aging effect on the copper.

I made the ring the leaves are attached to as well, the wreath frame that is. I had a length of copper pipe (again left over from the Copper Challenge that I never used) and I ran a wire through the pipe and bent it all in a circle. I used the wire to make a hanger at the top of the frame. It turned out that the length of pipe was not long enough, but as I originally planned to let the pipe show through in some places, I would just make sure the leaves covered the wire parts of the wreath frame. I then used one of my hammers and my anvil to flatten the pipe to make the leaves attach better.

Here you can see the depth of the copper leaves.

I knew that my personal soldering abilities were not good enough to be able to place the leaves exactly where I wanted them so I switched my connecting component to hot glue. This worked out very well and I was able to place the leaves precisely where I wanted each one to go. I then flipped the wreath over and poured hot glue all over the frame where it connected to the leaves. This gave the wreath lots of stability and now absolutely nothing moves.

Photo showing wreath hanging from my loft
This is where I hang my wreathes in the house.

I am so happy with my wreath and it is now hanging in my house and just looks gorgeous. I did have a good laugh at the unveiling though. You will find out when more wreaths are posted! Amazingly, working with all that cut copper, I never did cut myself. This may be the first project in a while that didn’t end with a few bandaged fingers.

Happy Crafting,

Kristin!

Side view of felt flower magnets.

Crafty Challenge 10: Felt Flower Magnets

So, we didn’t announce our latest challenge publicly, but we decided to make magnets! I have still been having too much fun with felt lately and figured that what better material to use for my magnets.

Overhead view of all 18 felt flower magnets.
Here are all 18 magnets that I made.

I decided to make felt flower magnets and as usual, I giggled my way through the project. Something about felt is so much fun and is so enjoyable that I just laugh and chuckle the whole time. I think it is also one of the few materials that I can almost always get exactly what I imagined in my head created with my hands.

Side view of felt flower magnets.
Here you can see the depth of each flower magnet.

I bought myself a bunch of magnets from our local hardware store, Kleindorfer’s. They have everything! The magnets are wonderful and are just right for holding miscellaneous objects to my fridge. I used that wonderful crafter staple, Aleene’s Tacky Glue to hold everything together and the felt is just standard crafter’s felt that I have bought from Joann’s and Michael’s.

Side view of felt flower magnets.

I used Google Images with the search on “flowers” and made most of my magnets based on photos of flowers I saw there. I didn’t use any patterns for these flowers, just cut out shapes that fit the petals I was trying to create. Some of the flowers are just images from my head and an imaginative use of various petal shapes.

Top view of felt flower magnets.

I did go through the flowers afterwards and do some tugging and pulling to be sure that all the petals and stamens would hold well. I had to touch up a few places with some more glue, but I think they will stand up to regular use very well.

Top view of felt flower magnets.

I had a lot of fun with this project and cannot wait for the next one!

Top view of felt flower magnets.
I just love the chrysanthemum shape!

Happy crafting,

Kristin

Chair Challenge

Cheri- It doesn’t seem to matter how much time we have for a challenge, I seem to always wait until the last minute to complete it.

Over the years, I’ve collected several chairs that need to be painted/redone.  I started with 3 chairs that I’ve had for a while and decided to try a different technique on each one. If I didn’t like how my chair was coming along, I’d move on to a different one.

The camp chair was my third try. It was a garage sale find and was a lot more unique than my other attempts. The bad part of the project, was that the canvas needed to be replaced. For a folding chair, this is a pretty major fix as the chairs stability depends on the canvas seat and the back.

After pulling off the canvas, I was amazed by the wonderful wooden skeleton the chair had. of course now I was faced with the daunting task of showing off the chair without covering it up too much.

After mulling it over in my head for a bit, I decided that something transparent would be best for the back. It just happened that I  picked up some unused medical tubing at another garage sale that would be perfect for the back of the chair. I dremelled about 12 holes on each side of the back. Then I took the tubing and wrapped it around the chair, tacking it in each place that had previously been drilled.

The back of the chair looked great, next came the seat. I first tried to use the tubing again, but the tubing needs to be held tight and this chair folds. I had some leather in my material stash and dug it out. It was a perfect fit to replace the canvas seat of the chair.

It needs a few more tweaks, but the finished product came out pretty cool.