
-Cheri
-Cheri
 Come quick. It’s the aurora borealis.
I used markers and colored pencils on this squiggle. The shading in the pants is not as smooth as I like, but the texture of the paper has that effect. Markers tend to fill in the valleys of the paper as in the shirt. Yet, I do like the glitter on her pants. Maybe it’s the reflection of the northern lights.
-Lynne


I started with markers on the shirt of this squiggle and finished with colored pencils. I think I like it better when I start with colored pencil and then marker. The pencil keeps the marker from bleeding through and the color spreads and blends better. The pants look more like the yellow green I wanted than the shirt looks like the red violet I wanted.
This squiggle boy sees the finish line and is determined to be the first to the tape. Maybe if his form was a little better?
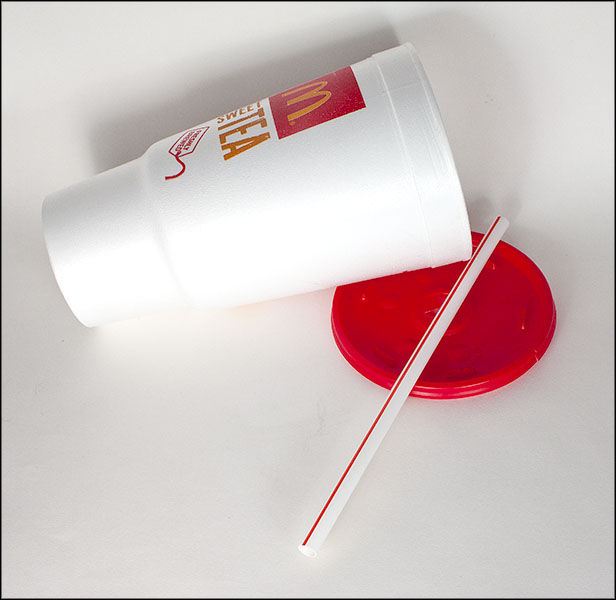
-Lynne: Craft challenge two is now over and it is time to think about challenge three. I had my moments with the last challenge. Having to work within limits that nearly excluded the basics of crafting such as glue and paint had me searching for ideas beyond the usual. Challenge three is a spinoff of challenge two and that search.
What if we had a challenge where the materials could only be those things that are incidental to a purchased item? This would be the things like the plastic bags that purchases come in, the packaging around your purchases, containers left after a fast food meal (not ones intended to be played with) and on and on. Unlike the last challenge glue, paint, staples and tape are allowed but they cannot be more than 5% of the finished item.
Therefore the rules are:
1. The materials used must be incidental to something you have purchased.
2. The materials cannot cost anything above the price of the purchased item.
Sisters and any others who would like to join in, start your creative juices flowing. Projects are due Sunday, November 6, 2011.
See our entries in the first two challenges here.


-Cheri: About 15 years ago I discovered this wonderful nut, that for some reason I had very little knowledge about up until then. It was pistachios. Pistachios are extremely yummy nuts. I love them and really can’t say anything bad about them other than the frustration of the shell not being open enough on a few.
I love to eat the nuts but I also like to use the shells. The shells are these pretty little half clam shells. They have a woody feel to them and take paint, marker and glue really well. They are really a nice item to work with. When I first started making items with the shells, I would very carefully tease the nuts out of the shell to leave it whole and would glue them together to make little Mallard ducks. I would then take the ducks and put them on a pond I had drawn on a piece of cardboard.
After I grew tired of the ducks, I started looking closely at the pretty little ovals and started thinking about all the creatures I could make out of them. Thus, the creatures featured here were created. Eventually, I ran out of ideas. But the funny thing is that every time I eat pistachios I usually save a handful of shells back just in case…..
-Lynne: These make whimsical cards of all kinds. Eat some pistachios, collect the shells, grab your scissors, construction paper and markers and have some fun making your own creations.


-Cheri

This drawing is a combination of markers and colored pencils. I am trying to get a good layer of pencil, then a smoother layer of marker and then shading by the pencils.
It is never worth it to argue with a parrot. They can do it standing on their heads.
-Lynne

-Lynne: Our hardware challenge sounded straight forward when we first proposed it. The idea of being turned loose in a hardware store seemed more like a dream than a challenge and the $5.00 limit on materials cost did not daunt me at all. We are “make-do” sisters.
Earlier this spring, I found the book “Simply Sublime Bags” by Judi Kahn. In it she shows how to make “no sew” purses using fabric and duct tape. I was so taken by the idea that I made myself a keyhole clutch from a feedsack with matching duct tape. The pattern can be found here online, but the book is well worth getting for all the wonderful ideas.
Beyond being extremely cute and novel, my clutch has been surprisingly durable. I have been wanting a slightly larger purse and this challenge seemed like the perfect time to make another one. After all, duct tape is to a hardware store like water is to a duck. Besides with a project like this, all I would need was the fabric and something to hold the fabric together in its purse shape.
I’m afraid that I became rather testy when I realized that glue, thread, staples, paint, ink and tape would count towards the $5.00 total. I can tell you right now that no hardware store can sell you 50 cents worth of glue. We had to buy what materials we needed in the quantities available and we could not buy a quantity and divide the price by the number we used. I only wanted 4 yards of fishing line, but I would have had to buy 700 yards for $2.99. That was more than half my budget. I needed to rethink how to “sew” the purse together.
I wandered the aisles of all the hardware stores in town. I had knowledgeable, helpful men following me trying to help me find the “right part.” They would always take a step backwards when I told them that not only did I not know the part I needed, I did not know what the part would be for. Hardware by its very nature is made to be used in the manner it was made. Wood screws are for wood and metal screws are for metal and never the twain shall meet. People who work at hardware stores are bewildered and confused by browsers.
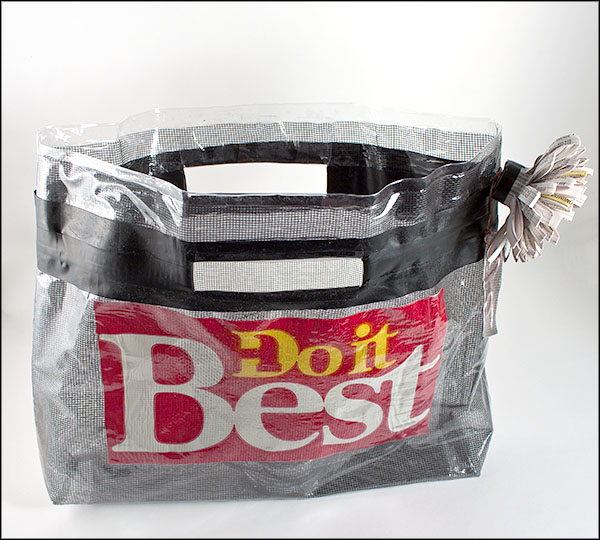
When I saw the fiberglass window screen, I knew I wanted to use it as the fabric for my purse. I could buy one foot of the 36″ wide screen and stay well within my budget. I noticed a roll of clear plastic vinyl next to the screen and remembered that plastic can be fused into a fabric by heating it with an iron. Heat unlike glue and staples would not cost me anything. I could sandwich the screen in between two pieces of the plastic and have both my fabric and my “glue.” I added some electrician’s tape which is cheap because it doesn’t stick to anything, a carriage bolt, a foot of copper wire and a brass hex nut to my list and I was 14 cents under my $5.00 limit.
I found that fusing the “fabric” could be tricky. You have to keep in mind what will melt fastest and that plastic can shrink in odd ways and iron accordingly. The holes in the fiberglass screen allowed the plastic to adhere to itself, but I found that where I needed a strong bond I had to use just the clear plastic. By cutting the screen smaller than the plastic, the seams were only plastic and strong enough to hold all the stuff I put in a purse.
I desperately needed some decoration for my purse and I only had 14 cents left in my budget, but I had become a crafty challenge participant. I gathered up the paper bag I had used for the free popcorn, the plastic bag for my purchases and the free telephone directory at the end of the counter and felt crafty as well as rich in materials.
The electrician’s tape strengthened the open handles and made a nice decorative statement around the top of the purse. I fused the logo from the plastic bag to the front of the purse to add the graphic text and some much-needed color. Once you start fusing it is hard to stop. I fashioned the copper wire into my initial and fused it in a sandwich of clear plastic, fiberglass screen, the label from the paper bag and another layer of plastic for a hang tag.

Hardware is hard and I wanted to soften it with a flower decoration. I had just noticed these paper flowers on craftgawker and I had that free telephone directory. I used a paper punch to put a hole in the edge of the purse and threaded the carriage bolt through it and the center of the folded flower. The hex nut secured the flower to the purse and made a “cuter than a button” flower center.
I may fuse some more plastic around the handles now that the challenge is over and I don’t have to worry about a budget. But I am very happy with the results. I love the idea of making your own fabric and fusing is forgiving. If you make a mistake, keep ironing things on till you like it. That is the way to Do it Best.
-Lynne: Our hardware challenge sounded straight forward when we first proposed it. The idea of being turned loose in a hardware store seemed more like a dream than a challenge and the $5.00 limit on materials cost did not daunt me at all. We are “make-do” sisters.
Earlier this spring, I found the book “Simply Sublime Bags” by Judi Kahn. In it she shows how to make “no sew” purses using fabric and duct tape. I was so taken by the idea that I made myself a keyhole clutch from a feedsack with matching duct tape. The pattern can be found here online, but the book is well worth getting for all the wonderful ideas.
Beyond being extremely cute and novel, my clutch has been surprisingly durable. I have been wanting a slightly larger purse and this challenge seemed like the perfect time to make another one. After all, duct tape is to a hardware store like water is to a duck. Besides with a project like this, all I would need was the fabric and something to hold the fabric together in its purse shape.
I’m afraid that I became rather testy when I realized that glue, thread, staples, paint, ink and tape would count towards the $5.00 total. I can tell you right now that no hardware store can sell you 50 cents worth of glue. We had to buy what materials we needed in the quantities available and we could not buy a quantity and divide the price by the number we used. I only wanted 4 yards of fishing line, but I would have had to buy 700 yards for $2.99. That was more than half my budget. I needed to rethink how to “sew” the purse together.
I wandered the aisles of all the hardware stores in town. I had knowledgeable, helpful men following me trying to help me find the “right part.” They would always take a step backwards when I told them that not only did I not know the part I needed, I did not know what the part would be for. Hardware by its very nature is made to be used in the manner it was made. Wood screws are for wood and metal screws are for metal and never the twain shall meet. People who work at hardware stores are bewildered and confused by browsers.
When I saw the fiberglass window screen, I knew I wanted to use it as the fabric for my purse. I could buy one foot of the 36″ wide screen and stay well within my budget. I noticed a roll of clear plastic vinyl next to the screen and remembered that plastic can be fused into a fabric by heating it with an iron. Heat unlike glue and staples would not cost me anything. I could sandwich the screen in between two pieces of the plastic and have both my fabric and my “glue.” I added some electrician’s tape which is cheap because it doesn’t stick to anything, a carriage bolt, a foot of copper wire and a brass hex nut to my list and I was 14 cents under my $5.00 limit.
I found that fusing the “fabric” could be tricky. You have to keep in mind what will melt fastest and that plastic can shrink in odd ways and iron accordingly. The holes in the fiberglass screen allowed the plastic to adhere to itself, but I found that where I needed a strong bond I had to use just the clear plastic. By cutting the screen smaller than the plastic, the seams were only plastic and strong enough to hold all the stuff I put in a purse.
I desperately needed some decoration for my purse and I only had 14 cents left in my budget, but I had become a crafty challenge participant. I gathered up the paper bag I had used for the free popcorn, the plastic bag for my purchases and the free telephone directory at the end of the counter and felt crafty as well as rich in materials.
The electrician’s tape strengthened the open handles and made a nice decorative statement around the top of the purse. I fused the logo from the plastic bag to the front of the purse to add the graphic text and some much-needed color. Once you start fusing it is hard to stop. I fashioned the copper wire into my initial and fused it in a sandwich of clear plastic, fiberglass screen, the label from the paper bag and another layer of plastic for a hang tag.
Hardware is hard and I wanted to soften it with a flower decoration. I had just noticed these paper flowers on craftgawker and I had that free telephone directory. I used a paper punch to put a hole in the edge of the purse and threaded the carriage bolt through it and the center of the folded flower. The hex nut secured the flower to the purse and made a “cuter than a button” flower center.
I may fuse some more plastic around the handles now that the challenge is over and I don’t have to worry about a budget. But I am very happy with the results. I love the idea of making your own fabric and fusing is forgiving. If you make a mistake, keep ironing things on till you like it. That is the way to Do it Best.

