Category Archives: How to

Christmas garland made of wrapping paper.

Ornament Advent: Day 23 Christmas Wrap Garland

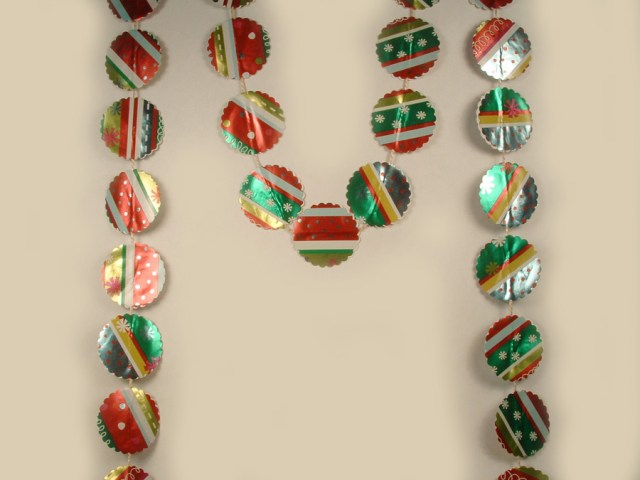
One of the greatest benefits of having a crafting family are how ideas are bounced, re-imaged, and re-shaped among us. I really love the Star Ornaments that Loryn made and I also just love the Chinese Fortune Garland that Cheri made. I decided to do something similar to Loryn’s stars and follow Cheri and make a garland. I am very happy with how it turned out!

Christmas garland made of wrapping paper.

Supplies:

Christmas wrap

Paper punch (I used 2″ seal punch)

Glue stick or pen

Yarn, string, or ribbon

Christmas garland made of Christmas wrap and shaped into a wreath.

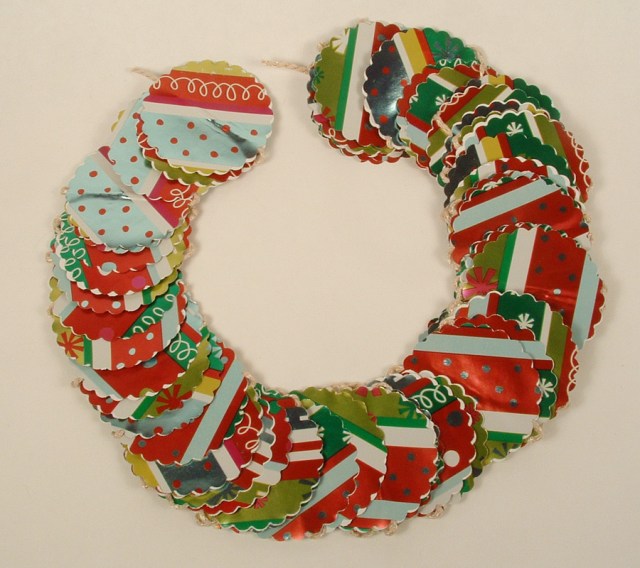
I had some really shiny Christmas wrap and also had this 2″ seal paper punch. I used the paper punch to cut around 120 pieces out of the Christmas wrap. I then pulled out some thick crochet thread that is a sort-of soft gold color and is ribbonish (flat and about 1/8″ thick). I spread glue on two cut-outs and glued the crochet thread between the two pieces. You do have to be sparing with the glue as the Christmas wrap is very thin. I left around 1/4″ of the yarn visible between the cut-outs.

Christmas Wrapping Paper Garland

My garland is around 12′ long and looks great on a tree! I think this whole garland took me around 45 minutes to make. The other nice thing about this garland is that once you fold up the shapes, it takes up so little space and stores very well.

Christmas Garland made of wrapping paper.

Happy Holidays and Happy Crafting!

Kristin

Christmas tree ornament made of chenille pipe cleaners.

Ornament Advent: Day 19 Chenille Tree

I knew from the beginning that I would just have to make a tree ornament for this Christmas advent. I have had one in mind, but I had no idea to execute it. I watched Loryn’s and Cheri’s tree ornaments get posted and loved each of them. My goal was to keep the ornament very simple and easy to make. This whole ornament probably took me about 30 minutes and I was Google Talking (can I use that that way?) with Mom which slows me down as we each share what we are project we are working on.

Christmas tree ornament made of chenille pipe cleaners.

I used chenille pipe cleaners, cut in half, then wrapped candy cane style for the form of my tree. I know I keep mentioning temari lately, but I have a ton of supplies leftover and so I used some really cool fuzzy green thread from my temari stash to wrap around the chenille pipe cleaners. I really liked how the fuzzy thread looks like the needles on a pine tree. I tied the ends of the thread and glued my knots to ensure that they wouldn’t come loose.

Christmas tree ornament made of pipe cleaners.

I grabbed all the thread wrapped pipe cleaners in one group. ran some silver wire down the middle, and approximately 1″ in on the pipe cleaners, wrapped the silver wire around the group to hold it together. Then I bent all the wires down over the silver wrapping so that just the wire stuck out the top. I used this bit of wire to string the wooden star bead and make the loop for the hanger. At this point, it you didn’t put the hanger on the ornament, it actually looks really cool just as a decoration for your table, although I would recommend putting something under it as the pipe cleaners are a bit scratchy.

Ornament hook made to look like a Christmas tree.

I love the hanger I made for this ornament. Whoever said that you needed to have plain hooks for your ornaments? I made the hanger out of more silver wire, just bending it into shape and curling the end so you didn’t poke yourself with it.

Ornament hook made of wire to look like a Christmas tree.

Happy crafting!

Kristin

Thread ball draped with glass seed beads sewn into ribbon.

Ornament Advent: Day 15 Beaded Ball

Gonna Go Back in Time!

Thread ball draped with seed beads

So, I was not feeling at all well this weekend and missed my Saturday post for the Ornament Advent. To make up for it, I decided to splurge and make a slightly more difficult ornament. For this ornament, I once again raided my temari ball stash and used one of the green balls for the base. It is around 3″ in diameter. I then wrapped the ribbon around the ball tacking it down first with pins and then with basting stitches.

Thread ball draped with glass seed beads sewn into ribbon.

The beads are from the giant spinner of seed beads that Mom and I bought to take with us when we went camping (yes, we like to craft while camping). I strung the beads and crossed under the ribbon, trying to make a slight draping effect while doing so. It was interesting how much heavier the ball got by the time I was finished. All those glass beads weigh more than you would think.

Green thread ball draped with stands of seed beads.

I then decided that I needed a bead topper and found a lovely smoky gray glass bead in my oddments and leftovers drawer that looks great. I made the hook and I was ready to go.

Green thread ball draped with seed beads.

I am really pleased with how this one turned out.

Happy Crafting,

Kristin

Ornament Advent: Day 18 Fortune Cookie Garland

Save your fortunes and make this holiday garland.

Cheri: My boys and I try to keep a standing date on Saturdays. We like to go and have lunch at a Chinese Restaurant in the small town where we live. I keep the fortunes as a keepsake. This is one of my favorite projects to make with them.

Supplies:

Fortune Cookie Fortunes

Glue or tape

Gold marker

How to:

Color a line around the slips with gold marker to dress it up a bit, and then glue/tape the fortunes into a circle, (make sure the fortune is on the outside). Attach them together and you have a great chain for the Christmas tree. I plan on continuing the chain throughout the year. Merry Christmas!

Fortune Cookie Garland

Ornament Advent: Day 16 Champagne Cork Angel

Champagne Cork Angel

Our own wonderful watercolorist and art instructor Teri Partridge  of the Pear Tree Gallery always teaches a full week of ornament classes in the month of December. She has agreed to join us as a guest author and post an ornament or two in our Advent Challenge. This angel is so cute and so much fun to make. Her excellent tutorial can be found here.

Ornament Advent: Day 14 Dinosaur Dandies

dinosaurbuddiescheri2

Cheri: This little group of dinosaurs are all dressed in their finest silver and glitter and are ready to decorate your tree.

Supplies:

Toy dinosaurs

Silver paint

Glitter

Oven-bake clay, red and white

Eye hooks

Paint your dinosaurs. I think you could probably spray paint them, but it is pretty cold here and I don’t think it is a good idea to spray paint in the house. (LOL)

After they are painted, (maybe 2 coats), put another coat of paint or sealer on them, and while they are still wet, sprinkle them with glitter. You could probably put a pretty heavy coat on, but I wanted them to look like they had been “kissed” with snow.

Knead a small ball of white clay and red clay, make a small coil with the white clay and roll it into a circle. Then make a small white ball for the tip of the hat. Make a small Hershey’s kiss with the red clay and stick it to the white circle. Attach the pom-pom and bake the clay according to the instructions. After they are baked and cooled, apply a little clear sealer and sprinkle with glitter.

Attach the red hat to the dinosaur with hot glue and then decide if you would like them to be doing something. I made a music book for one of the dinosaurs to make him look like he was singing and the other one with the outstretched hands was given an ornament to hold. These were both hot glued on.

I hope you like the ornaments I have made for our Christmas Advent Countdown. Wow, Christmas will be here before we know it.

dinosaurbuddiescherigawker1

Ornament Advent: Day 12 Wire and Fabric Scrap Puppy

christmaspuppylynne1

Lynne: I made this ornament “Puppy Under the Christmas Tree” from a wire armature stuffed with fabric scraps and then covered the figure with more fabric strips to get the finished shape.

I had so much fun doing this ornament. I love wire armature figures but I was sure that I could never make one. However I happened to see a book by Carla Sonheim called Drawing and Painting Imaginary Animals and found a photo of a figure done with wire and fabric. I draw my own imaginary animals called Squiggles and I told myself to make a figure just like I drew a squiggle. And it worked.

I used ordinary, hardware store galvanized wire (a gauge soft enough to work with your hands) to make the armature. One long piece made up the legs, body and tail. I used a shorter piece to shape the head and ears. I had to add more volume to the body and head to hold the fabric stuffing so I wired on some spiral shapes. Just keep adding and shaping, until you’re satisfied.

Then I stuffed and covered the armature with torn fabric scraps. Their frayed edges look like fur and give the ornament a vintage look. I used strips 1/4 inch to 1/2 inch wide and about 8 inches long. The strips need to be narrow to follow the contours of the body without sagging open in a curve. If I needed longer strips I just tied two or three of the shorter strips together. The knots disappear into the wrapped fabric. I did not use any glue or stitching to hold the strips on. I used scissors to poke the ends under the previous strips and tried to make sure loose ends were started and finished in  places that would be covered over. Small scissors are perfect for stuffing the ends under earlier layers.

I had old hat pins in my stash and I used them for the eyes and ears, but you could use buttons or embroidery. I used a small scrap of Christmas ribbon to make the collar and bow and fishing line to make an ornament loop, but I have to warn you that one look in those puppy eyes and it will be very difficult to stick the needle and fishing line through.

I’m keeping this puppy out of the ornament box after Christmas. He’s going to sit on the table right beside my favorite chair.

christmaspuppylynneback

t

christmaspuppylynnegawker

Ornament Advent: Day 11 Foil and Scrapbook Paper Ball

I really wanted to make a simple ornament with aluminum foil. I have been wracking my brain trying to think of something and it hit me while I was driving home from work. I could make an awesome ball with strips of foil and paper.

Ball Christmas ornament made of strips of paper and aluminum foil

The ornament is a ball inside a ball. The style is reminiscent of a ribbon temari ball  that I made years ago. I cut strips of aluminum foil 1″ wide and strips of scrapbook paper 1/4″ wide (all the strips were roughly 12″ long). I folded the foil lengthwise to not quite in half. I then folded the other edge to give myself two nice, smooth edges. This made the foil strips about 3/8″ wide. I ran a bone folder over the foil strips to make them smooth and shiny. I glued the scrapbook strips to the foil strips and let them dry.

Paper and aluminum foil Christmas ornament.

After they were dry, I cut the strips to 10″ long, just to make them easier to handle. Then I wrapped the strips around a solid object (I used a small glass for the outer ball and the glue bottle for the inner ball), glued the ends down, and cut off the excess. I made four smaller rounds and 4 larger rounds. I made the inner ball first then added the larger strips to make the outer ball. I glued the top and bottom where the strips met.

Ball ornament made of strips of paper and aluminum foil.

I made a small circle of foil about 1/4″ wide and glued that to the top of the ball and attached a homemade hook and I was finished. I think the whole ornament took me about an hour to make.

I am really happy with it, although it is rather delicate. At least if it gets bent out of shape it is really easy to fix.

Happy crafting!

Kristin

Ornament Advent: Day 10 Paper Roll Christmas Trees

Use rolled scrapbook paper to make this ornament.

Cheri: I cannot believe I have done 3 ornaments so far. Christmas is coming way too quick this year.

Scrap Paper Christmas Trees

Supplies:

Scrap paper or scrap book paper (I used a gift bag for the green tree)

Hole punch or a needle (the hole punch needs to be a small one)

Wire

Beads

Glue (If you would like to glue your tubes closed)

The easy part:

Cut strips of paper, in different widths. I think mine were 4 inches, 3 ½ inches, 3 inches, and down to maybe a ¼ of an inch. I made all the strips about 4 inches in length. Roll the strips like you are making little straws. After you have them all rolled, just find the center in each one and put a hole in it. Make sure you go all the way through it. This can be a little tricky if the paper is thick. This is when a needle is helpful. Run the wire through the tube. You can make a loop in each end of the wire and string them separately, or you can string all of them in a row on a wire, moving from largest to smallest. I put a bead in between each one.

I really like how these ornaments turned out and I think they will be a great addition to our Ornament Advent Tree.

paperchristmastreecheri7

Rolled Paper Christmas Tree

Ornament Advent: Day 8 Tissue Paper

papercircleornament

Lynne: I make flowers from tissue paper and I wanted to try to use the same technique for an ornament. I needed just a few materials:

about 8 inches of silver-colored wire

3 jingle bells

tissue paper, cut into 3 and 4 inch diameter circles

I used a small plate and a glass to trace around and cut approximately 20 four inch circles and 20 three inch circles. I used this tutorial for paper carnations from FoldingTrees.com with just a few modifications for my ornament.

Silver-colored wire replaces the floral wire and I used 2 different sizes of tissue paper circles to make the ornament spherical. The larger ones are in the middle with the smaller ones towards the ends. I painted the edges red with a permanent marker.

To hold the circles on the wire, I attached one bell under the circles and another bell on top of them. I also added a bell in the middle to give more support to shape the paper circles around. I had Cheri give me some tips on how to shape the wire for the hanger. She forms the spirals around a pencil and the hook around a permanent marker.

Start crimping the papers around the 3 bells until you’re happy with the shape and you’re done.

I’m really pleased with the way this came out and the small number of materials needed.

Happy Holidays.