Category Archives: DIY

Ornament Advent: Day 19 Chenille Tree
I knew from the beginning that I would just have to make a tree ornament for this Christmas advent. I have had one in mind, but I had no idea to execute it. I watched Loryn’s and Cheri’s tree ornaments get posted and loved each of them. My goal was to keep the ornament very simple and easy to make. This whole ornament probably took me about 30 minutes and I was Google Talking (can I use that that way?) with Mom which slows me down as we each share what we are project we are working on.

I used chenille pipe cleaners, cut in half, then wrapped candy cane style for the form of my tree. I know I keep mentioning temari lately, but I have a ton of supplies leftover and so I used some really cool fuzzy green thread from my temari stash to wrap around the chenille pipe cleaners. I really liked how the fuzzy thread looks like the needles on a pine tree. I tied the ends of the thread and glued my knots to ensure that they wouldn’t come loose.

I grabbed all the thread wrapped pipe cleaners in one group. ran some silver wire down the middle, and approximately 1″ in on the pipe cleaners, wrapped the silver wire around the group to hold it together. Then I bent all the wires down over the silver wrapping so that just the wire stuck out the top. I used this bit of wire to string the wooden star bead and make the loop for the hanger. At this point, it you didn’t put the hanger on the ornament, it actually looks really cool just as a decoration for your table, although I would recommend putting something under it as the pipe cleaners are a bit scratchy.
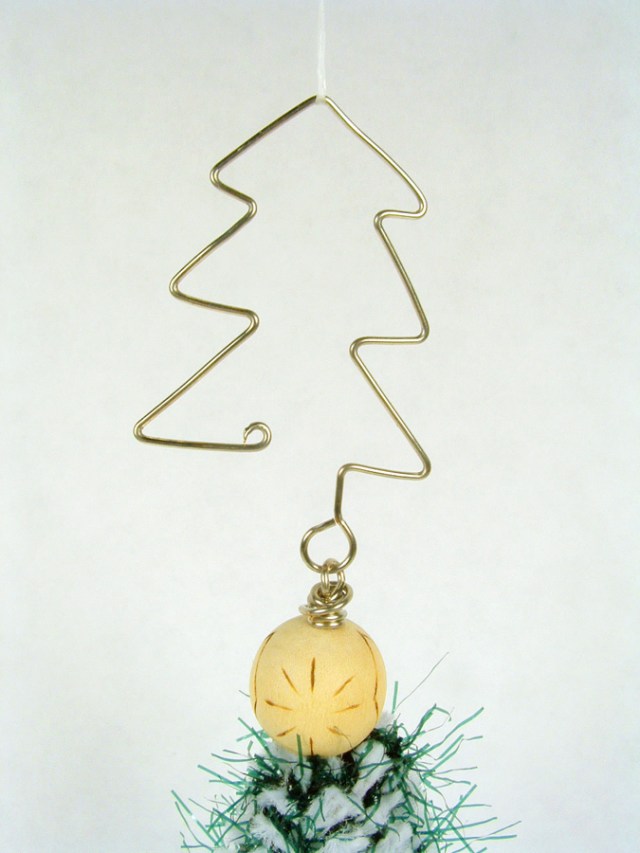
I love the hanger I made for this ornament. Whoever said that you needed to have plain hooks for your ornaments? I made the hanger out of more silver wire, just bending it into shape and curling the end so you didn’t poke yourself with it.

Happy crafting!
Kristin

Ornament Advent: Day 15 Beaded Ball
Gonna Go Back in Time!

So, I was not feeling at all well this weekend and missed my Saturday post for the Ornament Advent. To make up for it, I decided to splurge and make a slightly more difficult ornament. For this ornament, I once again raided my temari ball stash and used one of the green balls for the base. It is around 3″ in diameter. I then wrapped the ribbon around the ball tacking it down first with pins and then with basting stitches.
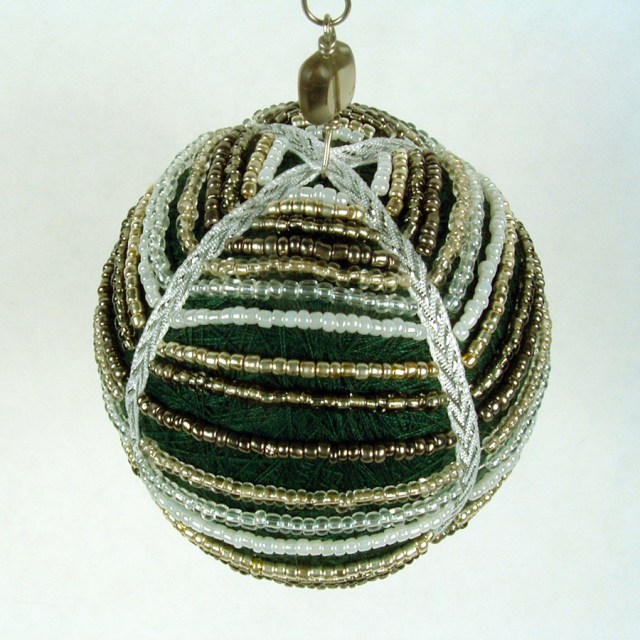
The beads are from the giant spinner of seed beads that Mom and I bought to take with us when we went camping (yes, we like to craft while camping). I strung the beads and crossed under the ribbon, trying to make a slight draping effect while doing so. It was interesting how much heavier the ball got by the time I was finished. All those glass beads weigh more than you would think.
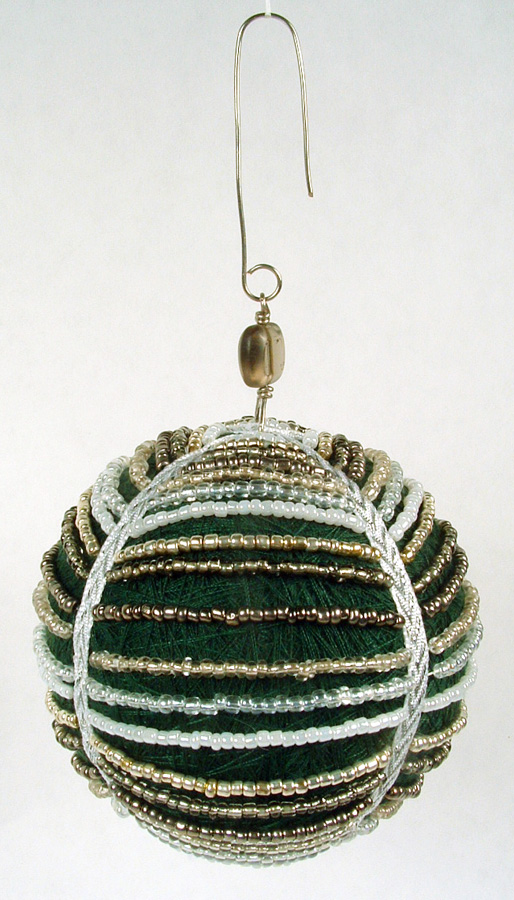
I then decided that I needed a bead topper and found a lovely smoky gray glass bead in my oddments and leftovers drawer that looks great. I made the hook and I was ready to go.
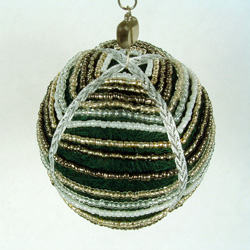
I am really pleased with how this one turned out.
Happy Crafting,
Kristin
Filling Santa’s toy bags. What a cat!


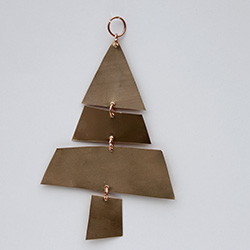
Ornament Advent: Day 17 Copper Christmas Tree

I love copper, as you can see here. I had some of the copper disks left and decided to make a Christmas tree mobile ornament. Just cut your sheet copper into some irregular branch-like shapes, punch holes with an upholstery needle, and assemble with jump rings. After fifteen minutes of work, a cute ornament emerges! It stands about 5″ tall and looks great on the tree!
— Loryn
Waxing the sleigh. What a cat!


Ornament Advent: Day 16 Origami Star
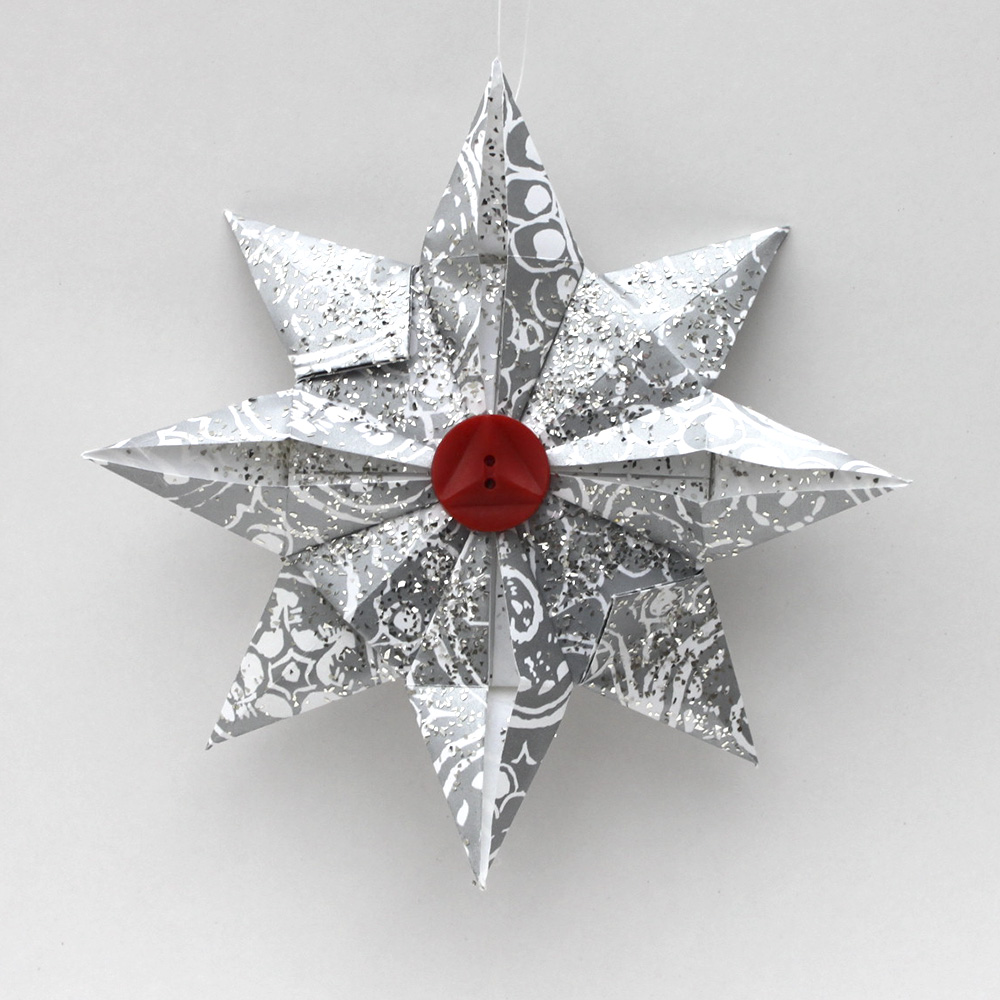
Lynne: I was hoping that since we had Teri Partridge as a guest author today with the Champagne Cork Angel, I would not be required to have an ornament. After some discussion about fair shares and obligations, here is my ornament.
While I was cruising the net this morning for an idea for our Ornament Advent, I found an origami Christmas Star that used wrapping paper scraps. Since most of my wrapping for Christmas is done, I have lots of small pieces of paper lying around and was eager to try it.
You will need 2, 6 x 6 inch squares of wrapping paper and this tutorial by Nikki, in Stitches. And that’s it. These are the clearest directions I’ve seen for origami folding and I was able to make 2 of these ornaments in about 30 minutes.
Once I was done with the origami figure, I added glitter and then hot-glued some vintage buttons to the front and back. I had these buttons stashed in a jar, but you could use whatever you have on hand. I added some fishing line to hang the star and marked off another day on the calendar.


Ornament Advent: Day 16 Champagne Cork Angel
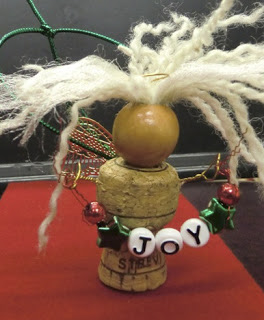
Our own wonderful watercolorist and art instructor Teri Partridge of the Pear Tree Gallery always teaches a full week of ornament classes in the month of December. She has agreed to join us as a guest author and post an ornament or two in our Advent Challenge. This angel is so cute and so much fun to make. Her excellent tutorial can be found here.

Ornament Advent: Day 14 Dinosaur Dandies
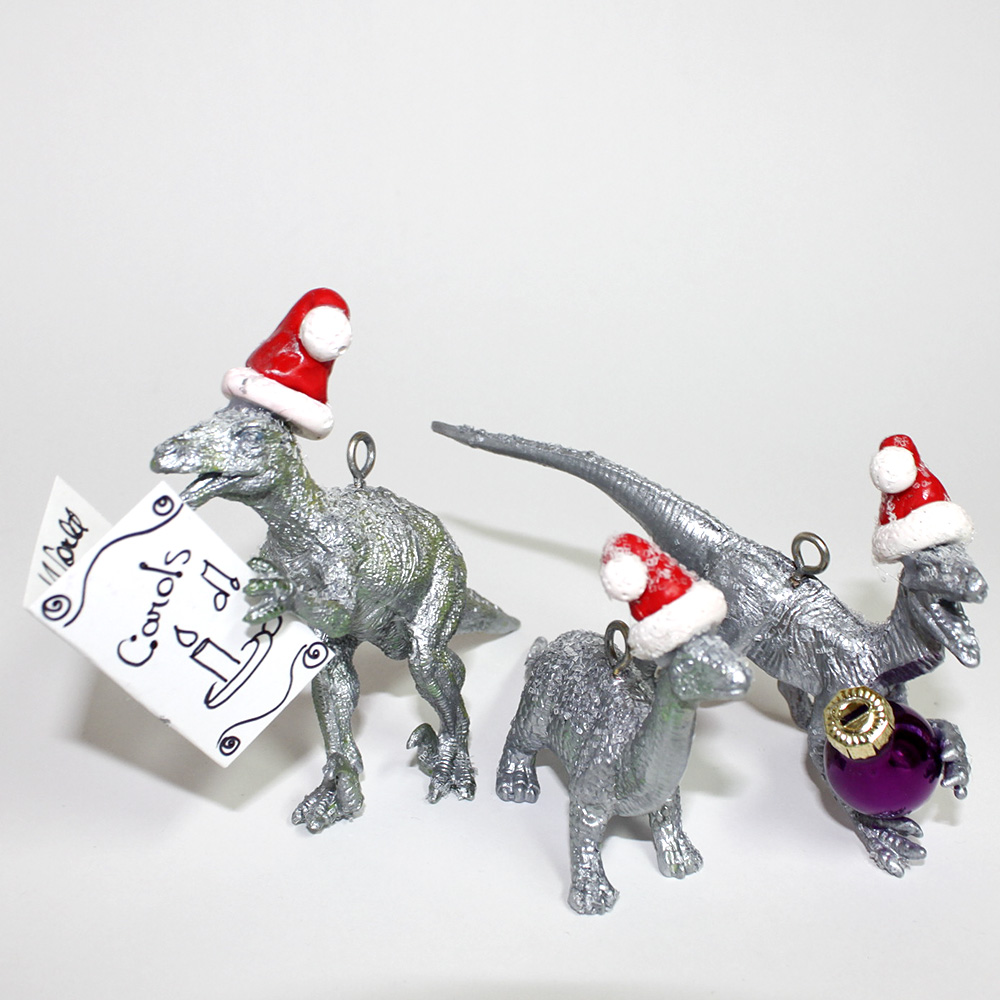
Cheri: This little group of dinosaurs are all dressed in their finest silver and glitter and are ready to decorate your tree.
Supplies:
Toy dinosaurs
Silver paint
Glitter
Oven-bake clay, red and white
Eye hooks
Paint your dinosaurs. I think you could probably spray paint them, but it is pretty cold here and I don’t think it is a good idea to spray paint in the house. (LOL)
After they are painted, (maybe 2 coats), put another coat of paint or sealer on them, and while they are still wet, sprinkle them with glitter. You could probably put a pretty heavy coat on, but I wanted them to look like they had been “kissed” with snow.
Knead a small ball of white clay and red clay, make a small coil with the white clay and roll it into a circle. Then make a small white ball for the tip of the hat. Make a small Hershey’s kiss with the red clay and stick it to the white circle. Attach the pom-pom and bake the clay according to the instructions. After they are baked and cooled, apply a little clear sealer and sprinkle with glitter.
Attach the red hat to the dinosaur with hot glue and then decide if you would like them to be doing something. I made a music book for one of the dinosaurs to make him look like he was singing and the other one with the outstretched hands was given an ornament to hold. These were both hot glued on.
I hope you like the ornaments I have made for our Christmas Advent Countdown. Wow, Christmas will be here before we know it.

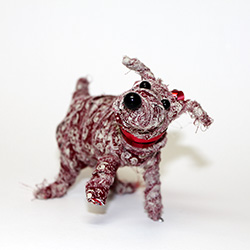
Ornament Advent: Day 12 Wire and Fabric Scrap Puppy
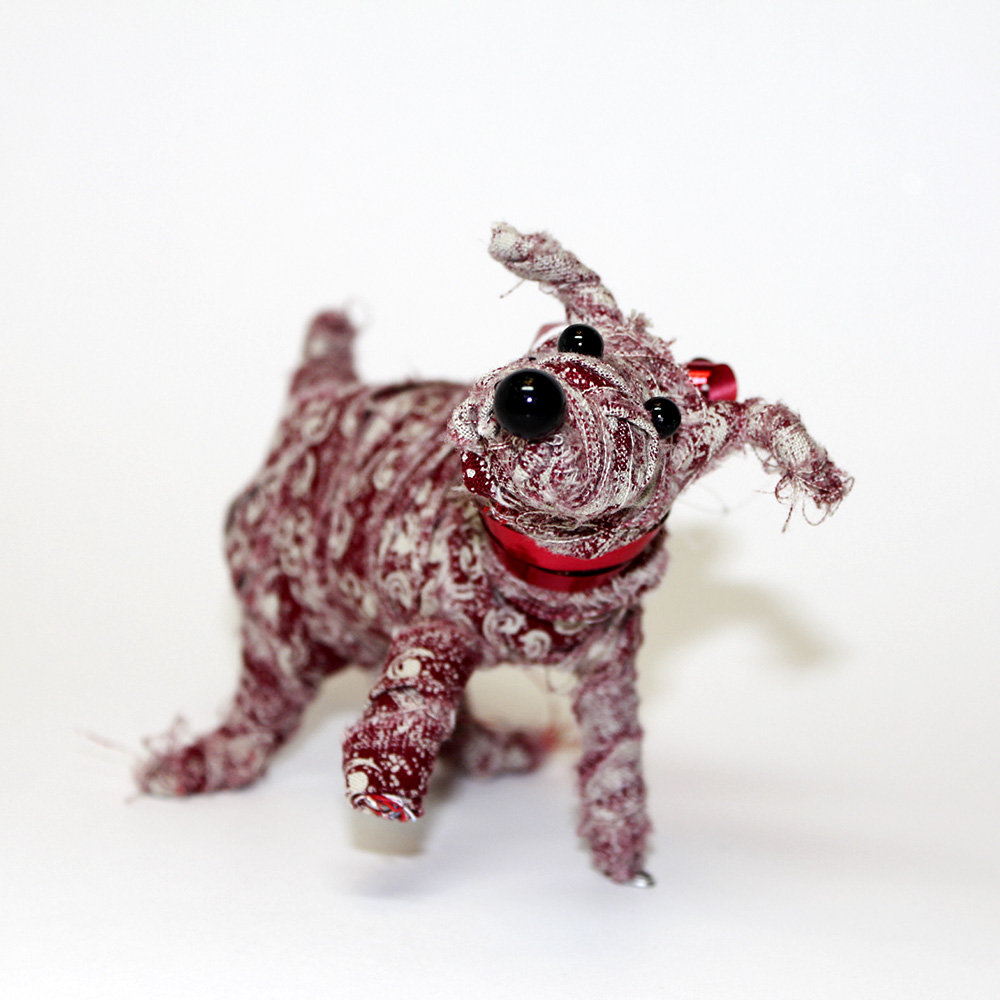
Lynne: I made this ornament “Puppy Under the Christmas Tree” from a wire armature stuffed with fabric scraps and then covered the figure with more fabric strips to get the finished shape.
I had so much fun doing this ornament. I love wire armature figures but I was sure that I could never make one. However I happened to see a book by Carla Sonheim called Drawing and Painting Imaginary Animals and found a photo of a figure done with wire and fabric. I draw my own imaginary animals called Squiggles and I told myself to make a figure just like I drew a squiggle. And it worked.
I used ordinary, hardware store galvanized wire (a gauge soft enough to work with your hands) to make the armature. One long piece made up the legs, body and tail. I used a shorter piece to shape the head and ears. I had to add more volume to the body and head to hold the fabric stuffing so I wired on some spiral shapes. Just keep adding and shaping, until you’re satisfied.
Then I stuffed and covered the armature with torn fabric scraps. Their frayed edges look like fur and give the ornament a vintage look. I used strips 1/4 inch to 1/2 inch wide and about 8 inches long. The strips need to be narrow to follow the contours of the body without sagging open in a curve. If I needed longer strips I just tied two or three of the shorter strips together. The knots disappear into the wrapped fabric. I did not use any glue or stitching to hold the strips on. I used scissors to poke the ends under the previous strips and tried to make sure loose ends were started and finished in places that would be covered over. Small scissors are perfect for stuffing the ends under earlier layers.
I had old hat pins in my stash and I used them for the eyes and ears, but you could use buttons or embroidery. I used a small scrap of Christmas ribbon to make the collar and bow and fishing line to make an ornament loop, but I have to warn you that one look in those puppy eyes and it will be very difficult to stick the needle and fishing line through.
I’m keeping this puppy out of the ornament box after Christmas. He’s going to sit on the table right beside my favorite chair.

t