Category Archives: Advent Ornament Countdown

Ornament Advent: Day 12 Wire and Fabric Scrap Puppy

christmaspuppylynne1

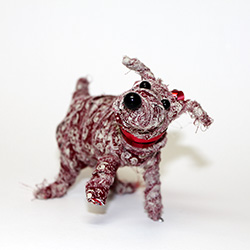
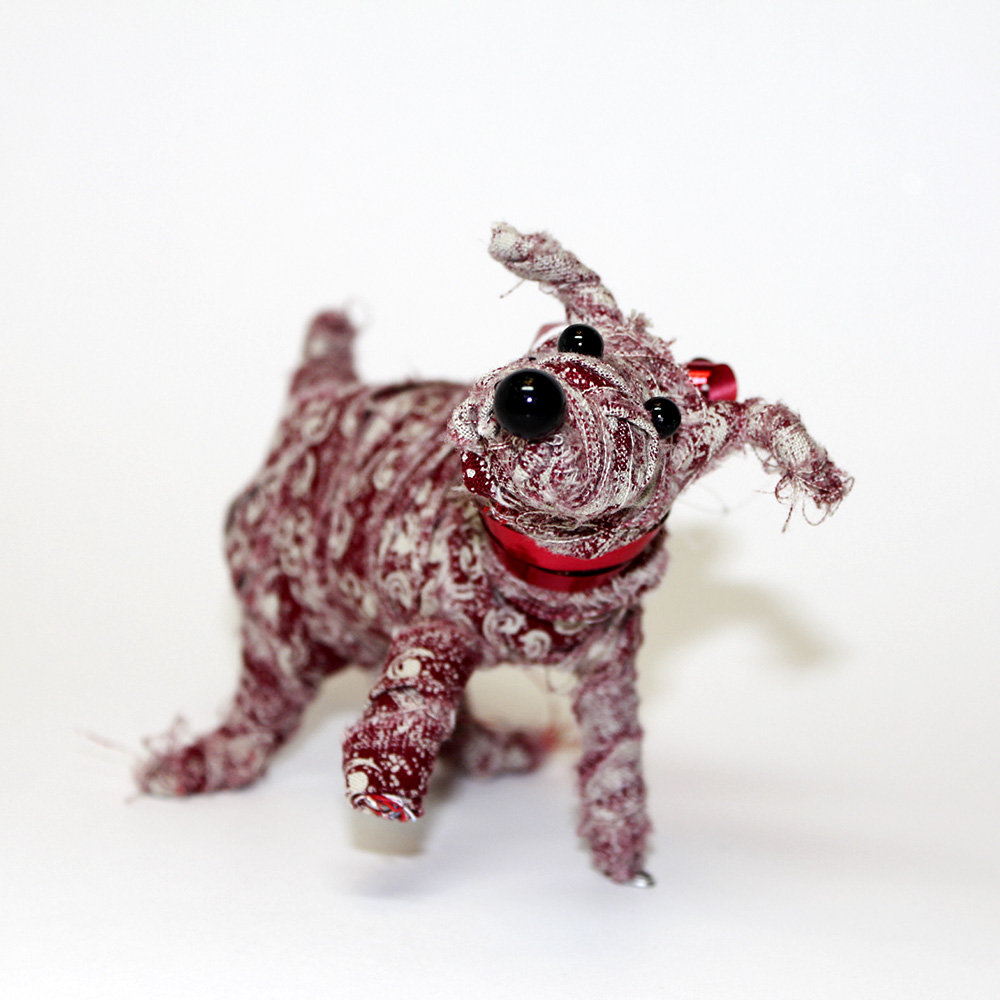
Lynne: I made this ornament “Puppy Under the Christmas Tree” from a wire armature stuffed with fabric scraps and then covered the figure with more fabric strips to get the finished shape.

I had so much fun doing this ornament. I love wire armature figures but I was sure that I could never make one. However I happened to see a book by Carla Sonheim called Drawing and Painting Imaginary Animals and found a photo of a figure done with wire and fabric. I draw my own imaginary animals called Squiggles and I told myself to make a figure just like I drew a squiggle. And it worked.

I used ordinary, hardware store galvanized wire (a gauge soft enough to work with your hands) to make the armature. One long piece made up the legs, body and tail. I used a shorter piece to shape the head and ears. I had to add more volume to the body and head to hold the fabric stuffing so I wired on some spiral shapes. Just keep adding and shaping, until you’re satisfied.

Then I stuffed and covered the armature with torn fabric scraps. Their frayed edges look like fur and give the ornament a vintage look. I used strips 1/4 inch to 1/2 inch wide and about 8 inches long. The strips need to be narrow to follow the contours of the body without sagging open in a curve. If I needed longer strips I just tied two or three of the shorter strips together. The knots disappear into the wrapped fabric. I did not use any glue or stitching to hold the strips on. I used scissors to poke the ends under the previous strips and tried to make sure loose ends were started and finished in  places that would be covered over. Small scissors are perfect for stuffing the ends under earlier layers.

I had old hat pins in my stash and I used them for the eyes and ears, but you could use buttons or embroidery. I used a small scrap of Christmas ribbon to make the collar and bow and fishing line to make an ornament loop, but I have to warn you that one look in those puppy eyes and it will be very difficult to stick the needle and fishing line through.

I’m keeping this puppy out of the ornament box after Christmas. He’s going to sit on the table right beside my favorite chair.

christmaspuppylynneback

t

christmaspuppylynnegawker

Ornament Advent: Day 11 Foil and Scrapbook Paper Ball

I really wanted to make a simple ornament with aluminum foil. I have been wracking my brain trying to think of something and it hit me while I was driving home from work. I could make an awesome ball with strips of foil and paper.

Ball Christmas ornament made of strips of paper and aluminum foil

The ornament is a ball inside a ball. The style is reminiscent of a ribbon temari ball  that I made years ago. I cut strips of aluminum foil 1″ wide and strips of scrapbook paper 1/4″ wide (all the strips were roughly 12″ long). I folded the foil lengthwise to not quite in half. I then folded the other edge to give myself two nice, smooth edges. This made the foil strips about 3/8″ wide. I ran a bone folder over the foil strips to make them smooth and shiny. I glued the scrapbook strips to the foil strips and let them dry.

Paper and aluminum foil Christmas ornament.

After they were dry, I cut the strips to 10″ long, just to make them easier to handle. Then I wrapped the strips around a solid object (I used a small glass for the outer ball and the glue bottle for the inner ball), glued the ends down, and cut off the excess. I made four smaller rounds and 4 larger rounds. I made the inner ball first then added the larger strips to make the outer ball. I glued the top and bottom where the strips met.

Ball ornament made of strips of paper and aluminum foil.

I made a small circle of foil about 1/4″ wide and glued that to the top of the ball and attached a homemade hook and I was finished. I think the whole ornament took me about an hour to make.

I am really happy with it, although it is rather delicate. At least if it gets bent out of shape it is really easy to fix.

Happy crafting!

Kristin

Ornament Advent: Day 10 Paper Roll Christmas Trees

Use rolled scrapbook paper to make this ornament.

Cheri: I cannot believe I have done 3 ornaments so far. Christmas is coming way too quick this year.

Scrap Paper Christmas Trees

Supplies:

Scrap paper or scrap book paper (I used a gift bag for the green tree)

Hole punch or a needle (the hole punch needs to be a small one)

Wire

Beads

Glue (If you would like to glue your tubes closed)

The easy part:

Cut strips of paper, in different widths. I think mine were 4 inches, 3 ½ inches, 3 inches, and down to maybe a ¼ of an inch. I made all the strips about 4 inches in length. Roll the strips like you are making little straws. After you have them all rolled, just find the center in each one and put a hole in it. Make sure you go all the way through it. This can be a little tricky if the paper is thick. This is when a needle is helpful. Run the wire through the tube. You can make a loop in each end of the wire and string them separately, or you can string all of them in a row on a wire, moving from largest to smallest. I put a bead in between each one.

I really like how these ornaments turned out and I think they will be a great addition to our Ornament Advent Tree.

paperchristmastreecheri7

Rolled Paper Christmas Tree

Ornament Advent: Day 9 Upcycled Felt Bird

feltbird

Loryn:  For Day 9 of our Ornament Advent challenge, I’ve made a bird from old sweaters that I felted. Wool felt is expensive, so upcycling old sweaters is a crafty way to have a good supply cheaply. I sewed the bird together using blanket stitch. (For a tutorial, see my felted ornament post from last Christmas). I wanted the bird to be delicate, so I used fine gauge sweaters so the felt isn’t too heavy. I loosely stuffed him with cut up felt scraps, which gives an old fashioned look.

feltbirdcl

For the details of the face, I used gold embroidery floss for the beak, and a bead with a few blue backstitches for the eye. He went together quickly and looks great on the tree!

— Loryn

feltbirdgawk

Ornament Advent: Day 8 Tissue Paper

papercircleornament

Lynne: I make flowers from tissue paper and I wanted to try to use the same technique for an ornament. I needed just a few materials:

about 8 inches of silver-colored wire

3 jingle bells

tissue paper, cut into 3 and 4 inch diameter circles

I used a small plate and a glass to trace around and cut approximately 20 four inch circles and 20 three inch circles. I used this tutorial for paper carnations from FoldingTrees.com with just a few modifications for my ornament.

Silver-colored wire replaces the floral wire and I used 2 different sizes of tissue paper circles to make the ornament spherical. The larger ones are in the middle with the smaller ones towards the ends. I painted the edges red with a permanent marker.

To hold the circles on the wire, I attached one bell under the circles and another bell on top of them. I also added a bell in the middle to give more support to shape the paper circles around. I had Cheri give me some tips on how to shape the wire for the hanger. She forms the spirals around a pencil and the hook around a permanent marker.

Start crimping the papers around the 3 bells until you’re happy with the shape and you’re done.

I’m really pleased with the way this came out and the small number of materials needed.

Happy Holidays.

Felt Christmas Tree ornament

Ornament Advent: Day 7 Felt Tree and Wreath

Today’s ornament was a massive lesson in frustration. Or rather, the ornament that you don’t see was. My original idea for an ornament failed spectacularly. My craft table is covered with parts, bits, and pieces. Around 10:00pm I realized that it was never going to work. Then began the frantic search. I dug through all of my supplies in the hope for a lightning strike. I didn’t get one until I was texting my sister that I was ready to give up. Right after I hit send, it hit me.

Felt Christmas Tree ornament

I love felt and I had a lot of fun last year with the pins and sequins ornament I made, so why not combine the two. The base of this ornament is a ball I made for temari. Temari is a Japanese art form that I played with a few years ago and kept all my supplies (go figure). You make the ball by taking a very large handful of stuffing and wrapping it with thread (one way to make the ball anyway). A lot of thread. You keep winding the thread around and around and around the stuffing until you get a round ball. This particular ball was my attempt to create a flattened ball to showcase a design on the front and back. I never did get around to completing the temari, but it gave me an excellent form to create my Christmas ornament.

Felt wreath side of the ornament

Next, I cut strips of felt around 1/2″ to 3/4″ wide and started cutting these strips into triangle pieces. Then I took my piles of pins and sequins and pinned the triangles to the ball to make the images of the wreath and tree. I used some fuzzy white thread to make a sort of frame to separate the two images by sewing it around and around the ball. I made a quick hook and voila! I was finished.

Side view of Christmas ornament
Here you can see the fuzzy white thread.

I really like the effect of the multiple colors of green for the Christmas tree and the stars in the wreath really make it pop. You could use anything for the form of the ornament, Styrofoam would be very easy. I imagine a Santa Claus/reindeer ornament would be very cute. Anyone want to try it? Send us your picture and we will post it! I would love to see someone else’s version.

Christmas tree side of ornament

Just goes to show that necessity really is the mother of invention.

Happy Crafting!

Kristin

Ornament Advent Day 6: Sunday Comics Christmas Ball

christmascomicsornamnet6

Cheri: I love comics, funnies, and cartoons. And I really love using comics for craft projects. This one is a favorite of mine. I hope you like it.

Supplies:

Sunday Funnies

Circle template (cup, glass, anything circular and in whatever size you would like, my circles were about 2 ½ inches in diameter).

Glue (any kind is fine).

Cardstock, (just a small circle is needed).

6 inches of ribbon

Instructions:

Fold the Sunday paper up so you can cut as many circles at once as possible. Then cut all of the circles in half. When you roll the paper, you want the circular edge to be the outer rim of the cone. Make about 45 cones and lay them aside.

Cut a smaller circle from the cardstock, this is just for a base to glue to.

Lay your cones around the cardstock circle, with the points touching, when you like how it looks, put a small amount of glue on each one and glue down. Place the next row of cones, try to put these in the little valleys created by the first row. You will be using a few less. Finally, glue one straight into the center, there should be a small spot for it. Do the same on the other side of the circle of cardstock.

Look at your ornament, and if you notice any thin spots just glue another cone into the spot. If you would like, you can glue more cones inside of the first cones. This gives the ornament a rose bud look.

What a fun project to make with the funnies, just make sure you read them first.

Merry Christmas

funnypapercones


christmascomicsornamnetgawker4


Ornament Advent: Day 5 Tiny Paper Stars

tinystarsfinal

Loryn — I see a lot of ornaments made the way these are – just glue three or more circles together – but I thought they would be really fun made with a star paper punch. They make tiny ornaments, just a few inches tall, and they’re perfect for a miniature tree.

tinystars

My paper punch is from Martha Stewart crafts. I cut a few stars from different colored scrapbooking papers, then folded each one down the middle. Glue three together around a piece of embroidery floss, then put beads on the bottom.

tinystarsfin

I like the single bead better than the one with two beads. Bells would be fun, too. They need some weight to make them hang right. The ornaments take just a few minutes to make, so you could decorate a mini tree in no time!

— Loryn

tinystarsgawk

Ornament Advent: Day 4 Pop Up Sticky Notes

popupornament

Lynne: I was surfing the web hoping to find an idea for our Advent Countdown when I came upon this great video from EepyBird. I fell in love with the sticky note pinwheels and started to think how I could modify one into an ornament. I needed a pad of pop up sticky notes, a glue stick, a darning needle, monofilament fishing line, micro glitter, spray adhesive and two buttons.

EepyBird.com counts out twelve pairs of pop up sticky notes and then glues the endnotes of the stack to each other. The structure is rotated three times to make the pinwheel. I must admit that I had to watch the video several times before I understood how the turns were done. If I watched where the doubled edges were each time the figure was turned, I could manage the proper sequence. Their excellent tutorial video is here.

The resulting structure holds its shape enough to roll down an incline, but not well enough to hang on a tree. I decided to gather the fins (the doubled edges) to prevent the pinwheel from coming apart. I used a large-eyed darning needle (sharp enough to go through the paper) with about 20 inches of fishing line. I used fishing line since it is invisible and I had a spool in my craft drawer. Using the needle to punch a hole about 1/8 inch from the edge (see photo below), draw the thread of fishing line through each fin until all the fins are gathered in a circle. Pull the line tight and knot the ends. Don’t cut the thread.

I used the two buttons to cover the hole in the middle of the pinwheel. Thread one of the buttons onto your fishing line and then push the needle through to the other side of the pinwheel. Gather these fins the same way, add the other button and tie a knot to keep everything together.

I used spray adhesive and micro glitter to add some holiday sparkle. For the hanger, I made a loop with the fishing line and attached it to two fins (see photo below) for the best balance.

I really like how the pinwheel looks and was especially pleased to make something with such an unusual material.

popupornament2