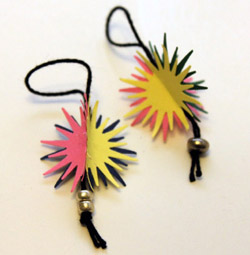
Ornament Advent Day 6: Sunday Comics Christmas Ball

Cheri: I love comics, funnies, and cartoons. And I really love using comics for craft projects. This one is a favorite of mine. I hope you like it.
Supplies:
Sunday Funnies
Circle template (cup, glass, anything circular and in whatever size you would like, my circles were about 2 ½ inches in diameter).
Glue (any kind is fine).
Cardstock, (just a small circle is needed).
6 inches of ribbon
Instructions:
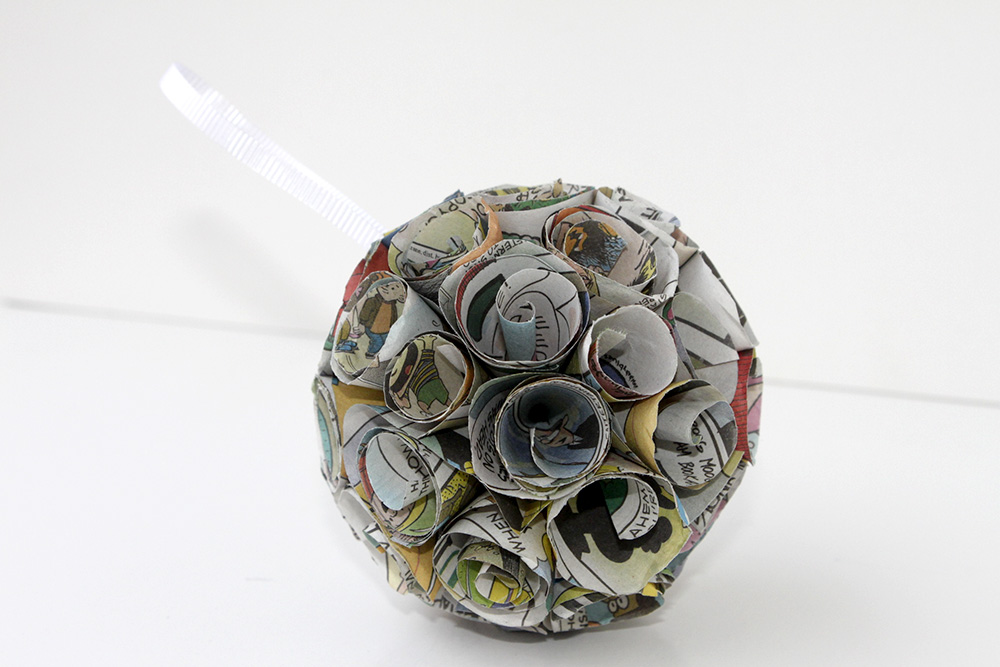
Fold the Sunday paper up so you can cut as many circles at once as possible. Then cut all of the circles in half. When you roll the paper, you want the circular edge to be the outer rim of the cone. Make about 45 cones and lay them aside.
Cut a smaller circle from the cardstock, this is just for a base to glue to.
Lay your cones around the cardstock circle, with the points touching, when you like how it looks, put a small amount of glue on each one and glue down. Place the next row of cones, try to put these in the little valleys created by the first row. You will be using a few less. Finally, glue one straight into the center, there should be a small spot for it. Do the same on the other side of the circle of cardstock.
Look at your ornament, and if you notice any thin spots just glue another cone into the spot. If you would like, you can glue more cones inside of the first cones. This gives the ornament a rose bud look.
What a fun project to make with the funnies, just make sure you read them first.
Merry Christmas

Gandalf the Grey. What a cat!
Ornament Advent: Day 5 Tiny Paper Stars

Loryn — I see a lot of ornaments made the way these are – just glue three or more circles together – but I thought they would be really fun made with a star paper punch. They make tiny ornaments, just a few inches tall, and they’re perfect for a miniature tree.

My paper punch is from Martha Stewart crafts. I cut a few stars from different colored scrapbooking papers, then folded each one down the middle. Glue three together around a piece of embroidery floss, then put beads on the bottom.
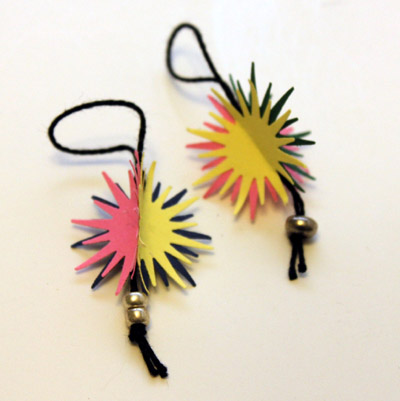
I like the single bead better than the one with two beads. Bells would be fun, too. They need some weight to make them hang right. The ornaments take just a few minutes to make, so you could decorate a mini tree in no time!
— Loryn
Admiral Link Naismith. What a cat!
Ornament Advent: Day 4 Pop Up Sticky Notes

Lynne: I was surfing the web hoping to find an idea for our Advent Countdown when I came upon this great video from EepyBird. I fell in love with the sticky note pinwheels and started to think how I could modify one into an ornament. I needed a pad of pop up sticky notes, a glue stick, a darning needle, monofilament fishing line, micro glitter, spray adhesive and two buttons.
EepyBird.com counts out twelve pairs of pop up sticky notes and then glues the endnotes of the stack to each other. The structure is rotated three times to make the pinwheel. I must admit that I had to watch the video several times before I understood how the turns were done. If I watched where the doubled edges were each time the figure was turned, I could manage the proper sequence. Their excellent tutorial video is here.
The resulting structure holds its shape enough to roll down an incline, but not well enough to hang on a tree. I decided to gather the fins (the doubled edges) to prevent the pinwheel from coming apart. I used a large-eyed darning needle (sharp enough to go through the paper) with about 20 inches of fishing line. I used fishing line since it is invisible and I had a spool in my craft drawer. Using the needle to punch a hole about 1/8 inch from the edge (see photo below), draw the thread of fishing line through each fin until all the fins are gathered in a circle. Pull the line tight and knot the ends. Don’t cut the thread.
I used the two buttons to cover the hole in the middle of the pinwheel. Thread one of the buttons onto your fishing line and then push the needle through to the other side of the pinwheel. Gather these fins the same way, add the other button and tie a knot to keep everything together.
I used spray adhesive and micro glitter to add some holiday sparkle. For the hanger, I made a loop with the fishing line and attached it to two fins (see photo below) for the best balance.
I really like how the pinwheel looks and was especially pleased to make something with such an unusual material.

Link the Salvation Army Bell Ringer. What a cat!


Christmas Ornament Advent: Day 3 Gold Rings

So, I make jewelry. In my collection of jewelry supplies are all sorts of materials and findings for really old projects that I just cannot get rid of. I guess you could call me a supply hoarder (I don’t feel too bad about this as I think Cheri has a bigger collection). Ask anyone in my family and they will tell you that I am a museum for clothes and supplies (I still have some beads from my very first Fire Mountain order around 20 years ago, and crap did I just make myself feel old). Anyway, the gold rings I used in this Christmas ornament have been in a drawer for years. I made a pair of earrings for my M-I-L out of them and of course, I did my usual M.O. and bought way too many supplies and was stuck with a bag full of various sizes of gold jump-rings.
For this project, I laid down some wax paper and pulled out my bottle of bead glue (super glue). I used some tweezers to place the rings where I wanted them and glued the whole piece together. I like the project so much that I think I am going to make a set of earrings with a similar shape for the holiday season. The ornament is around 3 inches top to bottom and side to side, not including the hook.
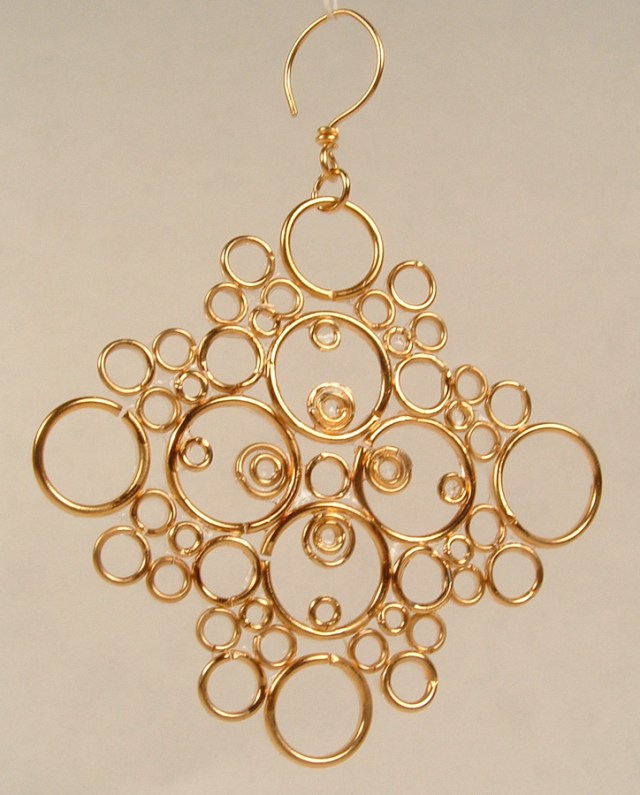
This is a very simple project and looks great on a Christmas tree. The jump-rings are available at most craft stores in the jewelry supply section.
Happy crafting!
Kristin
Miniature Train Conductor. What a cat!
Day two “Ornament Advent Countdown”.
Cheri-December 12, 2012. Day two of “The Crafty Sisters Advent Ornaments“.
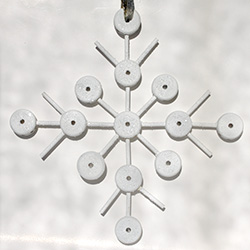
Snowflake ornament made with Tinker Toys
This is a super simple ornament to make and it really is pretty neat. It may not make the best ornament as it is a little large but it would be a great tree topper or a wall hanging.
All you need to do is get some Tinker Toys and pegs. I found some orphaned ones at a garage sale last summer and decided to give them a new life.
The design fell in to place pretty easily and then, I just hot glued the pieces together.
The hard part for me was the painting. Spray paint seemed to be the best way to go, but the paint soaked right in to the Tinker Toys. After several coats (and a patchy finish), eventually I finished painting it with acrylic paint and glittered it.
This was a fun project and the possibilities are endless.
Merry Christmas-Cheri