Ornament Advent: Day 11 Foil and Scrapbook Paper Ball
I really wanted to make a simple ornament with aluminum foil. I have been wracking my brain trying to think of something and it hit me while I was driving home from work. I could make an awesome ball with strips of foil and paper.
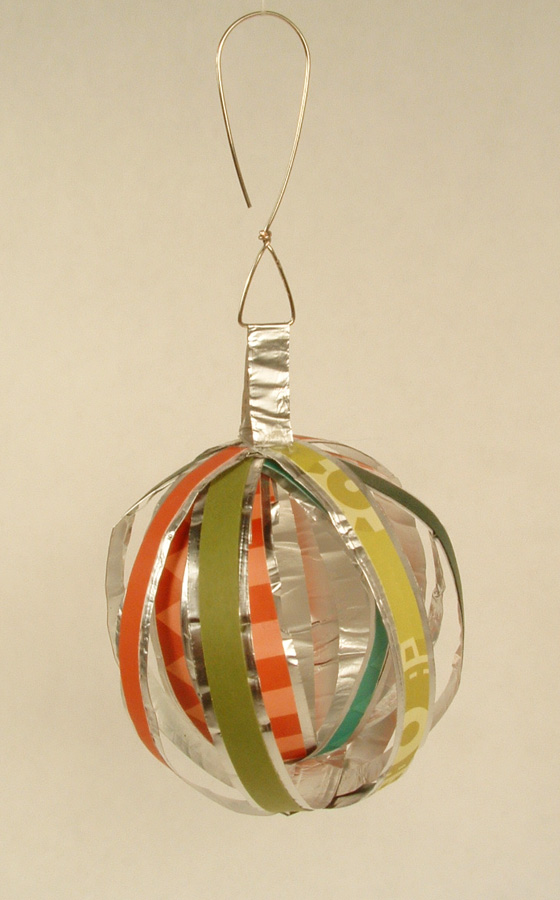
The ornament is a ball inside a ball. The style is reminiscent of a ribbon temari ball that I made years ago. I cut strips of aluminum foil 1″ wide and strips of scrapbook paper 1/4″ wide (all the strips were roughly 12″ long). I folded the foil lengthwise to not quite in half. I then folded the other edge to give myself two nice, smooth edges. This made the foil strips about 3/8″ wide. I ran a bone folder over the foil strips to make them smooth and shiny. I glued the scrapbook strips to the foil strips and let them dry.
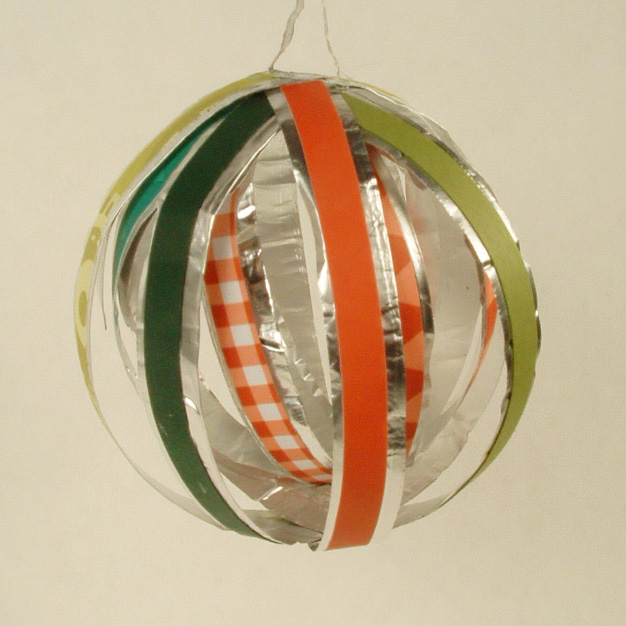
After they were dry, I cut the strips to 10″ long, just to make them easier to handle. Then I wrapped the strips around a solid object (I used a small glass for the outer ball and the glue bottle for the inner ball), glued the ends down, and cut off the excess. I made four smaller rounds and 4 larger rounds. I made the inner ball first then added the larger strips to make the outer ball. I glued the top and bottom where the strips met.
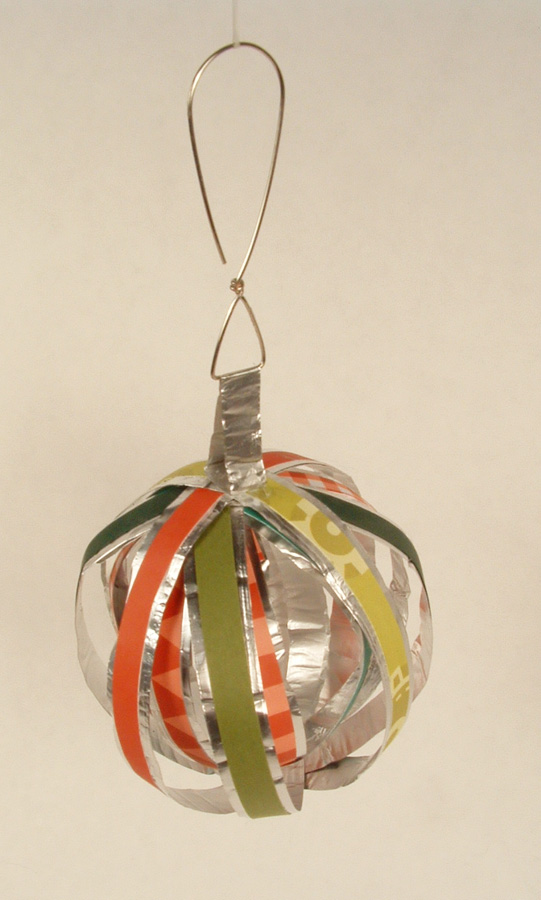
I made a small circle of foil about 1/4″ wide and glued that to the top of the ball and attached a homemade hook and I was finished. I think the whole ornament took me about an hour to make.
I am really happy with it, although it is rather delicate. At least if it gets bent out of shape it is really easy to fix.
Happy crafting!
Kristin
Howl and Calcifer (Howl’s Moving Castle). What a cat!


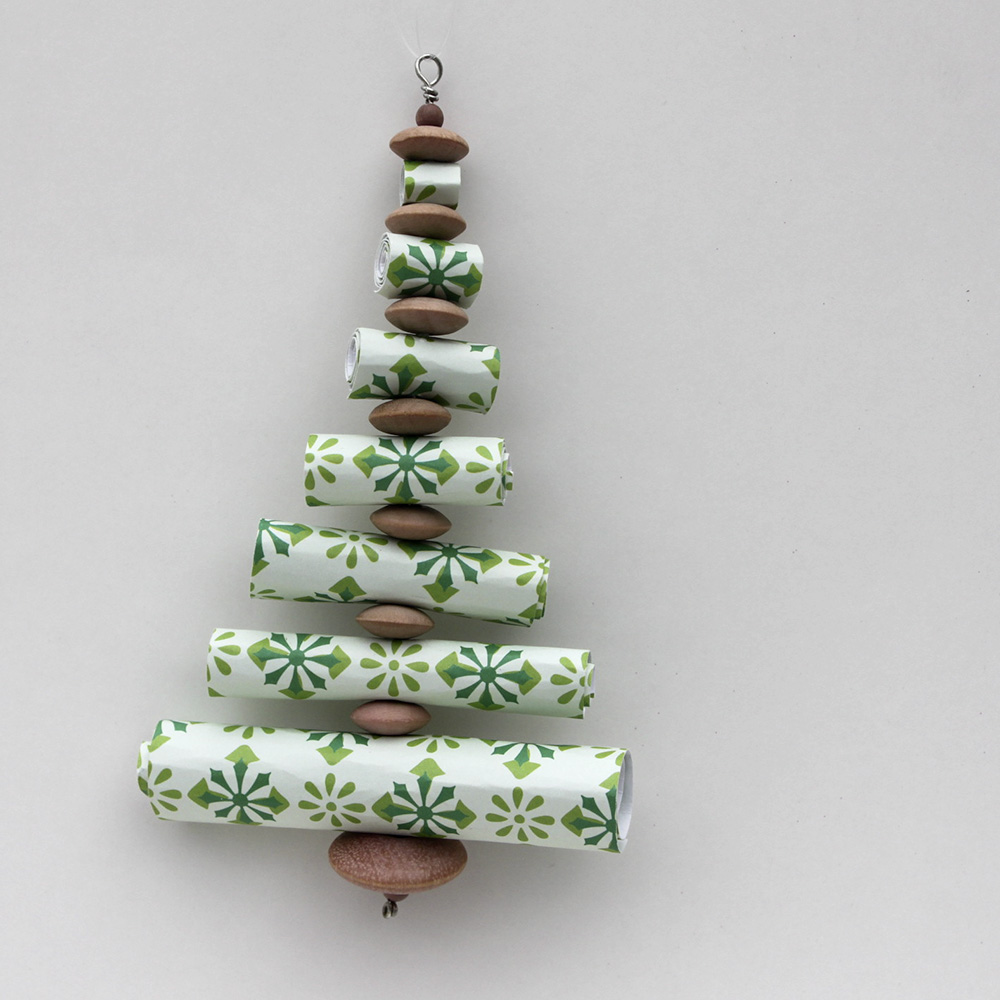
Ornament Advent: Day 10 Paper Roll Christmas Trees
Cheri: I cannot believe I have done 3 ornaments so far. Christmas is coming way too quick this year.
Scrap Paper Christmas Trees
Supplies:
Scrap paper or scrap book paper (I used a gift bag for the green tree)
Hole punch or a needle (the hole punch needs to be a small one)
Wire
Beads
Glue (If you would like to glue your tubes closed)
The easy part:
Cut strips of paper, in different widths. I think mine were 4 inches, 3 ½ inches, 3 inches, and down to maybe a ¼ of an inch. I made all the strips about 4 inches in length. Roll the strips like you are making little straws. After you have them all rolled, just find the center in each one and put a hole in it. Make sure you go all the way through it. This can be a little tricky if the paper is thick. This is when a needle is helpful. Run the wire through the tube. You can make a loop in each end of the wire and string them separately, or you can string all of them in a row on a wire, moving from largest to smallest. I put a bead in between each one.
I really like how these ornaments turned out and I think they will be a great addition to our Ornament Advent Tree.


Just chillin’. What a cat!

Ornament Advent: Day 9 Upcycled Felt Bird

Loryn: For Day 9 of our Ornament Advent challenge, I’ve made a bird from old sweaters that I felted. Wool felt is expensive, so upcycling old sweaters is a crafty way to have a good supply cheaply. I sewed the bird together using blanket stitch. (For a tutorial, see my felted ornament post from last Christmas). I wanted the bird to be delicate, so I used fine gauge sweaters so the felt isn’t too heavy. I loosely stuffed him with cut up felt scraps, which gives an old fashioned look.

For the details of the face, I used gold embroidery floss for the beak, and a bead with a few blue backstitches for the eye. He went together quickly and looks great on the tree!
— Loryn
Link Spielbert. What a cat!

Ornament Advent: Day 8 Tissue Paper

Lynne: I make flowers from tissue paper and I wanted to try to use the same technique for an ornament. I needed just a few materials:
about 8 inches of silver-colored wire
3 jingle bells
tissue paper, cut into 3 and 4 inch diameter circles
I used a small plate and a glass to trace around and cut approximately 20 four inch circles and 20 three inch circles. I used this tutorial for paper carnations from FoldingTrees.com with just a few modifications for my ornament.
Silver-colored wire replaces the floral wire and I used 2 different sizes of tissue paper circles to make the ornament spherical. The larger ones are in the middle with the smaller ones towards the ends. I painted the edges red with a permanent marker.
To hold the circles on the wire, I attached one bell under the circles and another bell on top of them. I also added a bell in the middle to give more support to shape the paper circles around. I had Cheri give me some tips on how to shape the wire for the hanger. She forms the spirals around a pencil and the hook around a permanent marker.
Start crimping the papers around the 3 bells until you’re happy with the shape and you’re done.
I’m really pleased with the way this came out and the small number of materials needed.
Happy Holidays.
Link the Cavecat. What a cat!

Ornament Advent: Day 7 Felt Tree and Wreath
Today’s ornament was a massive lesson in frustration. Or rather, the ornament that you don’t see was. My original idea for an ornament failed spectacularly. My craft table is covered with parts, bits, and pieces. Around 10:00pm I realized that it was never going to work. Then began the frantic search. I dug through all of my supplies in the hope for a lightning strike. I didn’t get one until I was texting my sister that I was ready to give up. Right after I hit send, it hit me.

I love felt and I had a lot of fun last year with the pins and sequins ornament I made, so why not combine the two. The base of this ornament is a ball I made for temari. Temari is a Japanese art form that I played with a few years ago and kept all my supplies (go figure). You make the ball by taking a very large handful of stuffing and wrapping it with thread (one way to make the ball anyway). A lot of thread. You keep winding the thread around and around and around the stuffing until you get a round ball. This particular ball was my attempt to create a flattened ball to showcase a design on the front and back. I never did get around to completing the temari, but it gave me an excellent form to create my Christmas ornament.

Next, I cut strips of felt around 1/2″ to 3/4″ wide and started cutting these strips into triangle pieces. Then I took my piles of pins and sequins and pinned the triangles to the ball to make the images of the wreath and tree. I used some fuzzy white thread to make a sort of frame to separate the two images by sewing it around and around the ball. I made a quick hook and voila! I was finished.

I really like the effect of the multiple colors of green for the Christmas tree and the stars in the wreath really make it pop. You could use anything for the form of the ornament, Styrofoam would be very easy. I imagine a Santa Claus/reindeer ornament would be very cute. Anyone want to try it? Send us your picture and we will post it! I would love to see someone else’s version.

Just goes to show that necessity really is the mother of invention.
Happy Crafting!
Kristin
