Cheri-December 12, 2012. Day two of “The Crafty Sisters Advent Ornaments“.
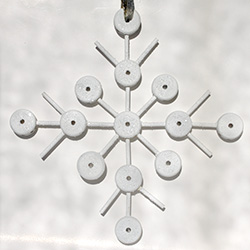
Snowflake ornament made with Tinker Toys
This is a super simple ornament to make and it really is pretty neat. It may not make the best ornament as it is a little large but it would be a great tree topper or a wall hanging.
All you need to do is get some Tinker Toys and pegs. I found some orphaned ones at a garage sale last summer and decided to give them a new life.
The design fell in to place pretty easily and then, I just hot glued the pieces together.
The hard part for me was the painting. Spray paint seemed to be the best way to go, but the paint soaked right in to the Tinker Toys. After several coats (and a patchy finish), eventually I finished painting it with acrylic paint and glittered it.
This was a fun project and the possibilities are endless.
Loryn – The Crafty Sisters are kicking off our Advent Ornament Challenge! For each day of December up til Christmas, we’ll be posting a fun and easy ornament that you can make.
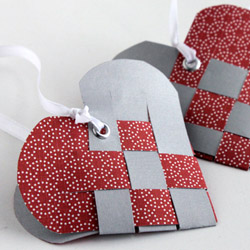
First up is this woven heart ornament. I remember making these in Girl Scouts in the early ’80s. I was fascinated by the technique. Weave the paper together, and it makes a basket. Magic!
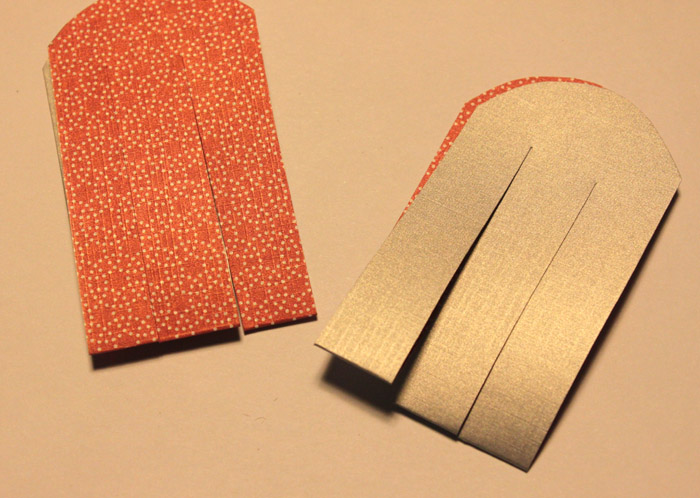
To make the ornament, first pick out your paper. Back in the Girl Scouts, we used construction paper, but I had some double sided scrapbooking paper on hand that worked great. Use a medium weight paper, not too thin or they won’t hold up, and not too thick or you won’t be able to do the weaving. Fold the paper over the 3 1/2″ mark, then trim off the rest.
Then you’ll want to cut two pieces that are 3 1/2″ long (one side of the fold only) by 2″ wide. Then fold one of them the other way so the reverse print is showing.
Then shape the top of each piece into a semi-circle, for one part of the heart. Cut two slits into each piece, starting at the fold. The slits need to be more than 2″ long. You’ll end up with this:
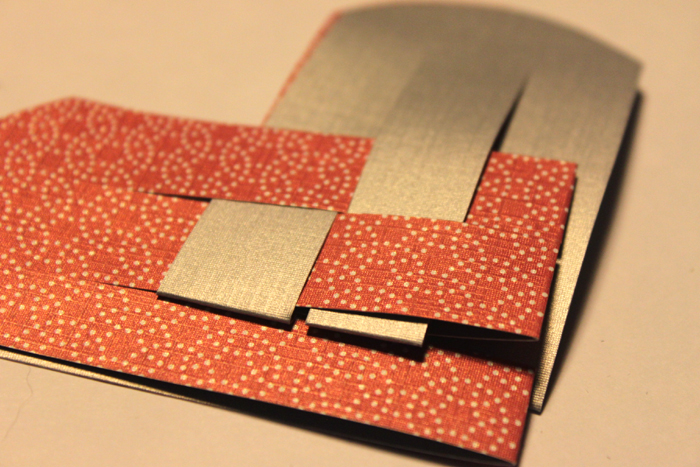
Now you’re ready to start weaving. The technique isn’t your standard over-under-over-under. Instead, you need to put the “under” pieces through the middle of the alternating piece. Here, I’m starting by inserting the gray piece into the middle of the pink:
Then the pink ones need to go through the middle of the gray on the next row. It’s best to do the first two on each side, then finish up the last three.
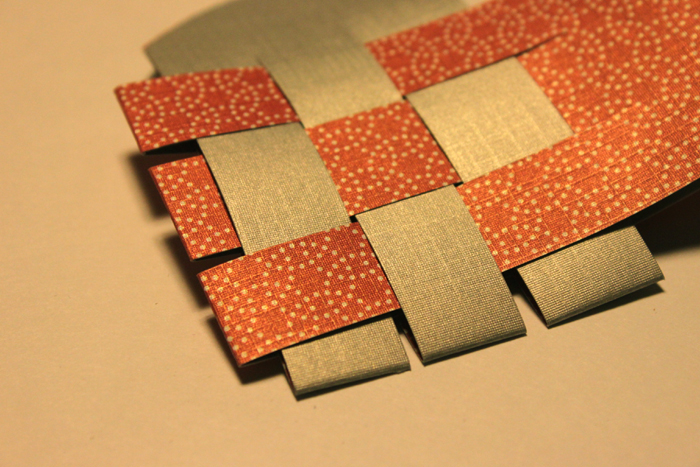
When you get to the last ones, you’ll see why the paper still needs to be flexible! Keep at it, and you’ll end up with this:
Now all you have to do is push the pieces into shape and add the finishing touches.
To give them a bit more finish, I put a small grommet onto each side of the heart, to thread the ribbon through. I used about 10″ of white ribbon and tied them off with square knots. Fill them with candy for a simple Christmas gift!
Hello Again! I feel like I have been incommunicado for a very long time. All the Crafty Sisters got together last weekend for our latest Crafty Challenge. This challenge was to make a fall wreath.
The wreath is 15″ tall and 13″ wide.
Due to everything in our house breaking down all at the same time, I was under a bit of a money crunch so I knew whatever I made, I had to have all the supplies already on hand. It helped that as soon as we started talking about a fall wreath, I was picturing a leaf wreath made of copper. And as some of you might remember, we did that wonderful Copper Crafty Challenge a while back and I still had a lot of the copper discs leftover from the copper necklace I made. The discs are remarkably easy to cut with heavy-duty scissors and I knew that they would make beautiful leaves.
Here you can really see the oily effect that burnishing the leaves created.
So, I started cutting and cutting and cutting. I had some very interesting dimples in my fingers from the force of cutting the copper discs, but I had some amazing maple leaf shapes. I also knew that I wanted to burnish the leaves to create different colors. I pulled out my trusty propane torch and proceeded to burn the crap out of one of the leaves. I learned very quickly that you only wanted to brush the copper leaves with heat very quickly. If you wanted a deeper color, you just kept running the torch over the copper quickly and letting it cool a second and repeat to the color desired. Thankfully, the blackened portions just wipe off and you can burnish again to your hearts content. I then bent the leaves very gently with a pair of pliers to give them some depth.
I did not coat the copper leaves with anything as I really will like the aging effect on the copper.
I made the ring the leaves are attached to as well, the wreath frame that is. I had a length of copper pipe (again left over from the Copper Challenge that I never used) and I ran a wire through the pipe and bent it all in a circle. I used the wire to make a hanger at the top of the frame. It turned out that the length of pipe was not long enough, but as I originally planned to let the pipe show through in some places, I would just make sure the leaves covered the wire parts of the wreath frame. I then used one of my hammers and my anvil to flatten the pipe to make the leaves attach better.
Here you can see the depth of the copper leaves.
I knew that my personal soldering abilities were not good enough to be able to place the leaves exactly where I wanted them so I switched my connecting component to hot glue. This worked out very well and I was able to place the leaves precisely where I wanted each one to go. I then flipped the wreath over and poured hot glue all over the frame where it connected to the leaves. This gave the wreath lots of stability and now absolutely nothing moves.
This is where I hang my wreathes in the house.
I am so happy with my wreath and it is now hanging in my house and just looks gorgeous. I did have a good laugh at the unveiling though. You will find out when more wreaths are posted! Amazingly, working with all that cut copper, I never did cut myself. This may be the first project in a while that didn’t end with a few bandaged fingers.
Cheri-There is something mysterious about rocks. Even lowly little plain rocks can be very special. Often these are the ones that need a second look. A few months ago, I realized these rocks were telling stories that could be just as amazing and interesting as the pretty sparkly ones. All it takes is a little bit of looking and eventually they will lend their shape to something beautiful.
To begin their transformation, I draw an outline on the rock in the shape I think it resembles. Then the rock is given details and personality with a permanent black marker, and I sign the back with my “nom de plume”.
I like to leave the rocks outside at places I visit. It makes me happy to think that someone will find it, pick it up and start their own story with it.
So, we didn’t announce our latest challenge publicly, but we decided to make magnets! I have still been having too much fun with felt lately and figured that what better material to use for my magnets.
Here are all 18 magnets that I made.
I decided to make felt flower magnets and as usual, I giggled my way through the project. Something about felt is so much fun and is so enjoyable that I just laugh and chuckle the whole time. I think it is also one of the few materials that I can almost always get exactly what I imagined in my head created with my hands.
Here you can see the depth of each flower magnet.
I bought myself a bunch of magnets from our local hardware store, Kleindorfer’s. They have everything! The magnets are wonderful and are just right for holding miscellaneous objects to my fridge. I used that wonderful crafter staple, Aleene’s Tacky Glue to hold everything together and the felt is just standard crafter’s felt that I have bought from Joann’s and Michael’s.
I used Google Images with the search on “flowers” and made most of my magnets based on photos of flowers I saw there. I didn’t use any patterns for these flowers, just cut out shapes that fit the petals I was trying to create. Some of the flowers are just images from my head and an imaginative use of various petal shapes.
I did go through the flowers afterwards and do some tugging and pulling to be sure that all the petals and stamens would hold well. I had to touch up a few places with some more glue, but I think they will stand up to regular use very well.
I had a lot of fun with this project and cannot wait for the next one!
Here we are! I managed to get my chair finished and before our display among ourselves even, although it then took me a week and a half to get the post up and ready.
The chair I chose to makeover is one of my kitchen chairs. Years ago, I received this wonderful 50’s table and chairs set from Memom (Mom to two Craftysisters and Grandmother to the other two). I loved the set, but the upholstery on the chairs was getting old and there were a few tears here and there. I decided that I would reupholster them, attempting to keep the same general style of vinyl, but more modern and more to my color scheme.
Here you can see the old and cruddy furniture tacks that I replaced.
I have actually already re-upholstered four of the six chairs and had started on a fifth when I made a common (well, common for me) error in judgement. I tried to used a piece of vinyl that was just a little too small. I was running out of material and didn’t want to buy some more (this even though I would need to buy more to finish the last chair). I have a tendency to make this sort of decision when I am too tired and should really just put the project away for a while. Well, maybe I learned my lesson this time. Anyway, I had already taken the chair back off and it was mostly finished, when the problems with the too small piece of vinyl really became apparent. There was no way to hide the staples holding the vinyl in place as the staples could not be placed in their proper positions due to the smaller size of the vinyl. At this point, my frustration in having to take all those darn staples out yet again caused me to set the whole project aside for about a year and a half. Of course, all this time the chair has sat upstairs in my loft as an impalement accident waiting to happen as the chair back was never put back on.
So, along comes this excellent opportunity to get back in the swing of chair re-upholstery and finally get at least another chair finished.
I found the color of vinyl that I wanted for the seats at Great Lakes Fabrics and bought quite a bit of it as I wanted extra for possible repairs later. The material is marine vinyl and I will eventually replace the backs with material from there as it is extremely durable. I wanted a marbleized effect that was reminiscent of the original fabric and this was similar and yet was much more my color style. I also purchased a large quantity of chrome half-dome furniture tacks from the same place. The white vinyl for the chair backs I purchased at Joann’s. I used high loft quilt batting from Joann’s for padding in my chair backs and a double layer of this for the chair seats.
Taking the chairs apart proved to be a great exercise is damaging fingers. I learned very quickly the importance of a good tack puller, pliers and wire cutters. There are over a hundred chrome half-dome furniture tacks on the back of each chair and that plus more than a hundred staples, makes taking the chairs apart a real chore. This is the step I really learned to dread more and more with each chair. I absolutely love the finished product though, so it is well worth it in the long run.
As this is my fifth chair to finish in the set, I can say that I have really learned a lot about re-upholstering kitchen chairs.
1. Always have excess material. You can cut off excess, you cannot add on more material after it has already been cut.
2. Wire cutters work very well to remove tacks and staples. The sharp edge grabs onto the tack or staple and pulls them out very handily.
3. Sub-staples, Sub-staples, Sub-staples. I got this from Craftysister Loryn who got it from Design Sponge. These are temporary staples put in at an angle and are meant to be removed. Design Sponge has a series of wonderful upholstery posts that describe everything you would really ever need to know about re-upholstery. I really wish I had seen these tutorials before I got started on my kitchen chairs. This pretty much guarantees that I will be re-doing the first four chairs again.
I am very, very happy with how my chair turned out and may actually get to the last chair in the set this week sometime. I am off all this week so, other than the heat, I have no excuse for not getting the last chair finished (other than the realization that I need to re-do the first four chair backs again anyway.).
I just love how sub-staples make the finishing on the chair backs so easy! When I look at this chair compared to the first four, I just cringe.
Cheri- It doesn’t seem to matter how much time we have for a challenge, I seem to always wait until the last minute to complete it.
Over the years, I’ve collected several chairs that need to be painted/redone. I started with 3 chairs that I’ve had for a while and decided to try a different technique on each one. If I didn’t like how my chair was coming along, I’d move on to a different one.
The camp chair was my third try. It was a garage sale find and was a lot more unique than my other attempts. The bad part of the project, was that the canvas needed to be replaced. For a folding chair, this is a pretty major fix as the chairs stability depends on the canvas seat and the back.
After pulling off the canvas, I was amazed by the wonderful wooden skeleton the chair had. of course now I was faced with the daunting task of showing off the chair without covering it up too much.
After mulling it over in my head for a bit, I decided that something transparent would be best for the back. It just happened that I picked up some unused medical tubing at another garage sale that would be perfect for the back of the chair. I dremelled about 12 holes on each side of the back. Then I took the tubing and wrapped it around the chair, tacking it in each place that had previously been drilled.
The back of the chair looked great, next came the seat. I first tried to use the tubing again, but the tubing needs to be held tight and this chair folds. I had some leather in my material stash and dug it out. It was a perfect fit to replace the canvas seat of the chair.
It needs a few more tweaks, but the finished product came out pretty cool.
Every single one of the Crafty Sisters has at least one chair in their house or in storage that is in desperate need of a repair/makeover. This challenge is all about getting one chair checked off our projects to complete list.
This time, part of the challenge is to document the whole process for you, our readers. You will get to see the befores and afters, as well as the steps we took (and possible failures we had to overcome) to complete the challenge.
Because this is a bit more time consuming than some of our other challenges, we are giving ourselves three weeks to finish this Crafty Challenge. We have until June 23rd to complete our Chair Repair Challenge!
All the Crafty Sisters have a storage space that looks like the photo above. Finding only one chair that needs to be repaired and made over is the hard part, so wish us luck!