All posts by Loryn Wrucke

Vintage Hardware Organizer Jewelry Box

jewelrychestgawk2

Whenever I come across vintage metal hardware organizer chests at garage sales, I try to pick them up. I’ve been obsessed with cabinets with lots of little drawers since I read about them in Pippi Longstocking when I was little. These cabinets usually run about $5 at garage sales around here, so they’re a cheap way to fulfill my childhood dream of having lots of little drawers!

jewelrychestall

They have usually been sitting in a garage for the last 30 or 40 years, so it takes a bit of elbow grease to clean them up. The effort is worth it!

jewelrychest2

The multiple drawers and dividers are perfect for keeping jewelry stored without tangling. I thought about making velvet liners for the drawers, and maybe I’ll get around to it eventually. The chest does a great job of storing my jewelry.

If you see these old chests at garage sales, don’t hesitate to pick them up. I just purchased two taller ones that I’ll be using in my craft room to hold sewing and office supplies.

—Loryn

Studio Makeover #4: Desks and Shelves

new desk and antique table

The studio is moving along! Once the walls were finished and the carpet pulled up, I painted the baseboards, put the quarter round back in, and painted the window trim of the two windows. I still have three (!) doors and trim to paint, but I want to get the furniture in place first.

I want a lot of work space in my studio, so I have two big desks. The one to the right is an antique wallpaper table that my mom picked up at a garage sale twenty years ago. It folds down into a long narrow box not any bigger than a couple 2x8s, and I had forgotten about it up in the attic. I stumbled upon it the other day, and I’m glad I did, because it makes a good desk for my laptop and office supplies.

The desk on the left is one that I built. I’m trying to use only things I have on hand, and I happened to have three 12′ long 2x8s that I got for my bathroom remodel and didn’t end up using. I cut them down to 9′ and used some scrap wood to connect them.

scrap wood to assemble 2x8 desk

The hairpin legs are some I picked up many years ago. They were attached to a horrible piece of hacked up counter top as a makeshift table, so they were very cheap. This is the third desk that I’ve made with them. This one will hold my sewing machine, sewing supplies, and an ironing surface in front of the window.

desk with art above

Once I had the desks in place, I immediately started hanging artwork and photos. I’m putting my most personal photos and pictures of my favorite people up here where I can look at them often. As you can see, the desk got messy immediately. My husband claims that even with fifty feet of desk space I still won’t have any clear work area, so I will have to prove him wrong!

shelfheight

To the right of the desks, I am placing three shelves. These are the metal kind that bolt together. Frankly, they’re a pain, but I had several sets in the garage. Good shelving can be pricey, so I just used what I have. I did make one customization. The shelves are 6′ tall (the one on the right), overwhelm the room, and don’t leave any room for lamps or artwork above. I cut them down to 61″ (the one on the left), which better suits the proportions of the room.

shelfbrackets

To cut them down, I used tin snips to cut down one of the standards where they attach in the middle. I’ve also cut them down at the top, but this tends to leave sharp edges. I may add plywood to the shelves to make them sturdier, but that’s a project down the road.

My next steps are to built a worktable and bulletin board across from the desks. I also need to figure out lighting, organize storage, and put in a lot of decorative touches!

— Loryn

Bicycle Basket Landing Strip

wall-mounted bicycle basket

The former back porch of my house is only 6 x 10 feet, and I have to pack a lot of uses into a small space. It has three doors, a window, and the fuse panel, and it serves as my main entrance, coat closet, laundry room, and storage. I have a tiny strip of wall that I wanted to use for bags, keys, hats, and mittens. I looked at a lot of different types of shelves, but I worried about the doors hitting the shelves and sending the contents flying. After several months of searching, I finally found these bicycle baskets. They’re very sturdy, a reasonable price, and easy to hang.

allbasketsT

I bought three of the baskets, one for my husband (his is pretty high off the ground, but he’s 6’4″), one for me, and one for all our hats, scarves, and gloves.

basketem

When we built this wall, I centered two studs so that I would be able to hang shelves of some kind down the road. If you don’t have studs in convenient places, be sure to use wall anchors.

The bicycle baskets are made to go on a rear rack, so they have an attachment bracket at the bottom. This didn’t bother me at all, but you could remove it if it got in the way.

baskethanger

Here’s a close up of the brass hangers I used to attach the baskets. I got them in a large box of picture framing hardware at a garage sale. They look like the clip part of a D-ring hanger, but I haven’t been able to find one to link to (even google image search match has failed me). If you don’t have any odd metal hardware hanging around, I’d use metal strapping or even part of an old leather belt.

basketkeys

I screwed several cup hooks into the wood trim above to give us a good spot for our keys, since we seem to collect them! The baskets have helped me to be more organized. No system on earth could prevent me from losing my keys (or purse … or gloves … or phone) every once in a while, but these baskets have helped!

— Loryn

Studio Makeover #3: Behr Premium Plus Ultra Paint & Primer Review

behr paint and primer

Behr Premium Plus Paint and Primer in One has been available at Home Depot for a while, and I was always really skeptical. I really like Zinsser’s water-based 1-2-3 Primer, and I just did not believe that paint alone could do as good a job. The carpenter who did my bathroom remodel convinced me to give it a try in that room. He had used it on bare drywall and had been very impressed. I gave it a try in the bathroom and was pretty impressed, too.

I had nearly an entire gallon left, so I decided that the real test would be whether it could cover this bright yellow paint with dark yellow and blue stars. I mixed my leftover gallon of grey with a gallon of ultra pure white to make a lighter grey. The paint is the flat finish, which is all I use on lumpy old plaster walls.

original room color

As a reminder, here’s what the walls looked like before painting. I sanded down the stars so there would be no raised edges showing through.

one coat behr paint and primer

And here’s what it looks like after one coat! This post is not sponsored in any way, it’s my unbiased review of this paint. I can’t believe how well it covers. You can see speckles of yellow where I didn’t roll on enough paint, as usually happens with a first coat. The stars have been completely covered. If your paint technique is good enough, you could probably get away with one coat.

paint

And here it is two two coats. Getting rid of that yellow was such a relief. The new grey color makes the tan trim look even worse, but it will be gone soon! I still have a half gallon of my trim paint (from Behr’s regular line), but when it is gone, I will try the Paint and Primer on my trim in a semi-gloss finish.

The Paint and Primer runs about $32 in the flat finish. My favorite Zinsser primer runs about $30 for a two gallon bucket, making the Paint and Primer over twice as much. If you need to watch every penny, you’ll want to stick to using a traditional primer. If time is more important, the Paint and Primer will save a lot of time. One of my next projects is painting my front stairwell, and I’m going to have to spend a lot of time on a 20 foot ladder over the stairs to get to it all. I’m going to use the Paint and Primer so I can spend as little time on the ladder as possible.

removing carpet

With the walls painted, I went ahead and started pulling out the carpet. I cut it into three foot strips so they’d be easy to carry. The wood floor underneath is in pretty good shape, with just a few areas where the finish has worn away. I’m not planning to do anything to the floor other than clean it with some Murphy’s oil soap. I couldn’t wait to hang my capiz shell lamp, so I hung it as soon as the paint was dry. Before I painted the ceiling, I drilled until I found a joist to hang the hook from.

It’s amazing how much the character of the room changes with the new color and the carpet removal! The next steps are painting trim and starting to bring in furniture!

— Loryn

Before You Do That Stencil – Studio Makeover Part 2

room ready to paint

The room is mostly cleared out, and I’m ready to paint! Unfortunately, there’s one painful step before that can happen. The star stencils have raised edges that have to be sanded down before I paint.

if you’re thinking about stenciling a room, think about how much work you’re willing to put into it when you want to change the room. All stencils leave raised edges of paint around the designs. It will show through any paint you put over it. Make sure it’s a stencil that you can live with for a long time!

If I wanted to get rid of the stenciling completely, I would need to remove the wallpaper, patch the plaster, skim coat, and then repaint. I’ve done that in several other rooms of the house, and it takes weeks of work. I’m trying to keep this a quick-and-dirty makeover, so I opted to just paint the wallpaper. I’m not worried about having perfect walls in my studio. In fact, I prefer the imperfect walls, because I can hang, tack, tape, and glue things to the wall without worrying about damaging the surface.

sanding away stenciled designs with a mouse sander

I tried hand sanding the first star and immediately went to get my mouse sander. I have a Craftsman sander that uses the 19.2 volt batteries. It makes quick work of each star, though I went through 3 or 4 batteries. I wouldn’t try sanding something like this by hand. You’d be ready to jump out the window after the first 20!

walls with sanded stencil design

I spread the sanding out over two days just to keep the vibrations of the sander from killing my hands and wrists. Each time a battery died, I took a break and did something else. When the sanding was finally finished, I painted the ceiling with two coats of Glidden ceiling paint. It’s the kind that goes on pink and dries white. It’s okay, but after painting the walls, I’ve completely switched my paint preferences (more on that in the next post!).

Before painting the walls, I did two other things. I put up new roller blinds, as you can see in the first picture. I wanted to keep the budget for this room to a bare minimum, so I used $9 Magic Fit blinds from Walmart.

magic fit blind install

I could not believe how easy these were to install. The blind is perforated to you can tear it in half inch intervals. The spring mechanism is adjustable, so after tearing the blind to size, you simply push the spring mechanism to the right size. It really does take about five minutes to adjust them.

Ultimately, though, I’m not very happy with them. The perforations tear really easily, so if you have cats, they will put tears in them really quickly. The blinds also curve in at the sides, so they don’t really give complete privacy. The tension rollers are really fussy, so getting the blind to roll straight is aggravating. I had planned to laminate them with a cute fabric when it got warm enough to use spray mount outside, but now I think I’m going to replace them down the road.

vintage light fixture with round bulbs

The last thing I did was to replace the surface mount light fixture with this nifty vintage chandelier. This is one of a pair that I’ve had for a long time. We tried to use them in Lynne’s living and dining rooms, but the fixtures just got lost in those big rooms with 10′ ceilings. The scale is just right up here (the ceiling is about 8’6″). To modernize the chandeliers, I took off the orange glass shades and used round decorator bulbs. I’ll use the second chandelier in the guest room with the same bulbs.

In my next post I’ll move on to painting!

Junk Room to Studio Makeover Part 1

studiomess

This is the dreaded junk room. Big, Victorian houses have so many rooms that it’s easy to end up with one (or more!) that are just piled up with stuff.  It’s the only room in the house that I haven’t touched at all. The house was a foreclosure, and in pretty rough shape when I bought it, so this room still has the filthy green carpet, ugly green valances, and stenciled star decoration, My goal is to turn it into a studio/office/workroom while spending as little as possible and making use of stuff I already have.

more mess

Still more mess, and most of it really isn’t junk. There are many pastel paintings by my stepdad, artist Richard Miles. He and my mom live in the other half of my duplex, and they don’t have a climate-controlled area to store his paintings that overflow from his studio. Pastels are very delicate, so they’ve been laid out all over the room. The first thing I needed to do was to box up all of the paintings.

I layered the pastels between sheets of glassine, laid them in shallow boxes, and stored them in the big closet of this room (it has a window, and was probably a nursery at one time). You can see it (with the lovely orange floral wallpaper) in the photo above. The shelves of the closet had just a few paintings laid on each shelf, so I needed to make much better use of the space.

Here’s what it looks like now:

paintingstorage1

I didn’t disturb paintings that had already been layered with glassine (they’re just too delicate), but I did photograph each painting that I boxed up and numbered the boxes. That way my stepdad can look through the files on the computer to find a particular painting.

pastel painting

Here is one I photographed as I was boxing it up. Isn’t his work beautiful?

pastel storage with shelf system

Here is the rest of the storage. The cabinet is a shelf I built him for Christmas a few years ago. It holds 48 paintings on foamcore.

With the paintings safely stored, the room was looking much better!

studioprogress3

I  recycled a giant load of cardboard, took a few bags to goodwill, and sold several items to a local antique dealer. I’m a packrat by nature, but I’ve become pretty ruthless about getting rid of stuff. It doesn’t help to keep things around “just in case” if it prevents you from using the space you have. After four two-hour cleaning sessions (less than I expected), the room was looking much better.

studioprogress4

That’s a lot of progress already! I’ll post again tomorrow with Part 2.

— Loryn

Custom Tool Belt How To

toolbeltfinal

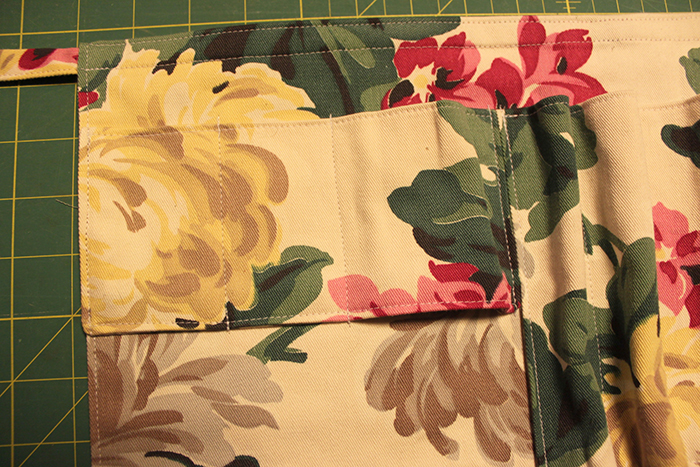
I wanted a simple tool belt that I could wear working on projects around the house. It needed to be lightweight (that ruled out traditional leather ones), hold all my basic tools, and have a pocket for my phone. I had some nifty vintage floral twill that I thought would be fun, but any medium weight canvas or twill will work. All of the pieces are doubled to hide seams and give it more weight.

Vintage floral twill

Here’s what you’ll need to make it:

  • One 21 x 17″ rectangle to make the main body of the tool apron (all measurements have 1/2″ seam allowances included)
  • One 17 x 14″ rectangle to make the large pockets
  • One 9.5 x 7.5″ rectangle for the upper small pockets and slot
  • One 6 x 6″ piece for the lower small pocket
  • One 2″ wide strip that is long enough to go around your waist and tie. You can piece two strips together if you don’t have a long enough piece of yardage.
  • All the tools that you will carry in your tool belt so you can determine sizes
  • Sewing machine, thread, and basic tools

toolbeltlayout

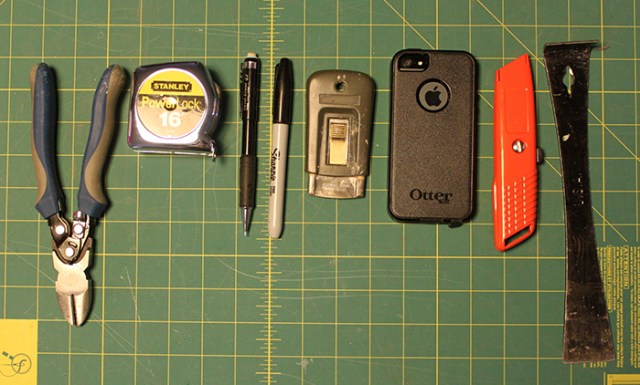
The first thing to do is to lay out the tools that you want to put into the tool apron. These are the basics that I frequently use around the house. You’ll want the main body to be long enough to fit all of your tools, plus an extra inch on each side. To determine the large pocket size, use a vinyl measuring tape to measure around the tools, leaving ease for each one. My large pocket ended up being 16″, plus 1″ for seam allowances (a half inch on each side).

The two large pieces

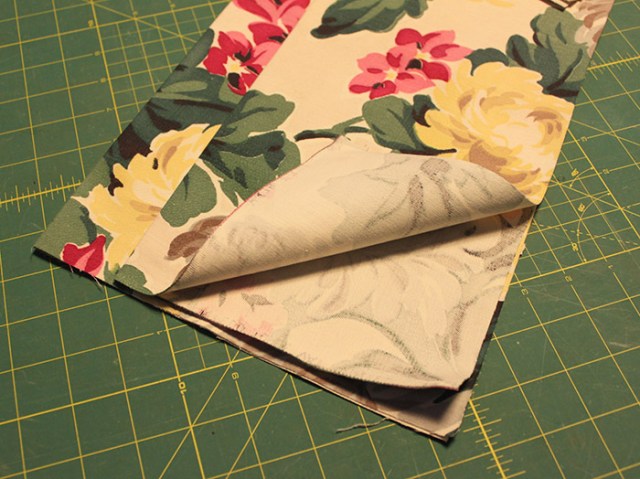
To get started, take your two largest pieces (the main body and the large pocket), fold them in half right sides out, and iron. The fold will be the top of the tool belt itself and the top of the pocket. Turn the main body piece wrong side out and stitch all the way around with a 1/2″ seam allowance, leaving a 2″ opening at the top of each side. Use that opening to turn the piece right side out. You’ll use the opening at the top to put the tie through. In the meantime, turn the corners neatly and press.

Do the same to the large pocket, leaving only one 2″ opening on one side. You’ll end up with this:

toolbeltsecondstep

Next, make the tie. I hate turning tubes, so I always make my ties using the method here. Make one long tie. It will run through the body of the apron and give it more support.

Topstitch around the tie, and run it through the main body. Then you can topstitch around the apron. I stitched at the top and bottom of the tie to hold it into place.

toolbelttiefasten

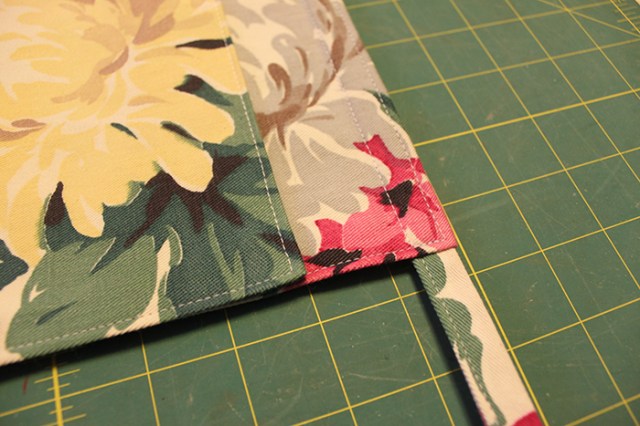
The next step is to topstitch all the way around the large pocket, stitching the turning slot closed. Now line one edge of it up with the main body and pin it into place. Now you need to start placing your tools to determine the pockets.

toolbeltpocketsizes

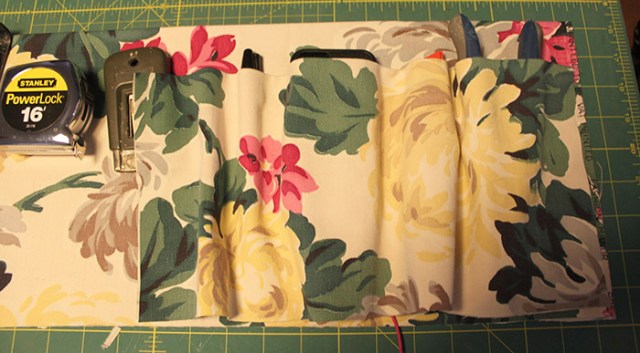
Above, you can see that I grouped the tools by size to make best use of space. Also, keep sharp and pointy tools to the sides, so you don’t poke yourself. Pin the pockets in place, and stitch each one:

toolbeltlargepocket

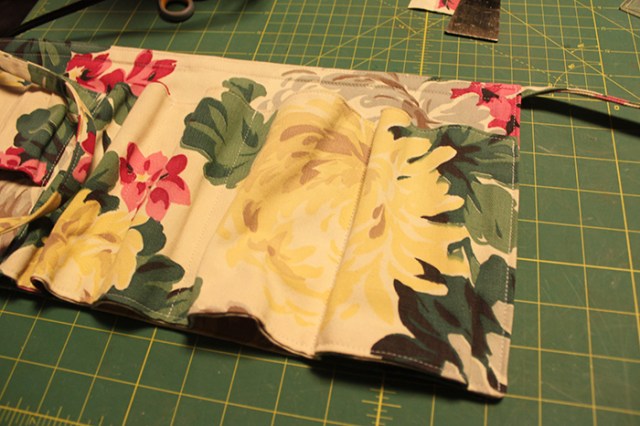
Here you can see the large pockets are stitched at the sides, but not the bottom. Sewing the bottom seam will be the last step. For now, we’ll move on to the smaller pockets at the sides.

toolbeltsmallpocket

The upper part contains a place to slot hang the measuring tape, and an open slot to hang the small cat’s paw (though it is awkward to carry, so I normally don’t use that slot). Below those pockets, I added two small pockets for nails and screws.

Once those pockets are in place and seamed at the sides, you’re ready to sew the bottom.

toolbeltpleats

Form pleats to make the pockets lie flat. Pin them in place, and then sew the bottom seam. You’ll be sewing through a lot of fabric at this point!

Once the bottom seam is done, your tool apron is ready to go! I made my ties long enough to wrap around and tie in front. You could also add a buckle if you prefer.

— Loryn

toolbelt2